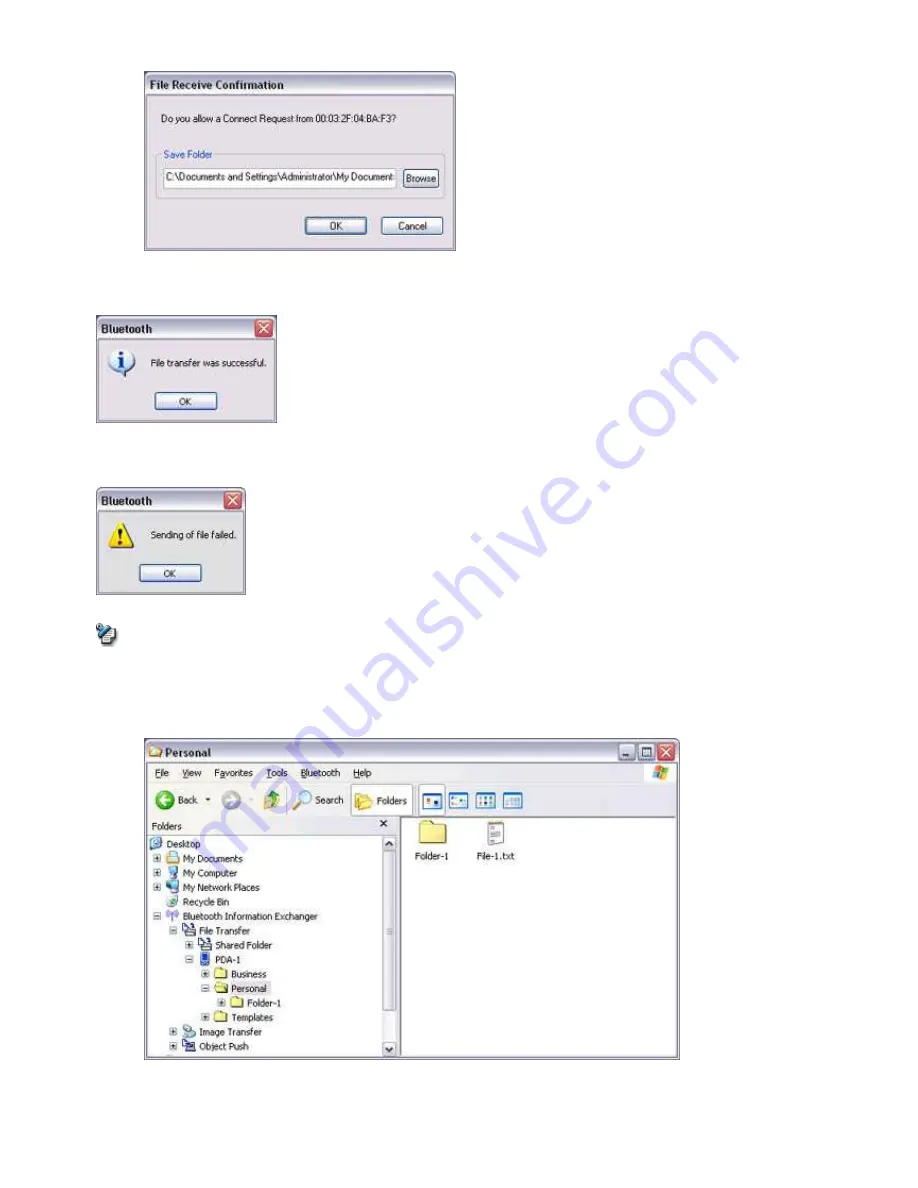
(receiving) device. The content of the message will vary with the software that supports the Bluetooth
TM
wireless technology
function on the destination device, so please be sure to follow the instructions provided.
If you are using the Bluetooth
TM
Utility, a message similar to the one below will appear.
If the file has been sent successfully, the message below will appear.
Please click on the [OK] button.
The message below will appear if the file transmission was unsuccessful.
Please click on the [OK] button to close the message, and repeat the procedure.
Note
o
Files that have been sent will be saved in a file transfer shared folder on the destination device.
o
Additionally, with "File transfer", you can open the shared folder on the destination device using Explorer, specify a subfolder,
and then send the file there.
o
You can use
Properties
in the Bluetooth Information Exchanger to change the location of the "Shared folder" on the hard drive.
■Sending files to a PC or PDA (by right-clicking the mouse)
1.
Turn on the PC or PDA
Confirm that a connection has been enabled before proceeding to the next step.
Page 271
Summary of Contents for VGN-BX563B - VAIO - Pentium M 1.73 GHz
Page 10: ...Relatedtopics Exchanging files with PCs and PDAs Page 10 ...
Page 54: ...Click on the Yes button in the disconnection confirmation dialog boxthat appears Page 54 ...
Page 67: ...Page 67 ...
Page 81: ...An image of the received faxwill be displayed Related topic Sending a fax Page 81 ...
Page 95: ...An image of the received faxwill be displayed Related topic Sending a fax Page 95 ...
Page 112: ...Page 112 ...
Page 139: ...Please click on the OK button to close the message and repeat the procedure Page 139 ...
Page 157: ...Page 157 ...
Page 197: ...An image of the received faxwill be displayed Related topic Sending a fax Page 197 ...
Page 218: ...An image of the received faxwill be displayed Related topic Sending a fax Page 218 ...
Page 223: ...Please click on the OK button to close the message and repeat the procedure Page 223 ...
Page 231: ...Click on the Yes button in the disconnection confirmation dialog boxthat appears Page 231 ...
Page 254: ...Page 254 ...
Page 294: ...Page 294 ...
Page 301: ...Page 301 ...
Page 327: ...Page 327 ...
Page 361: ...Page 361 ...
Page 366: ...The mouse will be connected Page 366 ...
Page 370: ...The new icon will appear Page 370 ...
Page 372: ...Page 372 ...
Page 378: ...Page 378 ...
Page 404: ...Page 404 ...
Page 427: ...Click on the Yes button in the disconnection confirmation dialog boxthat appears Page 427 ...
Page 440: ...Page 440 ...
Page 454: ...An image of the received faxwill be displayed Related topic Sending a fax Page 454 ...
Page 468: ...An image of the received faxwill be displayed Related topic Sending a fax Page 468 ...
Page 485: ...Page 485 ...
Page 512: ...Please click on the OK button to close the message and repeat the procedure Page 512 ...
Page 530: ...Page 530 ...
Page 570: ...An image of the received faxwill be displayed Related topic Sending a fax Page 570 ...
Page 591: ...An image of the received faxwill be displayed Related topic Sending a fax Page 591 ...
Page 596: ...Please click on the OK button to close the message and repeat the procedure Page 596 ...
Page 604: ...Click on the Yes button in the disconnection confirmation dialog boxthat appears Page 604 ...
Page 627: ...Page 627 ...
Page 667: ...Page 667 ...
Page 674: ...Page 674 ...
Page 700: ...Page 700 ...
Page 738: ...Page 738 ...


