background image

A

ddi

tion
a

O

p

erati

o

n

s

61

Searching using the index function

filename[01GB06ADD-NP0.fm] model name1[SLV-SF900G(ENG)] model name2[]

 [3-062-327-11 (1)]

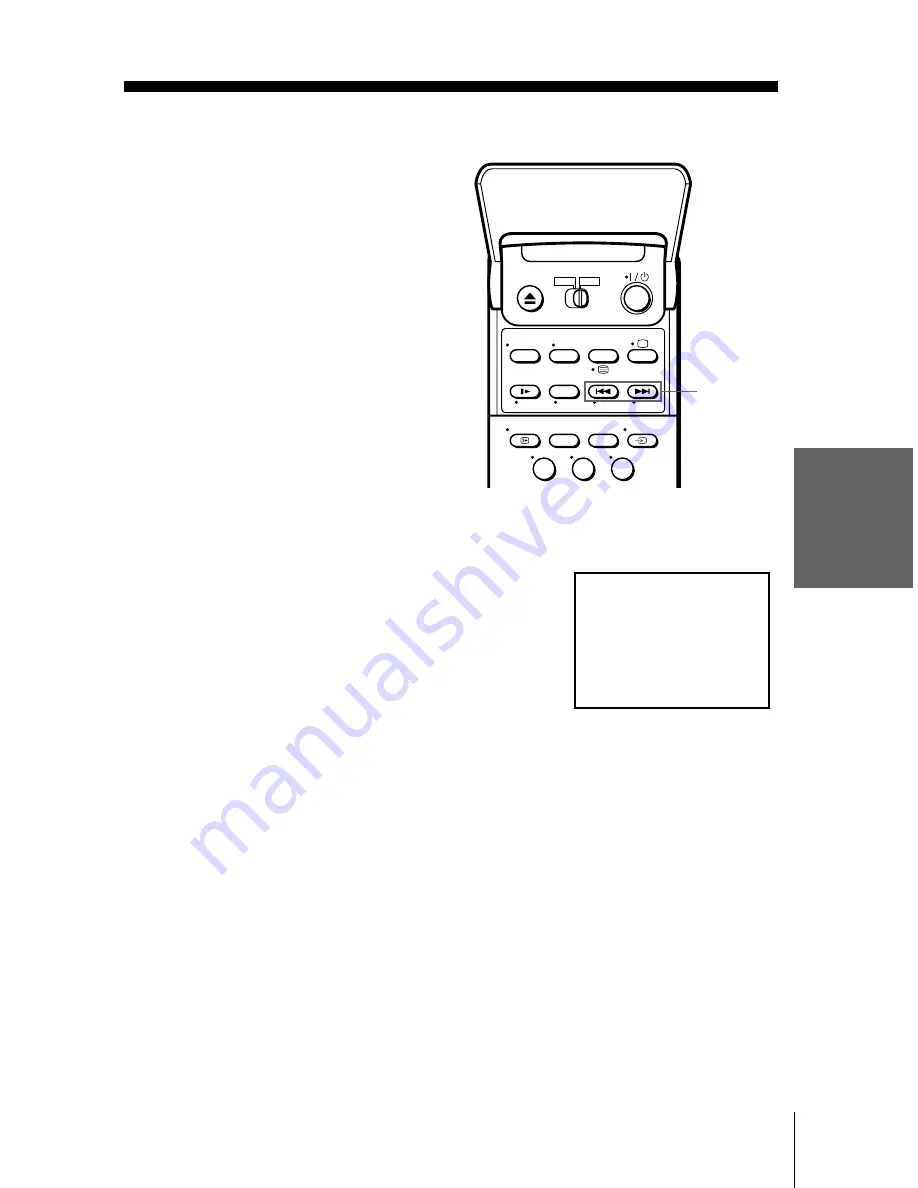
Searching using the index function

The VCR marks the tape with an index signal 
at the point where each recording begins. Use 
these signals as references to find a specific 
recording. The VCR can search up to 99 
index signals ahead or behind the current 
position.

To stop searching

Press 

x

 STOP.

Note

• No index signal will be added when recording starts from recording pause.  However, an 

index signal will be marked if you change the programme position during recording pause.

1

2

3

.

/

>


INDEX 
SEARCH

1

Insert an indexed tape into the VCR.

2

Press 

.

/

>

 INDEX SEARCH repeatedly to 

specify how many index signals ahead or behind 
you want to search : 

• To search ahead, press 

>

 INDEX 

SEARCH.

• To search backwards, press  

.

 INDEX 

SEARCH.

The VCR starts searching and the index number 
on the TV screen counts down to zero. Playback 
starts automatically from that point.

SEARCH

INDEX    2

Summary of Contents for SLV-SF900G

Page 1: ... 1 Video Cassette Recorder Operating Instructions The SmartFile function in this model meets the requirements of EU EFTA Central and Eastern Europe 2000 Sony Corporation SLV SF900G PAL NTSC 4 43 Chlorine free paper ...

Page 2: ...ord Installing Allow adequate air circulation to prevent internal heat buildup Do not place the unit on surfaces rugs blankets etc or near materials curtains draperies that may block the ventilation slots Do not install the unit near heat sources such as radiators or air ducts or in a place subject to direct sunlight excessive dust mechanical vibration or shock Do not install the unit in an inclin...

Page 3: ...searching at various speeds 54 Setting the recording duration time 55 Synchronized Recording 57 Checking changing cancelling timer settings 59 Recording stereo and bilingual programmes 61 Searching using the index function 62 Adjusting the picture 64 Changing menu options Editing 67 Connecting to a VCR or stereo system 69 Basic Editing SmartFile function 70 About the SmartFile function 72 Recordin...

Page 4: ...4 Unpacking Getting Started Step 1 Unpacking Check that you have received the following items with the VCR Remote commander R6 size AA batteries Aerial cable SmartFile labels ...

Page 5: ...sitive end clicks into position Using the remote commander You can use this remote commander to operate this VCR and a Sony TV Buttons on the remote commander marked with a dot can be used to operate your Sony TV If the TV does not have the symbol near the remote sensor this remote commander will not operate the TV 1 2 3 g Remote sensor TV VIDEO To operate Set TV VIDEO to the VCR VIDEO and point a...

Page 6: ...put source aerial in or line in t TV VIDEO Select the TV s programme position Programme number buttons PROG Adjust the TV s volume 2 Switch to TV Teletext off a TV Switch to Teletext Teletext 1 2 3 4 5 6 7 8 9 0 Programme number buttons WIDE PROG c C 1 AUDIO MONITOR t TV VIDEO 2 FASTEXT buttons a DISPLAY ...

Page 7: ... manufacturer s code number These buttons may not work with all TVs Tip When you set your TV s code number correctly while the TV is turned on the TV turns off automatically Select the sound AUDIO MONITOR Use FASTEXT FASTEXT buttons Call up the on screen display DISPLAY Change the Teletext page c C Switch to from wide mode of a Sony wide TV For other manufactures wide TVs see Controlling other TVs...

Page 8: ...If the TV uses a different remote control system from the one programmed to work with the VCR you cannot control your TV with the remote commander If you enter a new code number the code number previously entered will be erased If you remove the batteries of the remote commander for more than a few minutes the code number may be reset to 01 Sony In this case reset the appropriate code number Manuf...

Page 9: ...our TV with an aerial cable only see page 12 Connection to your TV and Set Top Box see page 13 Connection to your TV with a Scart EURO AV connector 1 Disconnect the aerial cable from your TV and connect it to AERIAL IN on the rear panel of the VCR 2 Connect AERIAL OUT of the VCR and the aerial input of your TV using the supplied aerial cable Mains lead iLINE 1 TV AERIAL IN Scart EURO AV to mains A...

Page 10: ... completely connected for example a Sony cable reference VMC 2121HG Please refer to your TV s instruction manual as well for this connection 3 Connect LINE 1 TV on the VCR and the Scart EURO AV connector on the TV with the optional EURO AV cable This connection improves picture and sound quality Whenever you want to watch the VCR picture press t TV VIDEO to display the VIDEO indicator in the displ...

Page 11: ...r details see Starting playback automatically with one button One Touch Play on page 39 One Touch Menu You can turn on the VCR and TV set the TV to the video channel and display the VCR s on screen display automatically by pressing MENU on the remote commander One Touch Timer You can turn on the VCR and TV set the TV to the video channel and display the timer recording menu the TIMER METHOD menu t...

Page 12: ...panel of the VCR 2 Connect AERIAL OUT of the VCR and the aerial input of your TV using the supplied aerial cable 3 Connect the mains lead to the mains You can now tune your TV to the VCR see page 15 Mains lead AERIAL IN to mains Aerial cable supplied AERIAL OUT Signal flow AERIAL IN AERIAL ANTENNE IN ENTREE OUT SORTIE AERIAL ANTENNE IN ENTREE OUT SORTIE ...

Page 13: ... on the STB this VCR automatically sends the signal from the STB to the TV without turning itself on Note You cannot watch programmes from your STB on the TV while recording unless you record a programme from your STB 1 Connect the STB to the LINE 3IN connector as shown above 2 Set POWER SAVE to OFF in the OTHER OPTIONS menu 3 Turn off the VCR To watch a programme from the STB turn on the STB and ...

Page 14: ...R is not required Additional connections To a stereo system You can improve sound quality by connecting a stereo system to the AUDIO OUT R L jacks as shown on the right AERIAL IN Aerial cable not supplied Scart cable not supplied Aerial cable supplied AERIAL OUT STB iLINE 1 TV Signal flow Scart EURO AV AERIAL IN AUDIO OUT R L LINE IN Audio cable not supplied ...

Page 15: ...CHANNEL on the VCR The factory preset RF Radio Frequency channel appears in the display window 3 Turn on your TV and select an unused programme position for the VCR picture for ex programme position 0 This programme position will be referred to as the video channel for watching your VCR on the TV after tuning is completed g RF CHANNEL PROGRAM 1 AUTO SET UP RF CHANNEL TV STEREO AUTO SET UP S M H LP...

Page 16: ...F channel until a clear picture appears 4 Tune in the programme position you have selected for ex programme position 0 until the picture shown on the right appears clearly on the TV screen background must be green Refer to your TV manual for tuning instructions If the picture does not appear clearly see To obtain a clear picture from the VCR below 5 Press RF CHANNEL You have now tuned your TV to t...

Page 17: ...rop down panel 2 Press briefly RF CHANNEL on the VCR The factory preset RF Radio Frequency channel appears in the display window 3 Press PROGRAM until the OFF indication appears in the display window The RF channel is then switched off The picture shown below appears clearly on the TV screen background must be green 4 Press RF CHANNEL again You can now set your VCR with the Auto Set Up function se...

Page 18: ...u do repeat Auto Set Up from the beginning When you operate the Auto Set Up function some of the settings VIDEO Plus timer etc will be reset In this case you have to set them again g PROGRAM AUTO SET UP Hold down AUTO SET UP on the VCR for more than 3 seconds The VCR automatically turns on and starts searching for all of the receivable channels and presets them in the appropriate order for your lo...

Page 19: ...e Auto Set Up function did not set the clock correctly for your local area try another station for the Auto Clock Set function Setting the clock manually Before you start Turn on the VCR and the TV Set the TV to the video channel MENU M m OK 1 Press MENU then press M m to highlight SETTINGS and press OK 2 Press M m to highlight CLOCK then press OK MENU OK PLAY SET SELECT OK MENU EXIT SETTINGS TUNE...

Page 20: ...etting and start the clock 8 Press MENU to exit the menu OK PLAY CONFIRM SET OK MENU EXIT CLOCK OFF AUTO ADJUST MANUAL ADJUST 1 1 2 0 0 0 SAT 0 0 0 SELECT OK PLAY CONFIRM SET OK MENU EXIT CLOCK OFF AUTO ADJUST MANUAL ADJUST 28 1 2 0 0 0 FRI 0 0 0 SELECT OK PLAY CONFIRM SET OK MENU EXIT CLOCK OFF AUTO ADJUST MANUAL ADJUST 8 9 2 0 0 0 THU 0 0 0 SELECT 2 OK PLAY CONFIRM SET OK MENU EXIT CLOCK OFF AUT...

Page 21: ...ng the clock Tip To change the digits while setting press to return to the item to be changed and select the digits pressing M m Note The menu disappears automatically if you don t proceed for more than a few minutes continued ...

Page 22: ...ght SETTINGS and press OK 2 Press M m to highlight CLOCK then press OK AUTO ADJUST is highlighted 3 Press OK OK PLAY MENU SET SELECT OK MENU EXIT SETTINGS TUNER CLOCK LANGUAGE RETURN TV GUIDE PAGE OK PLAY SET SELECT OK MENU EXIT CLOCK OFF AUTO ADJUST MANUAL ADJUST 1 1 2 0 0 0 SAT 0 0 0 OK PLAY CONFIRM SELECT OK MENU EXIT CLOCK OFF AUTO ADJUST CLOCK PROGRAM MANUAL ADJUST 2 0 0 0 THU 8 0 0 8 9 ON 2 ...

Page 23: ...ou don t proceed for more than a few minutes 4 Press M m to highlight ON then press OK 5 Press m to highlight CLOCK PROGRAM then press OK 6 Press M m until the programme position of the station that carries the time signal appears If the VCR does not receive the time signal from any station AUTO ADJUST returns to OFF automatically 7 Press MENU to exit the menu OK PLAY SET SELECT OK MENU EXIT CLOCK...

Page 24: ... you don t proceed for more than a few minutes MENU M m OK 1 Press MENU then press M m to highlight SETTINGS and press OK 2 Press M m to highlight LANGUAGE then press OK 3 Press M m to highlight the desired language then press OK OK PLAY MENU SET SELECT OK MENU EXIT SETTINGS TUNER CLOCK LANGUAGE RETURN TV GUIDE PAGE OK PLAY SET SELECT OK MENU EXIT LANGUAGE DEUTSCH FRANÇAIS ITALIANO ESPAÑOL PORTUGU...

Page 25: ... m OK PROG 1 Press MENU then press M m to highlight SETTINGS and press OK 2 Press M m to highlight TUNER then press OK 3 Press M m to highlight CHANNEL SET OK PLAY MENU SET SELECT OK MENU EXIT SETTINGS TUNER CLOCK LANGUAGE RETURN TV GUIDE PAGE OK PLAY SET SELECT OK MENU EXIT TUNER C AAB 1 2 PROG 1 CHANNEL SET AFT FINE TUNING RETURN ON OK PLAY SET SELECT OK MENU EXIT TUNER C AAB 1 2 PROG 1 CHANNEL ...

Page 26: ...ned in the following order UHF B21 B69 If you know the number of the channel you want press the programme number buttons For example for channel 05 first press 0 and then press 5 6 Press OK 7 To allocate another channel to another programme position repeat steps 4 and 5 8 Press MENU to exit the menu PROG SET SELECT OK MENU EXIT TUNER C1 2 PROG 4 CHANNEL SET AFT FINE TUNING ON RETURN Selected progr...

Page 27: ...ighlight RETURN and press OK Note The menu disappears automatically if you don t proceed for more than a few minutes 1 In step 5 above press programme number button 0 twice to display the number 00 beside CHANNEL SET 2 Press OK to confirm the setting then MENU to exit the menu 1 Press PROG or the programme number buttons to select the programme position for which you cannot obtain a clear picture ...

Page 28: ...t LISTS and press OK 2 Press M m to highlight CHANNEL LIST then press OK 3 Press M m to highlight the row on which you want to set or change the station name To display other pages for programme positions 6 to 60 press M m repeatedly OK PLAY MENU RETURN SET SELECT OK MENU EXIT LISTS CHANNEL LIST TIMER LIST OK PLAY MENU EXIT CHANNEL LIST ERASE PROGRAM MOVE PROGRAM PROG SELECT 1 2 3 4 5 AAB CDE FGH ...

Page 29: ... space is highlighted To correct a character press until the character you want to correct is highlighted then reset it You can set up to 5 characters for the station name 6 To change or to set the station name of another station repeat steps 2 to 4 7 Press OK to confirm the setting 8 Press MENU to exit the menu OK PLAY AAB MENU EXIT CHANNEL LIST CONFIRM OK NEXT PROG SELECT A CHARACTER 1 2 3 4 5 C...

Page 30: ... them Before you start Turn on the VCR and the TV Set the TV to the video channel Changing programme positions MENU M m OK 1 Press MENU then press M m to highlight LISTS and press OK 2 Press M m to highlight CHANNEL LIST then press OK OK PLAY MENU RETURN SET SELECT OK MENU EXIT LISTS CHANNEL LIST TIMER LIST OK PLAY MENU EXIT CHANNEL LIST ERASE PROGRAM MOVE PROGRAM PROG SELECT 1 2 3 4 5 AAB CDE FGH...

Page 31: ...l is inserted at the new programme position and the intermediate channels are displaced to fill the gap 5 Press OK to confirm the setting 6 To change the programme position of another station repeat steps 3 to 5 7 Press MENU to exit the menu OK PLAY MENU EXIT CHANNEL LIST CONFIRM SET STATION NAME PROG SELECT 1 2 3 4 5 AAB LMO FGH C C C C 1 0 5 0 2 3 6 9 NAME CH C2 7 OK CDE OK PLAY MENU EXIT CHANNE...

Page 32: ...er when you press the PROG buttons 1 2 3 4 5 6 7 8 9 0 CLEAR MENU M m OK 1 Press MENU then press M m to highlight LISTS and press OK 2 Press M m to highlight CHANNEL LIST then press OK OK PLAY MENU RETURN SET SELECT OK MENU EXIT LISTS CHANNEL LIST TIMER LIST OK PLAY MENU EXIT CHANNEL LIST ERASE PROGRAM MOVE PROGRAM PROG SELECT 1 2 3 4 5 AAB CDE FGH C C C C 1 0 5 0 2 3 6 9 NAME CH C2 7 CLEAR ...

Page 33: ... 3 Press M m to highlight the row which you want to disable 4 Press CLEAR The selected row will be cleared as shown on the right 5 Repeat steps 3 and 4 for any other programme positions you want to disable 6 Press MENU to exit the menu OK PLAY MENU EXIT CHANNEL LIST ERASE PROGRAM MOVE PROGRAM PROG SELECT 1 2 3 4 5 AAB CDE FGH C C C C 1 0 5 0 2 3 6 9 NAME CH C2 7 CLEAR LMO CLEAR MENU EXIT CHANNEL L...

Page 34: ... can check it any time but can never change it Before you start Turn on your TV and set it to the video channel Remove the tape in the VCR if there is one inserted Turn off the VCR g X 1 1 2 3 4 5 6 7 8 9 0 M m OK CLEAR 1 Hold down first X pause hold on 1 on standby simultaneously on the VCR for more than 3 seconds The VCR automatically turns on and the on screen display appears on the TV screen M...

Page 35: ...our personal code 3 Press OK A confirmation screen appears 4 If the displayed personal code is correct press OK to confirm the setting and to return to the normal display If the displayed personal code is wrong press CLEAR to cancel the code and re enter it restarting from step 2 5 Press 1 on standby to turn off the VCR OK PLAY MENU EXIT SECURITY FUNCTION PERSONAL CODE 1 5 7 8 CONFIRM SET SELECT O...

Page 36: ...e number of your VCR you can check the setting 1 Holding down first X pause hold down 1 on standby for more than 3 seconds The VCR automatically turns on and the entered personal code appears on the TV screen 2 Press OK to exit the menu MENU EXIT SECURITY FUNCTION PERSONAL CODE WB 1 5 7 8 ...

Page 37: ...tape 1 Turn on your TV and set it to the video channel 2 Insert a tape The VCR turns on and starts playing automatically if you insert a tape with its safety tab removed 1 2 3 4 5 6 7 8 9 0 Z EJECT DISPLAY CLEAR NTSC PB X PAUSE H PLAY x STOP M FF m REW g continued ...

Page 38: ...ing an NTSC recorded tape The picture becomes black and white The picture shakes No picture appears on the TV screen Black streaks appear horizontally on the TV screen The colour density increases or decreases If you playback a tape in LP or EP mode with the NTSC system the sound is heard in monaural While setting the menu on the TV screen you cannot use M m buttons for tape operation 3 Press H PL...

Page 39: ...CR the VCR and the TV turn on the TV is set to the video channel and playback starts automatically in one sequence when you press H PLAY Note When you use the One Touch Play function leave the TV on or in the standby mode 1 Insert a tape The VCR automatically turns on If you insert a tape with its safety tab removed the TV turns on and switches to the video channel Playback starts automatically 2 ...

Page 40: ...ammes Recording TV programmes 1 Turn on your TV and set it to the video channel To record from a decoder or other source turn it on 1 2 3 4 5 6 7 8 9 0 COUNTER REMAIN DISPLAY SP LP t TV VIDEO INPUT SELECT PROG z REC x STOP ...

Page 41: ...window 4 Press SP LP to select the tape speed SP or LP LP Long Play provides recording time twice as long as SP However SP Standard Play produces better picture and audio quality 5 Press z REC to start recording The recording indicator lights up red in the display window INPUT SELECT PROG TV STEREO AUTO SET UP S M H LP EP EDIT NICAM VPS PDC OPC SP VIDEO TV STEREO AUTO SET UP S M H LP EP EDIT NICAM...

Page 42: ...rd on a tape again cover the tab hole with adhesive tape You can also protect a recording by using the SmartFile function see page 90 Tips To select a programme position you can use the programme number buttons on the remote commander For two digit numbers press the ten s digit button followed by the programme number buttons The display appears on the TV screen indicating information about the tap...

Page 43: ... the TV s line input or when the TV tuner preset data for the programme position is different from the data preset in the VCR tuner If there already is a tape with its safety tab in place in the VCR the VCR automatically turns on and starts recording what you are watching on the TV when you press z REC You can turn the TV Direct Rec function ON and OFF in the OTHER OPTIONS menu see page 66 Notes Y...

Page 44: ...es at a time Before you start Check that the VCR clock is set to the correct time and date Insert a tape with its safety tab in place Make sure the tape is longer than the total recording time Turn on your TV and set it to the video channel If you insert a tape with the SmartFile function make sure the total recording time doesn t overlap the protected programme For details about the SmartFile fun...

Page 45: ... OPTIONS to VIDEO Plus The VIDEO Plus menu appears on the TV screen 2 Press the programme number buttons to enter the PLUSCODE NO If you make a mistake press CLEAR and re enter the correct number TIMER OK PLAY SET SELECT OK MENU EXIT TIMER METHOD STANDARD VIDEO Plus MENU EXIT VIDEO Plus SET 0 9 PLUSCODE NO THU 2 8 9 1 2 3 4 5 6 7 8 9 0 CLEAR MENU EXIT VIDEO Plus SET 0 9 PLUSCODE NO 1 2 4 6 THU 2 8...

Page 46: ...mation is incorrect press CLEAR to cancel the setting 4 If you want to change the date tape speed and the VPS PDC function setting 1 Press to highlight the item you want to change 2 Press M m to reset it To record the same programme every day or the same day every week see Daily weekly recording on page 47 To use the VPS PDC function set VPS PDC to ON For details about the VPS PDC function see Tim...

Page 47: ...broadcast delays early starts or broadcast interruptions when the VPS or PDC indicator in the display window is lit In step 4 above press M m to turn on off the VPS PDC indication after you set the recording date If you do not want to set the VPS PDC function turn off the VPS PDC indication You can also use the VPS PDC function for a source connected to the LINE 1 TV and LINE 3 IN Scart connectors...

Page 48: ...4 To check change or cancel the programme setting press to choose LIST then press OK after step 4 For details see step 3 in Checking changing cancelling timer settings on page 57 Notes When setting the timer with VPS PDC signals enter the start and stop times exactly as indicated in the TV programme guide otherwise the VPS PDC function won t work and the recording won t start If the VPS PDC signal...

Page 49: ...safety tab in place Make sure the tape is longer than the total recording time To record from a decoder or other source turn it on Turn on your TV and set it to the video channel If you insert a tape with the SmartFile function make sure the total recording time doesn t overlap the protected programme For details about the SmartFile function see page 70 Set TIMER OPTIONS to STANDARD or VARIABLE in...

Page 50: ... the same day every week see Daily weekly recording on page 51 To use the VPS PDC function set VPS PDC to ON For details about the VPS PDC function see Timer recording with VPS PDC signals on page 47 To record from a decoder or other source connected to the LINE 1 TV or LINE 3 IN connectors or the LINE 2 INjacks press INPUT SELECT to display L1 L2 or L3 in the PROG position 3 Press MENU to exit th...

Page 51: ...r on the picture at the point the tape speed is changed If you want to keep the same tape speed set AUTO LONG PLAY to OFF in the TAPE OPTIONS menu see page 64 Even if you set TIMER OPTIONS to VIDEO Plus in the OTHER OPTIONS menu you can set the timer manually Press MENU to select TIMER then go to step 2 Notes When setting the timer with VPS PDC signals enter the start and stop times exactly as ind...

Page 52: ...iew the picture during fast forward or rewind During fast forward hold M FF down During rewind hold m REW down Play at high speed During playback press M FF down or m REW on the remote commander During playback hold down M FF or m REW When you release the button normal playback resumes Play at twice the normal speed During playback press X2 1 2 3 4 5 6 7 8 9 0 m H M M FF m REW y SLOW X 2 ...

Page 53: ...s at the same time Notes The playback sound is muted during the operations in the above table In the LP mode noise may appear or there may be no colour If the playback mode mark doesn t appear on the TV screen press DISPLAY Play in slow motion During playback press y SLOW Play frame by frame During pause press M FF down or m REW on the remote commander Hold down M FF or m REW to play one frame eac...

Page 54: ...l recording mode To stop recording To stop the VCR while recording press x STOP Note You cannot display the current tape time in the display window when setting the recording duration z REC 1 While recording press z REC The indicator appears in the display window 2 Press z REC repeatedly to set the duration Each press advances the time in increments of 30 minutes The tape counter decreases minute ...

Page 55: ...unction for this feature to work When the connected equipment turns on the VCR also automatically turns on and starts recording a programme from LINE 3 IN How to connect for Synchronized Recording Connect the LINE 3 IN of the VCR to the TV Scart connector of the Set Top Box Then connect the LINE 1 TV connector to the TV i LINE 1 TV Scart cable not supplied Scart cable not supplied Programmable Set...

Page 56: ...and the second programmme starts recording only after the first programme has finished The Auto Clock Set function does not work while the VCR stands by for Synchronized Recording g SYNCHRO REC 1 2 3 4 5 6 7 8 9 0 PROG INPUT SELECT SP LP 1 Set the timer on the STB to the time of the programme you want to record then turn it off 2 Press SP LP to select the tape speed on the VCR 3 Hold down SYNCHRO ...

Page 57: ...er settings Checking changing cancelling timer settings Before you start Turn on your TV and set it to the video channel 1 2 3 4 5 6 7 8 9 0 1 M m OK CLEAR MENU 1 Press 1 to turn on the VCR 2 Press MENU then press M m to highlight LISTS and press OK continued ...

Page 58: ... to recording standby 4 Press M m to select the setting you want to change or cancel then press OK The selected setting appears in the TIMER menu 5 To change the setting press to highlight the item you want to change and press M m to change it To cancel the setting press CLEAR 6 Press MENU If any settings remain turn off the VCR to return to recording standby MENU EXIT TIMER LIST CANCEL SET SELECT...

Page 59: ... Press AUDIO MONITOR to select the sound you want Stereo programme Usually the mixed sound of left and right channels monaural Bilingual programme Usually the main sound monaural Selecting the sound during playback Press AUDIO MONITOR to select the sound you want To listen to On screen display Display window Stereo STEREO STEREO Standard sound No indicator No indicator To listen to On screen displ...

Page 60: ...ou play a tape recorded in monaural the sound is heard in monaural regardless of the AUDIO MONITOR setting If the AUDIO MONITOR button does not function check that AUDIO MIX in the AUDIO OPTIONS menu is set to OFF see page 65 If HIFI AUDIO is set to STANDARD the standard sound will be recorded on both the hi fi and normal audio tracks Pressing AUDIO MONITOR will not change the sound Usually main s...

Page 61: ...Note No index signal will be added when recording starts from recording pause However an index signal will be marked if you change the programme position during recording pause 1 2 3 INDEX SEARCH 1 Insert an indexed tape into the VCR 2 Press INDEX SEARCH repeatedly to specify how many index signals ahead or behind you want to search To search ahead press INDEX SEARCH To search backwards press INDE...

Page 62: ... original quality during playback To use the RR function press REALITY REGENERATOR button The REALITY REGENERATOR indicator lights up You can set RR to HIGH or NORMAL in the VIDEO OPTIONS menu see page 64 To turn it off press REALITY REGENERATOR The REALITY REGENERATOR indicator lights off About the Optimum Picture Control OPC function The Optimum Picture Control OPC function automatically improve...

Page 63: ... only in SP mode If the tape speed automatically switches from SP to LP the OPC function turns off However if the entire programme is recorded in LP mode the OPC function will work There is a delay of about ten seconds before the VCR actually starts recording while the VCR analyses the tape To avoid the delay first set the VCR to recording pause the OPC indicator flashes slowly and press z REC to ...

Page 64: ... to exit the menu Menu option Set this option to OPC ON to switch on the OPC Optimum Picture Control function and improve picture quality OFF to switch off OPC EDIT ON to minimize picture deterioration when editing OFF to turn off EDIT SHARPNESS LOW to playback a poor quality tape NORMAL to playback an average quality tape HIGH to playback a good quality tape RR NORMAL for normal everyday use HIGH...

Page 65: ...the AUDIO MONITOR button For details see page 59 HIFI AUDIO STANDARD to record standard sound on the hi fi audio track NICAM to record NICAM broadcasts on the hi fi audio track For details see page 59 Menu option Set this option to AUTO LONG PLAY ON to automatically record from SP Standard Play to LP Long Play when the tape length is not long enough OFF to normally record in SP Standard Play TAPE ...

Page 66: ... in the display window to save the VCR power OFF to turn on the indicators in the display window while the VCR is standing by TIMER OPTIONS VARIABLE to display the TIMER METHOD menu for selecting STANDARD or VIDEO Plus when pressing the TIMER button STANDARD to display only the TIMER menu when pressing the TIMER button VIDEO Plus to display only the VIDEO Plus menu when pressing the TIMER button F...

Page 67: ... the LINE IN connector or jacks of your VCR Refer to the examples A and B and choose the connection that best suits your VCR Example A Example B TV t LINE 3 IN VMC 2121HG Scart cable not supplied Scart EURO AV Signal flow Your VCR Recorder Other VCR Player g TV LINE 2 IN VMC 820 audio video cable not supplied LINE OUT Signal flow Your VCR Recorder Other VCR Player continued ...

Page 68: ... the plugs to jacks of the same colour If the other VCR is a monaural type leave the red plugs unconnected If you connect your VCR to both the LINE IN and LINE OUT jacks of the other VCR select the input correctly to prevent a humming noise If the other VCR does not have a Scart EURO AV connector use the VMC 2106HG cable instead and connect the cable to the line out jacks of the other VCR Tip You ...

Page 69: ...procedure above the VCR won t start recording with the OPC function To record a tape with the OPC function press z record again during recording pause in step 3 so the VCR analyses the tape Then press X pause after the OPC indicator stops flashing to start recording If you press X pause before the OPC indicator stops flashing the OPC function is cancelled g z X SET SELECT OK MENU EXIT VIDEO OPTION...

Page 70: ... available recording space Selecting and playing a programme page 77 To playback a recorded programme select the programme you want to watch using the SmartFile search list The VCR locates the programme and playback starts automatically Checking the contents of a tape page 78 When you bring the SmartFile label close to the SMARTFILE sensor on the VCR a summary of the recorded programmes appears in...

Page 71: ...tically label all future recordings of the same programme Registering the contents of a recorded tape in the SmartFile label page 88 You can register programmes recorded on a tape in the memory of a new SmartFile label Protecting a recorded programme page 90 You can protect a recorded programme from accidental over recording or erasure Erasing the data of an unwanted programme page 92 By erasing a...

Page 72: ...ine to the spine of the cassette This tape is henceforth referred to as a SmartFile tape Note on the purchase of SmartFile labels If you want to order additional SmartFile labels contact your nearest Sony service facility Notes The SmartFile label is equipped with a memory chip The memory chip may be damaged and cannot be used when you twist or fold the SmartFile label remove the SmartFile label a...

Page 73: ... already contains programme data see Recording after locating the Blank Time space on page 75 Before you start Turn on your TV and set it to the video channel Check that the VCR clock is set to the correct time and date Tip You can protect a recorded programme from accidental over recording or erasure see page 90 Note If you press the PAUSE button one or more times during recording thereby creatin...

Page 74: ...n t be stored correctly on the Smartfile list Also the programme label won t be stored correctly if the TV guide page information of Teletext is not set correctly see page 81 When you set the AUTO LONG PLAY option to ON in the TAPE OPTIONS menu and the tape speed automatically changes from SP to LP during recording the VCR displays the entire recording time converted to SP mode in the SmartFile li...

Page 75: ...nless you stop recording If there is a programme you want to prevent from being recorded over or erased protect that programme before you start recording another programme see page 90 Before you start Turn on your TV and set it to the video channel 1 2 3 4 5 6 7 8 9 0 M m OK SMARTFILE SP LP 1 Insert a SmartFile tape with its safety tab in place The SMARTFILE indicator lights up on the VCR 2 Press ...

Page 76: ...P mode and about 11 minutes in the SP mode the stored programme is over recorded for more than 20 minutes in the LP mode and about 11 minutes in the SP mode 4 Press SP LP to select the tape speed SP or LP The BLANK TIME changes according to the selected tape speed Select a tape speed that matches the length of the programme you want to record 5 Press OK The VCR goes to the beginning of the Blank T...

Page 77: ...in the SmartFile label the SmartFile tape is damaged or dirty the SmartFile tape has a portion recorded in the NTSC system M m OK SMARTFILE 1 Insert a SmartFile tape The SMARTFILE indicator lights up on the VCR 2 Press SMARTFILE The SmartFile search list appears on the TV screen 3 Press M m to select a programme Press M m repeatedly to turn the pages 4 Press OK The VCR starts searching for the beg...

Page 78: ...File sensor Slowly bring the center of the label within 3 cm of the SmartFile sensor There is a short beep the SMARTFILE indicator lights up on the VCR and the SmartFile check list appears The BLANK TIME space also appears in the display window 2 Press CURSOR M m to turn the pages 3 Press MENU to exit the SmartFile check list CURSOR M m SmartFile sensor g NEXT MENU EXIT 2 8 00 10 10 00 PAGE 1 1 10...

Page 79: ...heck list while you display the SmartFile list of a different SmartFile tape inserted into the VCR you display any other menu If the SmartFile check list doesn t appear on the TV screen try drawing the SmartFile tape at least 5 cm away from the SmarFile sensor then bring it back to within 3 cm of the sensor The menu disappears automatically if you don t proceed for more than a few minutes ...

Page 80: ...ion from the Teletext pages and stores it in the SmartFile label The TV guide page numbers depend entirely on the broadcast itself and may be subject to change If so you may have to set those TV guide page numbers manually in the TV GUIDE PAGE menu Setting the TV guide page number Before you start Turn on your TV and set it to the video channel SEARCH SELECT OK MENU EXIT MY VIDEO TAPE PAGE 1 CCB S...

Page 81: ...mber you want to modify and press OK 5 Press the programme number buttons to enter the TV guide page number and press OK to confirm the setting If you make a mistake press CLEAR to re enter the correct number 6 To set or change another TV guide page number repeat steps 3 and 4 above 7 Press MENU to exit the menu SET SELECT OK MENU EXIT SETTINGS TUNER CLOCK LANGUAGE RETURN TV GUIDE PAGE SET SELECT ...

Page 82: ...before the programme is scheduled to start the correct label information may not be transferred The VCR receives the label information two minutes after the recording starts If you set a timer recording with VPS PDC OFF the title information will be transferred in the middle of the recording Note that this function may not work correctly with programmes broadcast from some stations If the Broadcas...

Page 83: ... to 18 characters can be input for a programme and tape label Before you start Turn on your TV and set it to the video channel 1 2 3 4 5 6 7 8 9 0 M m OK MENU CLEAR 1 Insert a SmartFile tape The SMARTFILE indicator lights up on the VCR 2 Press MENU and select SMARTFILE EDIT then press OK The SMARTFILE EDIT menu appears SMARTFILE EDIT CATEGORY SELECT MENU EXIT SPORTS 1 10 NEWS SEVEN CCB SP 1H 30M 3...

Page 84: ...VEN CCB SP 1H 30M 30 9 SAT 7 00 SP 1H 30M SP 1H 30M FILMS PROG 32 2 8 00 10 10 00 10 10 SPORTS FESTIVAL PAGE 1 TITLE SMARTFILE EDIT BACK SELECT MENU EXIT SPORTS 1 10 NEWS SEVEN CCB SP 1H 30M 30 9 SP 1H 30M SP 1H 30M FILMS 2 8 00 10 10 00 10 10 SPORTS FESTIVAL PAGE 1 CONFIRM NEXT OK SMARTFILE EDIT BACK SELECT MENU EXIT SPORTS 1 10 NEWS SEVEN CCB SP 1H 30M 30 9 SP 1H 30M SP 1H 30M FILMS 2 8 00 10 10...

Page 85: ...d even when an information signal containing a different programme name category name or other information is broadcast with the programme However if you change the programme label and the category several times the VCR may automatically assign the set label only to the last recorded programme for which the programme label and category were changed 7 Press M m to select a category Each time you pr...

Page 86: ...ENU and select SMARTFILE EDIT then press OK The SMARTFILE EDIT menu appears 3 Press M to select the tape title SMARTFILE EDIT CATEGORY SELECT MENU EXIT SPORTS 1 10 NEWS SEVEN CCB SP 1H 30M 30 9 NICK MATT SP 1H 30M SP 1H 30M SHOW 2 8 00 10 10 00 10 10 SPORTS FESTIVAL PAGE 1 TITLE SMARTFILE EDIT TITLE EDIT SELECT MENU EXIT SPORTS 1 10 NEWS SEVEN CCB SP 1H 30M 30 9 NICK MATT SP 1H 30M SP 1H 30M SHOW ...

Page 87: ...ress The cursor moves to the next position 3 Repeat steps 1 and 2 to label the tape 6 Press OK The tape title is stored 7 Press MENU to exit the menu BACK SELECT MENU EXIT CONFIRM NEXT OK SMARTFILE EDIT SPORTS 1 10 NEWS SEVEN CCB SP 1H 30M 30 9 NICK MATT SP 1H 30M SP 1H 30M SHOW 10 10 SPORTS FESTIVAL PAGE 1 BACK SELECT MENU EXIT CONFIRM NEXT OK SMARTFILE EDIT SPORTS 1 10 NEWS SEVEN CCB SP 1H 30M 3...

Page 88: ...ategory see page 80 Before you start Turn on your TV and set it to the video channel Turn on your VCR To stop registration to the SmartFile label Press SMARTFILE GENERATOR The data registered before the button is pressed remains in the SmartFile label You can register the programmes again by pressing SMARTFILE GENERATOR again SMARTFILE GENERATOR g 1 Attach the SmartFile label to the spine of the c...

Page 89: ...e does not have an index signal or the index signal has been recorded over and erased the tape is damaged or dirty If you don t set the clock or the clock isn t set to the correct date the registration date won t be stored correctly on the SmartFile list After you press SMARTFILE GENERATOR and start registration registration is interrupted if you press x STOP H PLAY M FF m REW 1 or INDEX SEARCH In...

Page 90: ...channel SMARTFILE M m 1 Insert a SmartFile tape The SMARTFILE indicator lights up on the VCR 2 Press SMARTFILE The SmartFile search list appears on the TV screen 3 Press M m to select the programme you want to protect SEARCH SELECT OK MENU EXIT MY VIDEO TAPE PAGE 1 SPORTS 1 10 NEWS SEVEN CCB SP 1H 30M 30 9 NICK MATT SP 0H 30M SP 1H 30M SHOW START END BLANK TIME SP 1H 55M 10 10 SPORTS FESTIVAL SEAR...

Page 91: ...nstructions in Recording after locating the Blank Time space on page 75 Otherwise if the recording start point overlaps the protected programme the VCR may over record the protected programme If you insert a SmartFile tape which contains a protected programme or protect a programme for the first time on a new tape the VCR will analyse the position of the protected programme for a few seconds You c...

Page 92: ...ce Before you start Turn on your TV and set it to the video channel 1 2 3 4 5 6 7 8 9 0 M m SMARTFILE CLEAR DISPLAY 1 Insert a SmartFile tape The SMARTFILE indicator lights up on the VCR 2 Press SMARTFILE The SmartFile search list appears on the TV screen SEARCH SELECT OK MENU EXIT MY VIDEO TAPE PAGE 1 SPORTS 1 10 NEWS SEVEN CCB SP 1H 30M 30 9 NICK MATT SP 0H 30M SP 1H 30M SHOW START END BLANK TIM...

Page 93: ...r less in LP mode you cannot make the programme reappear by using the DISPLAY button 3 Press M m to select a programme you want to erase from the list 4 Press CLEAR The selected programme is erased from the SmartFile list If you erase a programme by mistake press DISPLAY to make the programme reappear 5 Press SMARTFILE The SmartFile search list disappears SEARCH SELECT OK MENU EXIT MY VIDEO TAPE P...

Page 94: ...er to the corresponding reference S1 symptom1 S2 symptom2 in the right column below CATEGORY REFER TO Picture while watching broadcast tuned by the TV while watching broadcast tuned by the VCR while playing a tape S2 S6 S1 S6 S3 S4 S5 Sound while playing a tape S7 S8 S9 Functional Playback S4 S9 S10 Normal recording S11 S12 SmartFile S13 S14 Timer recording S15 S16 Synchronized Recording S17 S18 S...

Page 95: ...ke sure the RF channel is set to OFF see page 17 t Existing broadcasts may interfere with the VCR Reset the RF channel output of your VCR see page 15 t Adjust the tracking with the TRACKING buttons see page 62 t The video heads are dirty see below Clean the video heads using the Sony T 25CLD E 25CLDR or T 25CLW video head cleaning cassette If these cleaning cassettes are not available in your area...

Page 96: ...pe cover the tab hole see page 42 S12 Nothing happens when you press z REC t Make sure the tape is not at its end t If the BL indicator is flashing in the display window the tape contains a programme protected by the SmartFile function see page 90 SmartFile S13 The programme label cannot be taken properly t Make sure the clock and the date are set correctly t Check the setting of the TV guide page...

Page 97: ...ation the VCR will not start recording t If the reception is poor the VPS PDC signal might be altered and the VCR might not start recording Synchronized Recording S17 The SYNCHRO REC indicator turns off while recording or does not go back to recording standby mode t The tape has reached its end Insert a new tape and press SYNCHRO REC again S18 The Synchronized Recording function does not work t Th...

Page 98: ...ich you want to record is protected or contains protected recordings Unlock the protection or use another tape or replace the safety tab see page 91 S27 The display is not lit when the VCR is in STANDBY mode t The VCR is in power save mode Set the POWER SAVE option to OFF in the OTHER OPTIONS menu see page 66 S28 POWER SAVE is set to ON but the display remains lit in STANDBY mode t The display is ...

Page 99: ... Information 99 Set Top Box control S32 You cannot watch the STB picture when the VCR is in standby mode or z REC standby mode t Make sure the POWER SAVE option is set to OFF in the OTHER OPTIONS menu see page 66 ...

Page 100: ... 3 IN 21 pin Video input pin 20 Audio input pins 2 and 6 LINE 2 IN VIDEO IN phono jack 1 Input signal 1 Vp p 75 ohms unbalanced sync negative AUDIO IN phono jack 2 Input level 327 mVrms Input impedance more than 47 kilohms AUDIO OUT phono jack 2 Rated output level 327 mVrms Load impedance 47 kilohms Output impedance less than 10 kilohms General Power requirements 220 240 V AC 50 Hz Power consumpti...

Page 101: ...R RR indicator 62 G SYNCHRO REC indicator 56 H Z eject button 38 I SYNCHRO REC button 56 J H playback button 38 K x stop button 38 L X pause button 38 M z record button 40 69 N AUTO SET UP 18 RF Radio Frequency CHANNEL button 15 O m rewind M fast forward buttons 38 P PROGRAM TRACKING buttons 15 18 62 Q REALITY REGENERATOR button 62 R SMARTFILE indicator 78 S Remote sensor 5 T OK button U SMARTFILE...

Page 102: ... 11 E Tape speed indicators 41 F VIDEO indicator 41 G TV indicator 43 H STEREO indicator 59 I NICAM indicator 59 J Time counter clock line programme position indicator 15 38 41 K Remaining time indicator 42 L Tracking indicator 62 M EDIT indicator 69 N BL Blank Time space indicator 78 O Tape recording indicator 41 EP TV STEREO S M LP SP VIDEO EDIT NICAM VPS PDC H BL SMARTLINK OPC ...

Page 103: ...NE 1 TV i LIGNE 1 TV connector 9 C t LINE 3 IN t ENTREE LIGNE 3 connector 13 D AERIAL IN ANTENNE ENTREE connector 9 12 E AERIAL OUT ANTENNE SORTIE connector 9 12 F NTSC PB Play Back switch 37 G LINE 2 OUT AUDIO R L VIDEO SORTIE LIGNE 2 AUDIO D G VIDEO 14 continued ...

Page 104: ...d Play LP Long Play button 40 G DISPLAY button 42 H ten s digit button 6 42 I 2 volume buttons for TV 6 J z REC record button 40 54 69 K MENU button L M m buttons OK button m REW rewind button 38 52 M FF fast forward button 38 52 H PLAY button 38 52 x STOP button 38 54 X PAUSE button 38 54 FASTEXT buttons for TV 1 2 3 4 5 6 7 8 9 0 ...

Page 105: ... 6 P a TV power on TV mode select button for TV 6 Q INDEX SEARCH buttons 61 R CLEAR button 37 44 57 S t TV VIDEO button 6 T Programme number buttons 6 U INPUT SELECT button 41 49 V PROG programme buttons 6 25 41 c C Teletext page access buttons for TV 7 W TIMER button 44 49 X SMARTFILE button 73 FASTEXT buttons for TV 1 2 3 4 5 6 7 8 9 0 ...

Page 106: ...MO MENU EXIT TIMER LIST CANCEL SET SELECT OK CLEAR RETURN DATE TIME PROG VPS PDC THU 2 8 9 2 0 0 0 2 1 0 0 SP TODAY AAB 2 0 0 0 2 1 0 0 AAB SP 0 3 9 2 0 0 0 1 3 0 CDE LP 1 0 VPS PDC 1 1 MON 1 4 0 0 1 5 0 0 LP FRI FGH SUN 6 3 0 7 0 0 LP I J K DATE CANCEL SET SELECT CLEAR MENU EXIT TIMER SP LP LIST TIME PROG TODAY AB 2 0 0 0 2 1 0 0 A SP VPS PDC OFF THU 2 8 9 RETURN SET SELECT OK MENU EXIT OPTIONS V...

Page 107: ... OPTIONS BUZZER DIMMER POWER SAVE TIMER OPTIONS TV DIRECT REC ON OFF OFF VARIABLE ON RETURN CONFIRM SELECT OK MENU EXIT CLOCK AUTO ADJUST CLOCK PROGRAM MANUAL ADJUST 2 0 0 0 THU 8 0 0 8 9 1 AAB 2 1 SET SELECT OK MENU EXIT LANGUAGE DEUTSCH FRANÇAIS ITALIANO ESPAÑOL PORTUGUÊS NEDERLANDS EΛΛHNIKA ENGLISH DANSK NORSK SVENSKA SUOMI TÜRKÇE SET SELECT OK MENU EXIT TV GUIDE PAGE MON TUE WED THU FRI SAT SU...

Page 108: ...108 ...

Page 109: ...Additional Information 109 ...

Page 110: ...ave 66 Presetting channels 25 R Recording 40 bilingual programmes 59 saving 42 using the VIDEO Plus system 44 what you are watching on the TV 43 while watching another program me 42 Remote commander 5 RF channel 15 17 RR Reality Regenerator 62 S Safety tab 42 Searching at various speeds 52 using the index function 61 Set Top Box connecting 13 line through 13 SMARTFILE 70 checking the contents of a...

Reviews: