


1-10
45
Recording TV programs
Ba
sic
O
p
er
at
ions
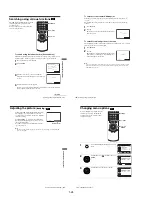
To stop recording
Press
x
STOP.
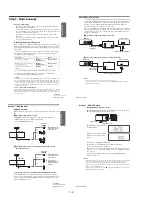
To check the remaining tape length
Press DISPLAY to display the time counter. With the display on, press DISPLAY
again to check the remaining time. The white bar indicates the current location in
relation to the entire tape length. The remaining time also appears. Press DISPLAY
to turn off the indicators.
To check the remaining tape length of a tape, set
“
Tape Length
”
in the
“
VIDEO
FUNCTION SETUP
”
menu correctly (page 104).
Maximum Recording Time
3
Press SP/EP to select the tape speed, SP or EP.
EP (Extended Play) provides recording time three times as long as SP
(Standard Play). However, SP produces better picture and audio quality.
4
Press
z
REC to start recording.
“
REC
”
appears in the display window.
Tape Length
SP
EP
T-120
2 hrs
6 hrs
T-160
2 hrs 40 mins
8 hrs
T-180
3 hrs
9 hrs
Time counter
Remaining tape length
continued
46
Recording TV programs
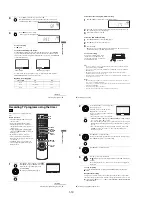
To watch another TV program while recording
To watch a DVD while recording
To save a recording
To prevent accidental erasure, break
off the safety tab as illustrated. To
record on the tape again, cover the tab
hole with adhesive tape.
Tips
• To select a channel, you can use the number buttons on the remote commander. Enter the
channel number, then press ENTER.
• You can select a video source from the LINE IN 1 or LINE-2 IN jacks using the INPUT
SELECT button.
• The display appears on the TV screen indicating information about the tape, but the
information will not be recorded on the tape.
• If you do not want to watch TV while recording, you can turn off the TV. When using a cable
box, make sure to leave it on.
Notes
• The remaining tape length may not be indicated accurately for short tapes such as T-20 or
T-30, or tapes recorded in the LP mode.
• It may take up to one minute for the VCR to calculate and display the remaining tape length
after you press DISPLAY.
• You cannot record a DVD to a VCR tape.
• To watch a TV program during video recording, stop disc playback.
1
Press TV/VIDEO to display “TV” in the display window.
2
If your TV is connected to the VCR using A/V connections, set the TV to the
TV’s antenna input; if not, skip this step.
3
Select another channel on the TV.
1
Press SELECT DVD to control the DVD player.
2
Press
Z
and place the disc on the disc tray.
3
Press
H
PLAY.
The disc tray closes and the DVD player starts playback. The TV screen will
automatically change to the DVD playback screen.
Safety tab
47
Recording TV programs using the timer
Ba
sic
O
p
er
at
ions
Recording TV programs using the timer
You can preset up to eight programs at a
time.
Before you start…
• Check that the DVD-VCR clock is set to
the correct time.
• Turn on the DVD-VCR and your TV.
• Switch the input selector on your TV so
that the signal from the player appears on
the TV screen.
• Set TV / DVD·VIDEO to DVD·VIDEO,
then press SELECT VIDEO to control the
VCR (page 10).
• When using a cable box, turn it on.
• Insert a tape with its safety tab in place.
Make sure the tape is longer than the total
recording time.
• If the DVD player is in play mode, you
cannot display the setup menu. Stop the
DVD playback.
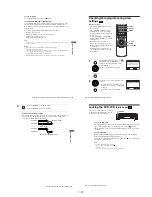
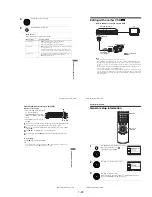
1
Press SET UP, then press
V/v
to select
(PROGRAM) and press ENTER. You can also
display the timer programming menu by
pressing TIMER.
The timer programming menu appears.
SET UP
INPUT
SELECT
V/v/B/b
ENTER
?
/
1
x
STOP
CLEAR
TIMER
Z
H
PLAY
TV/VIDEO
CH START
END
DATE
RETURN
SPEED
v
V
b
B
continued
48
Recording TV programs using the timer
To stop recording
To stop the DVD-VCR while recording, press SELECT VIDEO and then press
x
STOP.
Daily/weekly recording
In step 2 above, press
v
to select the recording pattern. Each time you press
v
, the
indication changes as shown below. Press
V
to change the indication in reverse order.
Mo~Fr
t
Sun’s
t
Mon’s
t
.....
t
Sat’s
t
1 month later
t
(dates count down)
t
the current date
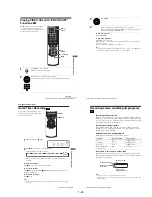
2
Set the channel number, start and stop times,
date, and tape speed:
1
Press
b
to select each item in turn.
2
Press
V/v
to set each item.
To correct a setting, press
B
to return to that
setting and reset.
• To record from a source connected to the
LINE IN 1 or LINE-2 IN jacks, press INPUT SELECT or
V/v
to display
“L1 ” or “L2” in the “CH” position.
• To record the same program every day or the same day every week, press
v
while the date is flashing. For details, see “Daily/weekly recording” on
page 48.
• To use the Auto Tape Speed function, press
v
to display “Auto” in the
“SPEED” position. For details, see “To use the Auto Tape Speed
function” on page 49.
3
Press ENTER to confirm the setting.
To enter another setting, press
V/v
to select the next row and repeat step 2.
Press CLEAR repeatedly to cancel the setting.
4
Press ENTER to confirm all settings.
5
Press
?
/
1
to turn off the DVD-VCR.
The
indicator appears in the display window and the VCR stands by for
recording.
To record from a decoder or other source, leave the connected equipment
switched on.
CH START
END
DATE
RETURN
SPEED
v
V
b
B
35
CLEAR
Summary of Contents for RMT-V501C
Page 10: ... 10 MEMO ...
Page 67: ...3 BLOCK DIAGRAM 3 2 3 1 SLV D350P D550P ...
Page 68: ...3 4E MEMO ...
Page 70: ...4 3 4 4 4 1 VCR MAIN FUNCTION TIMER COMPONENT SIDE ...
Page 71: ...4 6 4 5 CONDUCTOR SIDE ...
Page 72: ...4 7 4 8 COMPONENT SIDE CONDUCTOR SIDE 4 2 DVD MAIN ...
Page 73: ...4 10 4 9 4 3 DIAL TIMER SLV D550P Only COMPONENT SIDE CONDUCTOR SIDE ...
Page 74: ...4 12E MEMO ...
Page 76: ... BLOCK IDENTIFICATION OF MAIN PCB 5 3 5 4 Component Side Conductor Side VCR MAIN PCB ...
Page 77: ...5 1 S M P S 5 6 5 5 ...
Page 78: ...5 2 POWER DRIVE 5 7 5 8 ...
Page 79: ...5 3 LOGIC FUNCTION TIMER 5 10 5 9 ...
Page 80: ...5 4 A V 5 11 5 12 ...
Page 81: ...5 5 Hi Fi MTS 5 14 5 13 ...
Page 82: ...5 6 INPUT OUTPUT 5 15 5 16 ...
Page 83: ...5 7 DVD 5 18 5 17 ...
Page 84: ...MEMO 5 20E ...
Page 112: ...7 18E MEMO ...