


1-21
84
4
Select “System,” and press ENTER.
5
Select an available TV system, BG, DK, L, or
I, and press ENTER (see page 85).
6
Select “Normal/CATV,” and press ENTER.
7
Select “Normal,” and press ENTER.
To set CATV (Cable Television) channels,
select “CATV.”
8
Select “Channel Set,” and press ENTER.
9
Press
M
/
m
repeatedly until the channel you
want is displayed, then press ENTER.
The channels are scanned in the order shown
in the table below.
• If you know the number of the channel you
want, press the number buttons. For
example, for channel 5, first press “0” and
then press “5.” Then press ENTER.
10
Select “Audio,” and press ENTER.
11
Select “NICAM,” and press ENTER.
12
Select “AFT” and press ENTER.
13
Select “On” to turn on AFT, and press
ENTER.
• If the Auto Fine Tuning function does not
work effectively, select “Off” and press
ENTER. When the fine tuning bar appears,
press
<
/
,
to obtain a clearer picture, and
press ENTER.
To preset another channel, repeat from step 3.
BG
Select this when in West European
countries, except those listed in
“Receivable channels” (page 85).
DK
Select this when in East European
countries.
I
Select this when in Great Britain/
Ireland.
L
Select this when in France.
Settings - Channel Setting
Prog. 8
System :
Normal / CATV :
Channel Set :
Station Name :
PAY - TV / CANAL+ :
Audio :
BG
Normal
C1
ARD
On
NICAM
BG
DK
I
L
Settings - Channel Setting
Prog. 8
System :
Normal / CATV :
Channel Set :
Station Name :
PAY - TV / CANAL+ :
Audio :
BG
Normal
C1
CDE
Off
NICAM
Normal
CATV
Settings - Channel Setting
Prog. 8
System :
Normal / CATV :
Channel Set :
Station Name :
PAY - TV / CANAL+ :
Audio :
BG
Normal
C1
CDE
Off
NICAM
C2
NICAM
Normally, select this.
Standard
Select this if the sound from
NICAM broadcasts is not
clear.
On
Turns on the Auto Fine
Tuning function. Normally,
select this.
Off
Allows you to adjust the
pictures manually.
Settings - Channel Setting
Prog. 8
System :
Normal / CATV :
Channel Set :
Station Name :
PAY - TV / CANAL+ :
Audio :
BG
Normal
C5
CDE
Off
NICAM
NICAM
Standard
Settings - Channel Setting
Prog. 8
Normal / CATV :
Channel Set :
Station Name :
PAY - TV / CANAL+ :
Audio :
AFT :
Normal
C5
CDE
Off
NICAM
On
On
Off
Fine Tuning
Prog. 8
85
Se
tti
n
gs
a
nd
Adj
us
tm
en
ts
◆
Receivable channels
Station Name
Changes or enters a new station name (up to 5
characters). The recorder must receive channel
information (for instance, SMARTLINK
information) for station names to appear
automatically.
1
Follow steps 1 to 3 of “Using the Setup
Displays” (page 82) to select “Settings” in the
Setup Display.
2
Select “Channel Setting,” and press ENTER.
3
Press PROG +/– to select the programme
position for which you want to change or enter
a station name.
4
Select “Station Name,” and press ENTER.
The display for entering characters appears.
To enter characters, see page 40.
5
Select “Finish,” and press ENTER.
PAY-TV/CANAL+
Sets the PAY-TV/Canal Plus channels.
For details, see page 30.
Channel List (Changing/Disabling
the channels)
Changes or disables the programme positions after
setting the channels. If any programme positions
are unused or contain unwanted channels, you can
disable them.
You can also change station names. If the station
names are not displayed, you can enter them
manually.
1
Follow steps 1 to 3 of “Using the Setup
Displays” (page 82) to select “Settings” in the
Setup Display.
2
Select “Channel List,” and press ENTER.
3
Press
M
/
m
to select the row containing the
programme position you want to change or
disable.
To change, press ENTER and go to step 4.
To disable, press CLEAR and go to step 6.
The disabled positions will be skipped when
you press PROG +/–.
To display other pages for programme
positions 7 to 99, press
M
/
m
repeatedly.
TV system
Channel coverage
BG (West European
Countries, except
those listed below)
E2 - E12 VHF
Italia A – H VHF
E21 – E69 UHF
S1 – S20 CATV
S21 – S41 HYPER
S01 – S05 CATV
DK (East European
Countries)
R1 – R12 VHF
R21 – R69 UHF
S1 – S20 CATV
S21 – S41 HYPER
S01 – S05 CATV
I (Great Britain/
Ireland)
Ireland A – J VHF
South Africa 4 – 13 VHF
B21 – B69 UHF
S1 – S20 CATV
S21 – S41 HYPER
S01 – S05 CATV
L (France)
F2 – F10 VHF
F21 – F69 UHF
B – Q CATV
S21 – S41 HYPER
Settings - Channel Setting
Prog. 1
System :
Normal / CATV :
Channel Set :
Station Name :
PAY - TV / CANAL+ :
Audio :
BG
Normal
C3
AAB
Off
NICAM
AAB
"A"
"a"
Symbol
Cancel
Finish
Space
Clear All
Back
,
.
-
1
B
A
C
2
E
D
F
3
H
G
I
4
K
J
L
5
1
2
3
4
5
N
M
O
6
Q
P
R
S
U
T
V
8
X
W
Y
Z
7
9
0
6
7
8
9
0
Input Station Name
Settings - Channel List
Prog
1
2
3
4
5
6
Channel
Name
AAB
FGH
PQR
C3
C5
C12
C21
C23
C24
,
continued
86
4
Press
M
/
m
until the selected channel row
moves to the desired programme position.
The selected channel is inserted at the new
programme position.
5
Press ENTER to confirm the setting.
6
To change or disable the programme position
of another station, repeat from step 3.
Be sure to correctly select the programme position you
want to disable. If you disable the wrong programme
position by mistake, you need to reset that channel
manually.
Turns on the Auto Clock Set function when a channel
in your local area broadcasts a time signal.
Follow steps 1 to 3 of “Using the Setup
Displays” (page 82) to select “Settings” in the
Setup Display.
Select “Clock,” and press ENTER.
3
Select “Auto Adjust,” and press ENTER.
4
Select “On,” and press
,
.
5
Press
M
/
m
repeatedly until the programme
position of the station that carries a time signal
appears, and press ENTER.
• If the recorder does not receive a time signal
from any station, “Auto Adjust” returns to
“Off” automatically and the menu for setting
the clock manually appears on the screen.
z
Hint
If you set “Auto Adjust” to “On,” the Auto Clock Set
function is activated whenever the recorder is turned off.
Note
The Auto Clock Set function does not work while the
recorder is standing by for Synchro-Recording.
◆
To set the clock manually
If the Auto Clock Set function did not set the clock
correctly for your local area, try another station for
the Auto Clock Set function or set the clock
manually.
1
Follow steps 1 to 3 of “Using the Setup
Displays” (page 82) to select “Settings” in the
Setup Display.
2
Select “Clock,” and press ENTER.
3
Select “Auto Adjust,” and press ENTER.
4
Select “Off,” and press ENTER.
5
Select “Present Time,” and press ENTER.
6
Press
M
/
m
to set the day, and press
,
.
Set the month, year, hour, and minutes in
sequence. Press
<
/
,
to select the item to be
set, then press
M
/
m
to set the numbers. The
day of the week is set automatically.
To change the numbers, press
<
to return to
the item to be changed, and press
M
/
m
.
7
Press ENTER to start the clock.
Settings - Channel List
Prog
1
2
3
4
5
6
Channel
Name
AAB
FGH
PQR
C3
C12
C21
C5
C23
C24
Present Time : Thu 1. 1. 2004. 21:39
Settings - Clock
Auto Adjust : Off 1 ARD
Present Time : Thu 1. 1. 2004. 21:39
Off
1
Settings - Clock
Auto Adjust : Off 1 ARD
Present Time : Thu 1. 1. 2004. 21:39
On
1
Settings - Clock
Auto Adjust : Off 1 ARD
Present Time : Thu 1. 1. 2004. 21:39
Off
1
Clock - Present Time
Set the time and date manually.
0 00
:
1
2004
Thu 1
87
Se
tti
n
gs
a
nd
Adj
us
tm
en
ts
Language
OSD (On-Screen Display)
Switches the display language on the screen.
DVD Menu (DVD VIDEO only)
Switches the language for the DVD menu.
Audio (DVD VIDEO only)
Switches the language of the sound track.
When you select “Original,” the language given
priority in the disc is selected.
Subtitle (DVD VIDEO only)
Switches the language of the subtitles recorded on
the disc.
When you select “Audio Follow,” the subtitle
language changes according to the language you
selected for the sound track.
z
Hint
If you select “Others” in “DVD Menu,” “Subtitle,” or
“Audio,” select and enter a language code from
“Language Code List” (page 112) using the number
buttons.
Note
If you select a language in “DVD Menu,” “Subtitle,” or
“Audio” that is not recorded on the DVD VIDEO, one of
the recorded languages will be automatically selected.
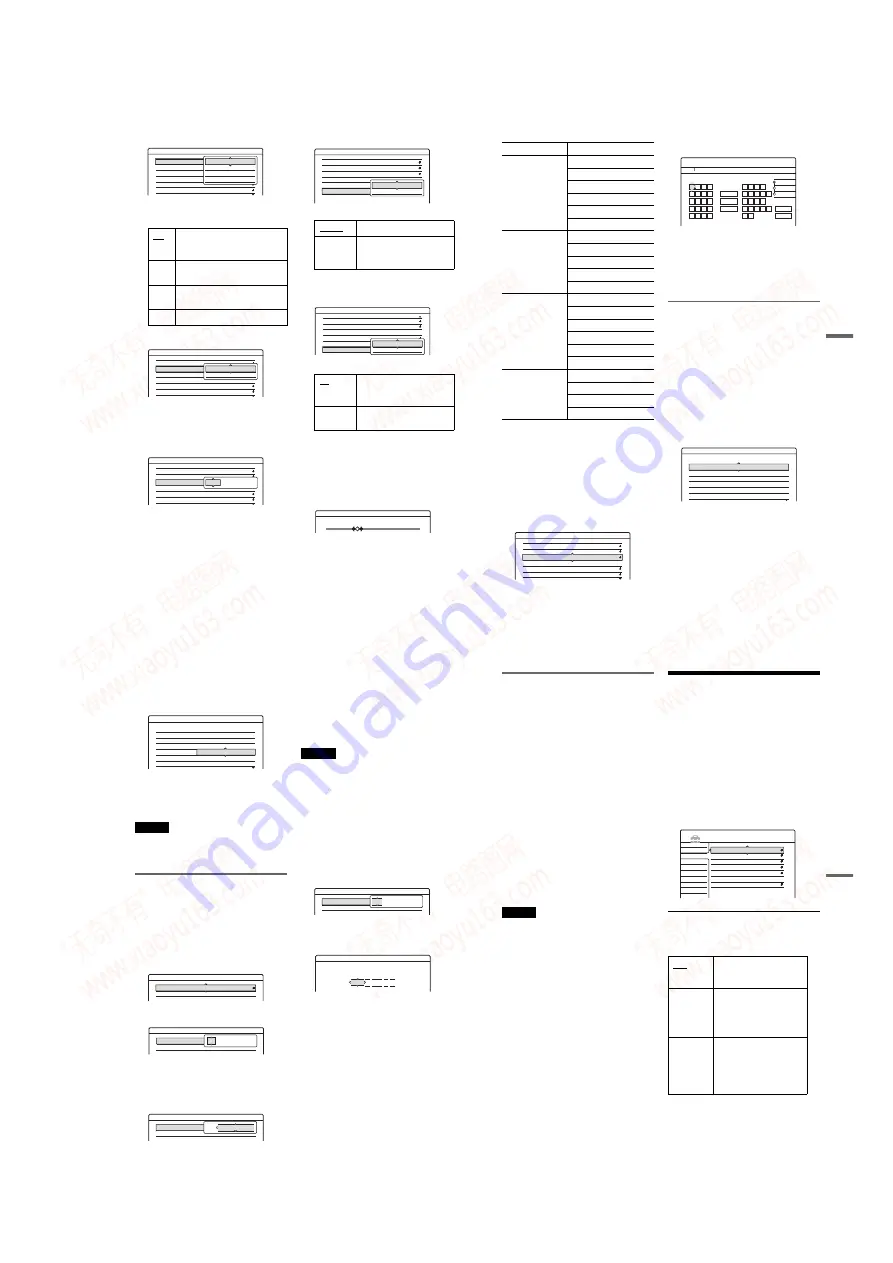
Video Settings (Video)
Video settings will adjust items related to the
image, such as size and colour.
Choose the settings according to the type of TV,
tuner, or decoder connected to the DVD recorder.
1
Press SYSTEM MENU while the recorder is
in stop mode.
2
Select
“
SETUP,
”
and press ENTER.
3
Select
“
Video,
”
and press ENTER.
The Video Setup appears with the following
options. The default settings are underlined.
TV Type
Selects the aspect ratio of the connected TV (4:3
standard or wide).
16:9
Select this when connecting
to a wide-screen TV or TV
with a wide mode function.
4:3 Letter
Box
Select this when connecting
to a 4:3 screen TV. Displays
a wide picture with bands on
the upper and lower portions
of the screen.
4:3 Pan
Scan
Select this when connecting
to a 4:3 screen TV.
Automatically displays a
wide picture on the entire
screen and cuts off the
portions that do not fit.
Settings
Video
Audio
Features
Options
Easy Setup
SETUP
TV Type :
Pause Mode :
Component Out :
Progressive Mode :
Screen Saver :
Scart Setting
Line4 input :
16 : 9
Auto
Off
Auto
On
Video
,
continued
www. xiaoyu163. com
QQ 376315150
9
9
2
8
9
4
2
9
8
TEL 13942296513
9
9
2
8
9
4
2
9
8
0
5
1
5
1
3
6
7
3
Q
Q
TEL 13942296513 QQ 376315150 892498299
TEL 13942296513 QQ 376315150 892498299


