


1-5
20
Controlling TVs with the remote
You can adjust the remote’s signal to control your
TV.
If you connected the recorder to an AV amplifier
(receiver), you can use the supplied remote to
control the AV amplifier’s (receiver’s) volume.
Notes
• Depending on the connected unit, you may not be able
to control your TV or AV amplifier (receiver) with
some or all of the buttons below.
• If you enter a new code number, the code number
previously entered will be erased.
• When you replace the batteries of the remote, the code
number may be reset to the default setting. Set the
appropriate code number again.
1
Slide the TV/DVD switch to TV.
2
Hold down
[
/
1
.
3
Enter your TV
’
s manufacturer code (see
“
Code numbers of controllable TVs
”
below) using the number buttons.
4
Release
[
/
1
.
When the TV/DVD switch is set to TV, the
remote performs the following:
* If you use the number buttons to select the TV’s
programme position, press -/-- followed by the number
buttons for two-digit numbers.
To operate the TV/DVD button
(for SCART connections only)
The TV/DVD button switches between the
recorder and the last input source selected on the
TV. Point your remote at the recorder when using
this button. The button works even if the TV/DVD
switch is set to DVD.
When you connect the recorder to the TV via the
SCART jacks, the input source for the TV is set to
the recorder automatically when you start
playback. To watch another source, press the TV/
DVD button to switch the TV’s input source.
Code numbers of controllable TVs
If more than one code number is listed, try
entering them one at a time until you find the one
that works with your TV.
[
/
1
Turns your TV on or off
2
(volume) +/–
Adjusts the volume of your
TV
PROG +/–
Selects the programme
position on your TV
(wide mode)
Switches to or from the
wide mode of a Sony wide-
screen TV
t
(TV/video)
Switches your TV’s input
source
1
2
3
4
5
6
7
8
9
0
TV/DVD
switch
"
/
1
2
+/–
Number buttons,
SET/-/--
t
, TV/DVD
PROG +/–
Number buttons and
SET, -/--*
Selects the programme
position on your TV
Manufacturer
Code number
Sony
01 (default)
Aiwa
01 (default)
Grundig
11
Hitachi
23, 24, 72
Loewe
06, 45
Nokia
15, 16, 69, 73
Panasonic
17, 49
Philips
06, 07, 08, 23, 45, 72
Saba
12, 13, 36, 43, 74, 75
Samsung
06, 22, 23, 71, 72
Sanyo
25
Sharp
29
Telefunken
12, 13, 36, 43, 74, 75
Thomson
12, 13, 43, 74, 75
Toshiba
38
LG
06
JVC
33
21
H
ook
up
s and
Se
tti
n
gs
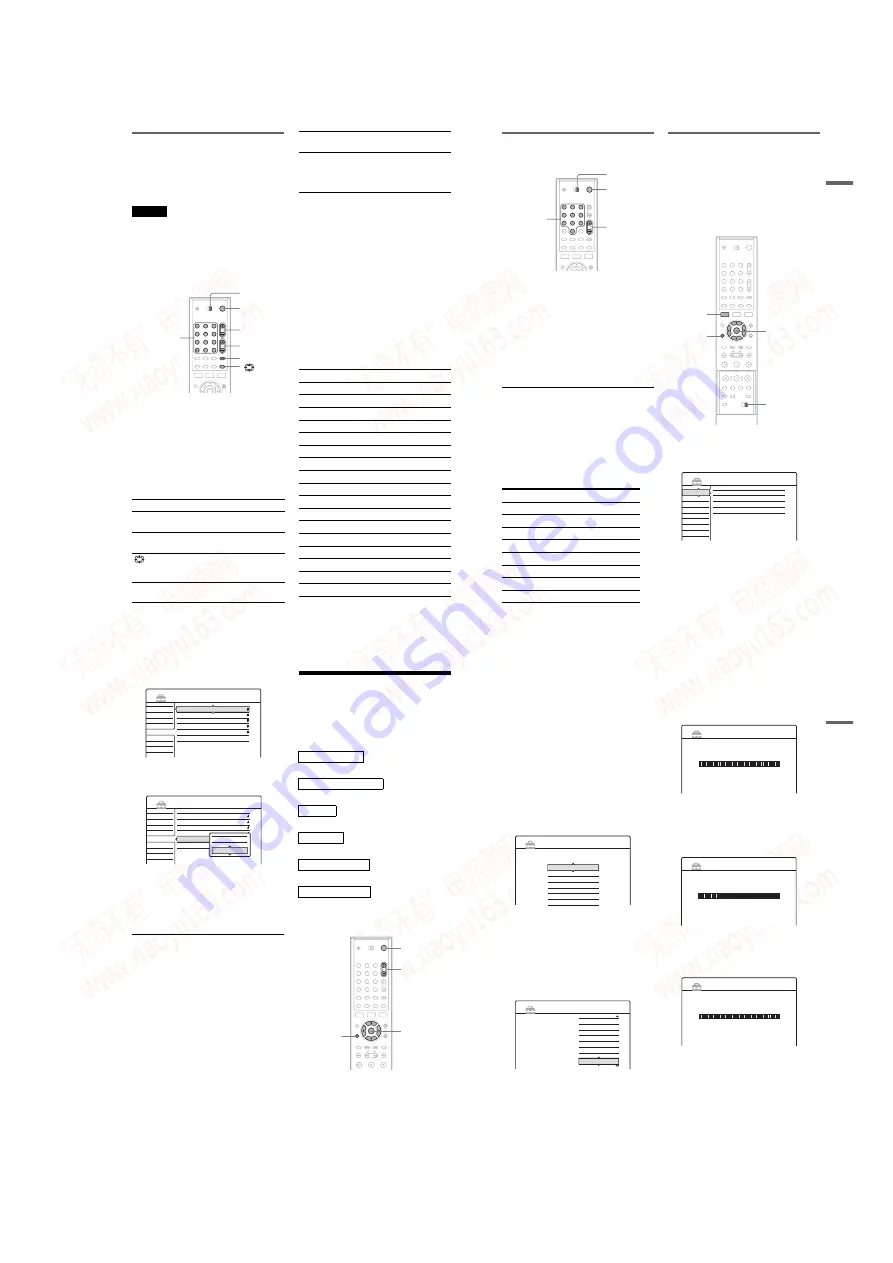
Controlling the volume of your AV
amplifier (receiver) with the remote
1
Slide the TV/DVD switch to DVD.
2
Hold down
[
/
1
, and enter the
manufacturer code (see the table below)
for your AV amplifier (receiver) using the
number buttons.
3
Release
[
/
1
.
The
2
(volume) +/– buttons control the AV
amplifier’s volume.
If you want to control the TV’s volume, slide
the TV/DVD switch to TV.
z
Hint
If you want to control the TV’s volume even when the
TV/DVD switch is set to DVD, repeat the steps above
and enter the code number 90 (default).
Code numbers of controllable AV amplifiers
(receivers)
If more than one code number is listed, try
entering them one at a time until you find the one
that works with your AV amplifier (receiver).
If you have a Sony DVD player or
more than one Sony DVD recorder
If the supplied remote interferes with your other
Sony DVD recorder or player, set the command
mode number for this recorder and the supplied
remote to one that differs from the other Sony
DVD recorder or player.
The default command mode setting for this
recorder and the supplied remote is DVD3.
1
Press SYSTEM MENU.
The System Menu appears.
2
Select
“
SETUP,
”
and press ENTER.
Manufacturer
Code number
Sony
78, 79, 80, 91
Denon
84, 85, 86
Kenwood
92, 93
Onkyo
81, 82, 83
Pioneer
99
Sansui
87
Technics
97, 98
Yamaha
94, 95, 96
1
2
3
4
5
6
7
8
9
0
TV/DVD
switch
"
/
1
2
+/–
Number
buttons
1
2
3
4
5
6
7
8
9
0
SYSTEM
MENU
M
/
m
,
ENTER
COMMAND
MODE
O
RETURN
SETUP
Settings
Video
Audio
Features
Options
Easy Setup
Channel Setting
Channel List
Clock
Language
,
continued
22
3
Select
“
Options,
”
and press ENTER.
4
Select
“
Command Mode,
”
and press
ENTER.
Select the Command mode (DVD1, DVD2,
or DVD3), and press ENTER.
Slide the COMMAND MODE switch on the
remote so it matches the mode you
selected above.
To return to the previous step
Step 7: Easy Setup
Follow the steps below to make the minimum
number of basic adjustments for using the
recorder. If you do not complete Easy Setup, it
will appear each time you turn on your recorder.
Settings are made in the following order.
m
m
m
m
m
m
1
Turn on the TV.
2
Press
[
/
1
.
The recorder turns on.
Settings
Video
Audio
Features
Options
Easy Setup
Format DVD :
DVD Bilingual Rec. :
Dimmer :
Auto Display :
Command Mode :
Factory Setup
VR
Main
Normal
On
DVD3
SETUP
Settings
Format DVD :
VR
SETUP
OSD Language Setup
Tuner and Channel Setup
Clock Setup
TV Type Setup
Video Connection Setup
Audio Connection Setup
Finished!
1
2
3
4
5
6
7
8
9
0
"
/
1
<
/
M
/
m
/
,
,
ENTER
O
RETURN
PROG +/–
23
H
ook
up
s and
Se
tti
n
gs
3
Switch the input selector on your TV so that
the signal from the recorder appears on
your TV screen.
“Initial settings necessary to operate the DVD
recorder will be made. You can change them
later using Setup. Before you start, check that
you have made all necessary connections.”
appears.
• If this message does not appear, select “Easy
Setup” from “SETUP” in the System Menu
to run Easy Setup. For details, see “Settings
and Adjustments” (page 82).
4
Press ENTER.
The Setup Display for selecting the language
used in the on-screen display appears.
5
Select a language.
6
Press ENTER.
The Setup Display for selecting your country
and language for the tuner system appears.
The channel order will be set according to the
country or language you select.
7
Select your country or language.
• If you live in a French speaking country that
is not listed on the display, select “ELSE.”
8
Press ENTER.
• If you made connection
A
(page 14) and the
connected TV complies with
SMARTLINK, the Preset Download
function automatically starts.
• If the Preset Download function does not
work or if you made a connection other than
A
, the Auto Tuner Preset function
automatically starts searching for all of the
receivable channels and presets them.
To set the channels manually, see page 83.
9
After the download or search is complete,
the Clock function automatically starts.
Once the clock signal is received, the Setup
Display for selecting the aspect ratio of the
connected TV appears.
• If the current time or date is not set, the
display for setting the clock manually
appears. Set the clock manually using
<
/
M
/
m
/
,
, and press ENTER.
OSD
1/9
Select the screen Language.
English
Français
Deutsch
Italiano
Español
Nederlands
Dansk
EASY SETUP
EASY SETUP
Tuner System
2/9
Select a country and
language.
L
N
NL
P
S
SF
UK
ELSE
– Français
– Dansk/Norsk
– Nederlands
– Português
– Svenska
– Suomi
– English
– English
EASY SETUP
Preset Download
3/9
Loading data from TV.
Please wait.
Prog. 1
EASY SETUP
Auto Tuner Preset
3/9
Searching for receivable channels.
Please wait.
Prog. 1
EASY SETUP
Clock
4/9
Searching for clock data.
Please wait.
,
continued
www. xiaoyu163. com
QQ 376315150
9
9
2
8
9
4
2
9
8
TEL 13942296513
9
9
2
8
9
4
2
9
8
0
5
1
5
1
3
6
7
3
Q
Q
TEL 13942296513 QQ 376315150 892498299
TEL 13942296513 QQ 376315150 892498299


