1-16
64
“Protect”: Protects the title. Select “On” when
the Protection display appears. “
” appears
next to the protected title. To cancel the
protection, select “Off.”
“Title Name”: Allows you to enter or re-enter
a title name (page 40).
“Set Thumbnail”: Changes the title’s
thumbnail picture that appears in the Title List
(page 33).
“A-B Erase”: Erases a section of the title (see
below).
z
Hints
• You can erase multiple titles at one time (page 64), or
erase all of the titles on the disc at once (page 36).
• You can label or re-label DVDs (page 36).
Note
You cannot protect Playlist titles.
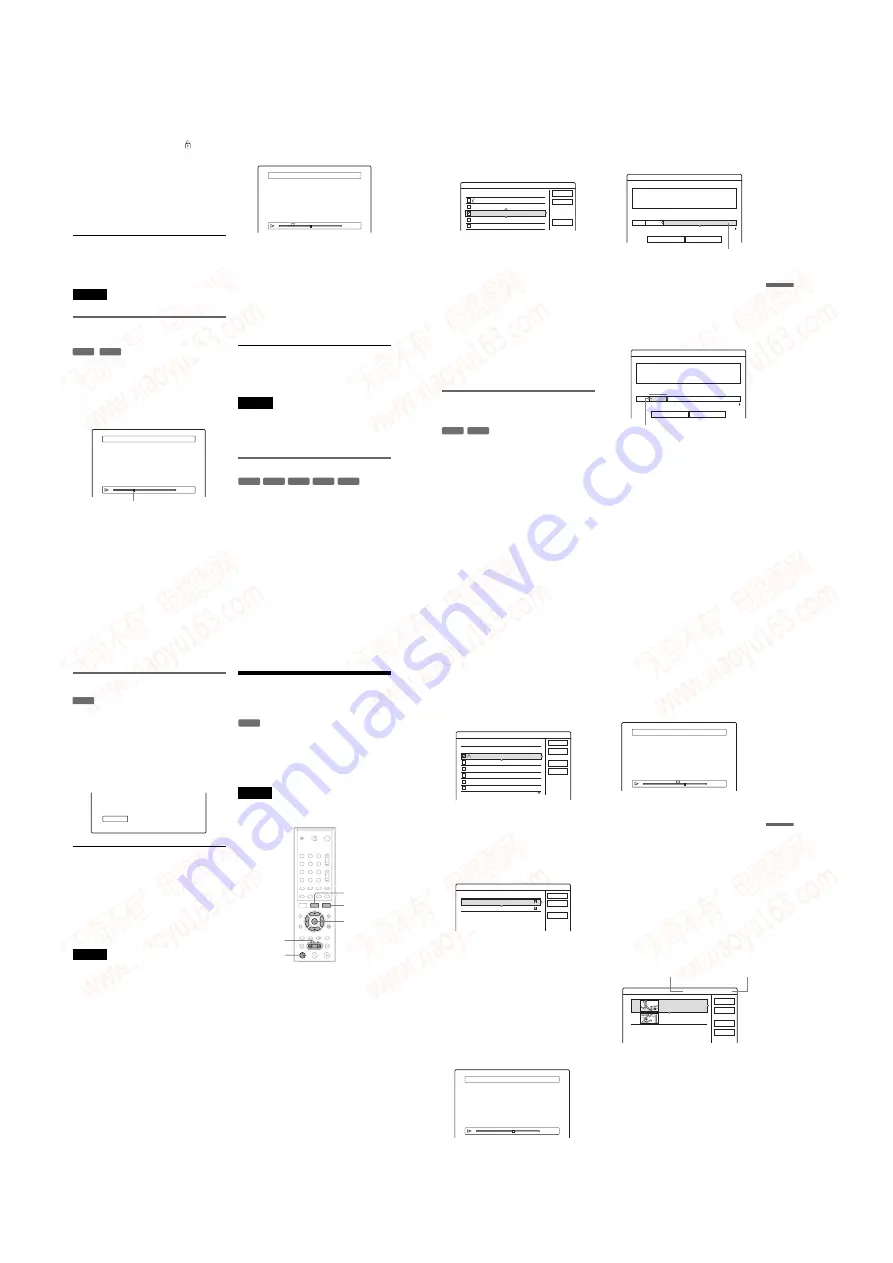
Erasing a section of a title
(A-B Erase)
You can select a section (scene) in a title and erase
it. Note that erasing scenes in a title cannot be
undone.
1
After step 2 of
“
Editing a Title,
”
select
“
A-B Erase
”
and press ENTER.
The display for setting point A appears.
• When the title is protected, the display asks
for confirmation. To continue, select
“Change,” and when the protection display
appears, select “Off.”
2
Select point A by pressing
m
/
M
, and
press ENTER.
The display for setting point B appears.
3
Select point B by pressing
m
/
M
, and
press ENTER.
The display asks for confirmation. To reset
either point A or B, select “Change A” or
“Change B,” and go to step 2 or 3.
4
Select
“
OK,
”
and press ENTER.
The scene is erased, and the display asks
whether to erase another scene. To continue,
select “Yes,” and repeat from step 2. To finish,
select “No.”
z
Hint
A chapter mark is inserted after the scene was erased. The
chapter mark divides the title into separate chapters on
either side of the mark.
Notes
• Images or sound may be momentarily interrupted at the
point where you erase a section of a title.
• Sections shorter than five seconds may not be erased.
• For DVD+RWs, the erased section may be slightly
different from the points you selected.
Erasing multiple titles (Erase Titles)
You can select and erase two or more titles at one
time using the TOOLS menu.
1
Press TITLE LIST to turn on the Title List
menu, and press TOOLS.
The TOOLS menu appears.
2
Select
“
Erase Titles,
”
and press ENTER.
The display for selecting titles to be erased
appears.
+
RW
-RWVR
A-B Erase (Set point A)
2 DEF 20:00-21:00
A 0:12:34
B : :
– – – – –
Playback point
A-B Erase (Set point B)
A 0:12:34
B 0:23:45
A
2 DEF 20:00-21:00
-RWVR -RW
Video
+
RW
-
R
+
R
65
E
d
it
in
g
3
Select a title, and press ENTER.
A check mark appears in the check box next to
the selected title. To clear the check mark,
press ENTER again. To clear all of check
marks, select “Reset All.”
• When the title is protected, the display asks
for confirmation. To continue, select
“Change,” and when the protection display
appears, select “Off.” To cancel, select
“Close.”
4
Repeat step 3 to select all of the titles you
want to erase.
5
When you finish selecting titles, select
“
OK,
”
and press ENTER.
The list of the titles to be erased appears for
confirmation. To change the selection, select
“Change,” and repeat from step 3.
6
Select
“
OK
”
and press ENTER.
The titles are erased.
Erasing titles to open up disc space
(Disc Map)
When recording on a DVD+RW or DVD-RW
(Video mode), the recorder searches for the largest
open space and records there. Before you start,
check the disc status by using Disc Map, and erase
titles to create a space large enough for the
recording.
1
Insert a disc and press TITLE LIST.
2
Press TOOLS and select
“
Disc Map,
”
and
press ENTER.
The Disc Map appears. To check the open
space, select the space by pressing
<
/
,
.
• When
b
or
B
appears on either side of the
screen, you can scroll sideways by pressing
<
/
,
.
3
Select a title by pressing
<
/
,
, and
press ENTER.
The display for selecting titles to be erased
appears. To cancel the selection, press
ENTER again.
• When the title is protected, the display asks
for confirmation. To continue, select
“Change,” and when the protection display
appears, select “Off.” To cancel, select
“Close.”
4
Repeat step 3 when erasing more titles.
5
Select
“
Erase,
”
and press ENTER.
The display asks for confirmation. To change
the selection, select “Change.”
6
Select
“
OK,
”
and press ENTER.
The selected titles are erased, freeing up disc
space.
1 AAB 13:00-14:00 15. 9
2 DEF 20:00-21:00 17. 9
3 AAB 9:00- 9:30 25. 9
4 GHI 20:00-20:30 25. 9
5 DEF 20:00-20:30 15.10
Erase Titles
Select the titles to erase.
OK
Cancel
Reset All
-RW
Video
+
RW
Disc Map
Empty Title
Erase
Cancel
2.3GB
HQ: 0H30M
LP : 1H30M
HSP: 0H45M
EP: 2H00M
SP: 1H00M
SLP: 3H00M
Selected open space
Disc Map
Erase
Cancel
2 DEF 20:00- 21:00
Fri 17.9 20:00( 1H00M)
SP 0.6GB
Selected title
,
continued
66
Creating chapters manually
You can manually insert a chapter mark at any
point you like during playback or recording.
Press CHAPTER MARK at the point where you
want to divide the title into chapters.
Each time you press the button, “Marking...”
appears on the screen and the scenes to the left and
right of the mark become separate chapters.
You can combine two chapters by erasing the
chapter mark during playback.
Press
to search for a chapter number, and
Creating and Editing a
Playlist
Playlist edit allows you to edit or re-edit without
changing the actual recordings. A Playlist title can
contain up to 50 scenes.
For details, see “Edit options for DVD-RWs (VR
mode)” (page 62).
Note
Once you create a Playlist title from original titles, you
will be unable to erase or edit the original titles.
Press TITLE LIST to turn on the Title List
menu, and press TOOLS.
The TOOLS menu appears.
“
Create Playlist,
”
and press ENTER.
The display for selecting titles appears.
-RWVR
-RWVR
1
2
3
4
5
6
7
8
9
0
<
/
M
/
m
/
,
,
ENTER
TOOLS
H
TITLE LIST
67
E
d
it
in
g
3
Select the title you want to include in the
Playlist title, and press ENTER.
A check mark appears in the check box next to
the selected title. To clear the check mark,
press ENTER again. To select all of the titles,
select “Select All.”
4
Repeat step 3 to add more titles.
To go to the next page of titles, press
m
. To
clear all of the check marks, select “Reset
All.”
5
Select
“
OK,
”
and press ENTER.
The list of selected titles appears. To add
another title, select “Add Title.”
6
Select one of the titles, and press ENTER.
The sub-menu appears.
“Capture”: Adds a section of the title to the
Playlist title as one scene.
“Capture All”: Adds the entire title to the
Playlist title as one scene. After capturing the
title, select “Scene List” and go to step 12.
“Check Scenes”: Allows you to check the
captured scene.
7
Select
“
Capture,
”
and press ENTER.
The display for setting the start point (IN)
appears. The title starts to play in the
background.
8
Select the IN point by pressing
m
/
M
,
and press ENTER.
The display for setting the end point (OUT)
appears, and the title continues to play in the
background.
9
Select the OUT point by pressing
m
/
M
,
and press ENTER.
The display asks for confirmation. To reset the
IN or OUT point, select “Change IN” or
“Change OUT” and repeat step 8 or 9. To view
the selected scene, select “Preview.”
10
Select
“
OK,
”
and ENTER.
The selected section is captured as a scene,
and the display asks whether you want to
continue. To continue, select “More,” and
repeat the steps above. To capture a scene
from another title, select “New Title.”
11
When you finish capturing scenes, select
“
No More
”
and press ENTER.
The Scene List menu appears with all of the
selected scenes.
12
Select the scene you want to edit, and
press ENTER.
The sub-menu appears.
“Move”: Changes the scene order.
“Erase”: Erases the scene. The selection is
cancelled.
“Preview”: Displays thumbnail pictures of the
scenes.
“Change IN”: Allows you to change the IN
point, and repeat from step 8.
“Change OUT”: Allows you to change the
OUT point, and repeat from step 9.
1 AAB 13:00-14:00 15. 9
2 DEF 20:00-21:00 17. 9
3 AAB 9:00- 9:30 25. 9
4 GHI 0:00-20:30 25. 9
5 DEF 20:00-20:30 15.10
6 L3 21:00-21:30 19.10
Create Playlist
Select the titles you want to capture.
OK
Cancel
Select All
Reset All
Original
Create Playlist - Selected Titles
Select a title to start capturing.
Cancel
Add Title
1 AAB 13:00-14:00 15. 9
0
2 DEF 20:00-21:00 17. 9
0
Scene List
OUT - : - - : - -
IN 0:10:26
Capture (Set IN point)
2 DEF 20:00-21:00
IN
OUT 0:23:45
IN 0:10:26
Capture (Set OUT point)
2 DEF 20:00-21:00
Scene List
Total 0:33:28
Scenes 2
OK
Quit
Add
Preview
1
2
DEF 20:00-21:00
0:10:26 - 0:23:45
DEF 20:00-21:00
0:25:00 - 0:45:08
Total number
of scenes
Total duration of
the selected scene
,
continued
www. xiaoyu163. com
QQ 376315150
9
9
2
8
9
4
2
9
8
TEL 13942296513
9
9
2
8
9
4
2
9
8
0
5
1
5
1
3
6
7
3
Q
Q
TEL 13942296513 QQ 376315150 892498299
TEL 13942296513 QQ 376315150 892498299