background image

57

Alarm Setting


Cha

p

te

r 4  

De
tai
led Des

c

ript
ion
s

 of

 Set

tings
 and

 Wi
ndo

ws

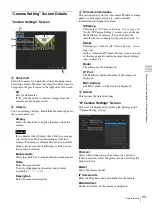
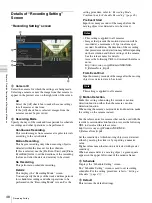
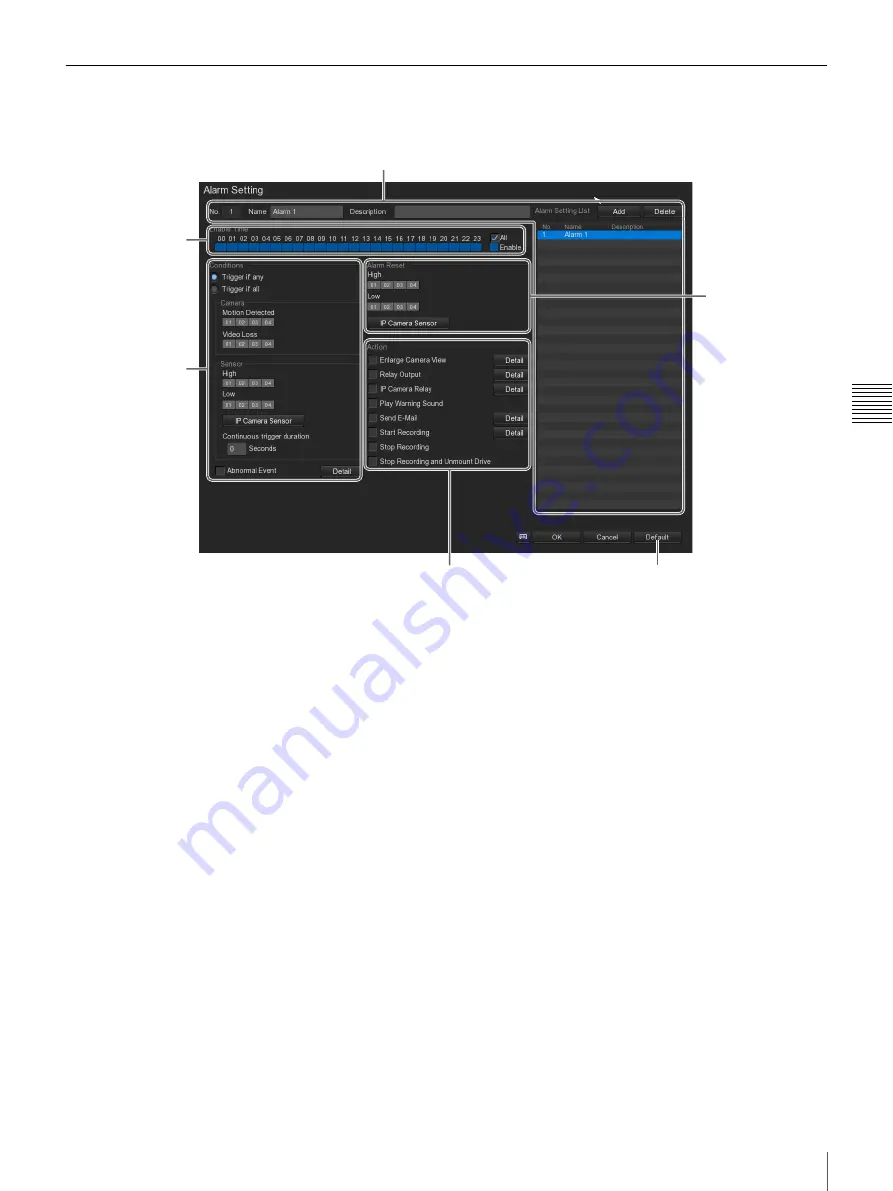
“Alarm Setting” Screen Details

“Alarm Setting” Screen

A

No.

This displays the number of the alarm setting.

Name

Enter the name of the alarm setting.
Use only alphanumeric characters and symbols 
(excluding \ / : * ? " < > |).

Description

Enter the description of the alarm setting.

Add

This adds the alarm setting to a list.

Delete

This deletes the selected alarm setting from the list.

Alarm Setting List

This displays a list of the registered alarm settings.

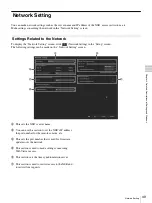
B

Enable Time

This allows you to specify time periods during which the 
alarm settings are enabled by clicking in the squares 
corresponding to the desired time period.
Select the [All] check box to enable alarms for all time 
periods.

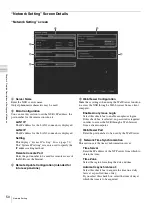
C

 Conditions

This section is used to specify the conditions that generate 
an alarm.

Trigger if any

This causes an alarm to be generated if any one of 
the set conditions is met.

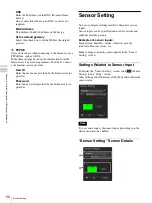
Trigger if all

This causes an alarm to be generated if all of the set 
conditions are met.

Camera

This sets the cameras that are to serve as alarm 
triggers.

Motion Detected

Select the cameras for which motion detection is to 
trigger an alarm.

Video Loss

Select the cameras for which loss of video signal is 
to trigger an alarm.

Sensor

This sets the sensor statuses that are to serve as alarm 
triggers.

C

E

F

D

B

A

Summary of Contents for Ipela NSR-S10

Page 1: ...Network Surveillance Recorder User s Guide Before operating the unit please read this manual thoroughly and retain it for future reference NSR S10 S20 4 262 347 12 1 2010 Sony Corporation ...

Page 2: ...oScan 15 Functions and Operating Procedure of Monitoring LIVE Screen 16 Controlling Cameras 17 Using Camera Presets 17 Recording Searching and Playing Images 18 Recording Camera Images 18 Playing Recorded Images 19 Searching by Event 20 Setting a Bookmark 21 Functions and Operating Procedure of Playback Screen 22 Exporting Recorded Images 23 Backing Up Recorded Images 23 Exporting Recorded Images ...

Page 3: ...0 Camera Settings 41 Advanced Camera Settings 41 Camera Setting Screen Details 43 Recording Setting 45 Making Settings Related to Recording 46 Recording Mode Combinations for Schedule Recording 46 Setting a Schedule 47 Details of Recording Setting Screen 48 Network Setting 49 Settings Related to the Network 49 Network Setting Screen Details 50 Sensor Setting 52 Settings Related to Sensor Input 52 ...

Page 4: ...ks IPELA and are trademarks of Sony Corporation Microsoft and Windows are registered trademarks of Microsoft Corporation in the United States and or other countries Other products or system names appearing in this document are trademarks or registered trademarks of their respective owners Further the or symbols are not used in the text ...

Page 5: ...the e SATA interface Monitor from a browser You can access the NSR from a computer browser which then can be used to monitor record or play back images Other features The NSR is capable of continuous recording motion detection and alarm recording among others Run searches for recorded images by date and time sensors movement detection video signal loss etc Audio recording and playback 1 are also s...

Page 6: ...orage devices However it does not support USB 2 0 Mass Storage HDDs or CD DVD drives Do not connect mass storage devices other than USB memory devices to the unit Be aware that errors may still occur when writing data to a USB 2 0 Mass Storage memory device depending on the type of device used If errors occur when writing data use a USB flash memory device of a different type Features and Function...

Page 7: ...12V Use this connector to connect the AC adapter I Cable clamp hole Attach the supplied cable clamp here to prevent the power cord from disconnecting Infrared remote control unit If a button on the infrared remote control unit is pressed while the remote control unit is pointed at the infrared sensor on the main unit then the main unit will perform the operation corresponding to that button A Play...

Page 8: ...ght in order to select an item that is located to the right on the screen ENTER button Use this button to confirm the selection of the current item or monitor frame and to execute other operations Before using the infrared remote control unit Remove the insulating sheet Replacing the lithium battery in the infrared remote control unit The infrared remote control unit uses a standard CR2025 lithium...

Page 9: ... for details on the camera and on various settings for recording sensors and alarms refer to Detailed Descriptions of Settings and Windows page 33 Logging On to the NSR Before you can use the NSR you must first log on 1 Turn on the NSR The power comes on automatically when the power cord of the AC adapter is plugged into the power outlet After the NSR has been turned off either by a screen based o...

Page 10: ...and Control Cameras connected to the same segment on the network are automatically located and registered to the NSR and images from these cameras appear on the Main screen Continuous recording starts automatically after the cameras are registered ...

Page 11: ...iption of the basic operations for each screen This unit has a Main screen which is used to monitor live images and to retrieve and play back recorded images and a Setup screen which is used for making various settings Main screen Monitoring LIVE screen PLAYBACK screen Setup Screen Soft keyboard Various setting screens ...

Page 12: ...images click LIVE or PLAYBACK in the upper right corner of the screen Monitoring LIVE screen For details on monitoring refer to Monitoring page 15 and Controlling Cameras page 17 Monitor Frame Use this button to switch between live image display and playback of recorded images Allows you to log off or restart the NSR This displays the soft keyboard that is used to input text This is used to make v...

Page 13: ...e 18 Setup Screen Click the button for the item that you want to configure to display the configuration screen This is used when searching for a recording from a specified date and time These are used to specify particular time frames from which to play back images in the selected monitor frame These are used when playing back recorded images Click the button for the item you want to set ...

Page 14: ...t are necessary for operating the NSR such as camera registration schedule settings and user registration The setting items that are displayed depend on the button that was click on the Setup screen This displays the soft keyboard that is used to input text This restores the default settings This puts the new settings into effect ...

Page 15: ...era can be displayed in the 1 1 1 screen layout by clicking the camera ID button or by clicking the monitor frame Monitoring Audio from Cameras Enable audio from the cameras by checking the Enable Audio checkbox on the Camera Setting screen For details on this setting refer to Settings Related to the Cameras page 40 When audio from a camera is enabled appears in the upper left corner of the monito...

Page 16: ...cted while recording is in progress appears Audio enabled grayed out when disabled C Camera ID This is used to select the camera for displaying images in the monitor frame D Layout switch Switches the layout of the monitor frames This button switches the screen layout to 1 1 1 screen This button switches the screen layout to 2 2 4 screen E Monitor frame status switch Switches the monitor window st...

Page 17: ...s the soft keyboard that is used to input text N Record This starts or stops the recording of camera images according to the recording mode configured in the Recording Setting screen Under default settings recording starts automatically at system startup O Exit This allows you to reboot power off or log on as a different user P Status display This displays the current date and time and the current...

Page 18: ... playback position by date and time and playing from alarm history Searching by Event page 20 You can search for and play back recorded images according to a specified event sensor input movement detection or loss of video signal Setting a Bookmark page 21 You can bookmark recorded images for quick retrieval Recording Camera Images You can manually start and stop the recording of camera images acc...

Page 19: ...recorded image is played back Changing the Playback Time Frame for Selected Images You can change the time frame from which to play back images for the selected image by using the hour buttons and playback slider at the bottom of the Playback screen Use the hour buttons to specify the hour and the playback slider to specify the minute Specifying a Date and Time for Playback This allows you to spec...

Page 20: ... You can search for and play back recorded images according to a specified event sensor input movement detection or loss of video signal 1 Select the monitor frame displaying the image from the camera for which you want to search 2 Click Event Search on the right side of the Playback screen The Event Search Setting screen appears 3 Set the search conditions 1 Select the check boxes of the events f...

Page 21: ...g a Bookmark You can bookmark recorded images for quick retrieval 1 Pause at the scene that you want to bookmark and click Bookmark The Bookmark screen appears 2 Click Add The Bookmark Editor screen appears 3 Input the bookmark name and click OK The bookmark is added to the list Returning to a Bookmark When you double click the desired bookmark the corresponding bookmarked scene is displayed in th...

Page 22: ...ent log records sensor input movement detection loss of video signal etc To use the Find Next function deselect the Output Event List check box in the Event Search Setting screen and perform the search F Event log This displays the event operation system network history G Set Segment This is used to specify the portion of a recorded image to be exported Click this button to set the current playbac...

Page 23: ...ied date and time Clicking Date Selection causes the calendar to appear which can then be used to specify the date and time M Status display This displays the date and time that an image was recorded and the playback speed Exporting Recorded Images You can back up stored copies of recorded images onto USB flash memory and export them as proprietary format movies dvr files or as still images JPEG f...

Page 24: ...recorded images starts The following screen appears during backup to allow you to confirm the progress 4 When backup is complete click OK 5 To close the Backup Setting screen click OK In addition to the recorded images the NSR S Viewer software for playing back movie files dvr is also copied Exporting Recorded Images as Movies You can export saved recorded images as movies in a format dvr files th...

Page 25: ...l Images You can capture one scene of recorded or live images and export it as a still image file JPEG file 1 Click Save at the scene you want to export To capture a recorded image display the target recorded image in the monitor frame pause the image at the scene that you want to export and then click Save The Snapshot screen appears 2 Select the media to which you want to export the image and cl...

Page 26: ...ning Sound check box in the Alarm Setting Screen page 57 If the e mail notification function for alarm occurrences is enabled e mail will be sent once per minute until the problem that triggered the alarm is resolved To stop the sending of e mail deselect the Send E Mail check box in the Alarm Setting Screen page 57 System Administration This section describes how to change the password and how to...

Page 27: ...ppears 4 Enter a new password and click OK Enter the same password again in Confirm Password The password is changed 5 To close the User Setting screen click OK Shutting Down Restarting and Logging Off 1 Click Exit in the lower right corner of the Monitoring LIVE screen The Logout screen appears 2 Click the button for the desired operation The selected operation is performed ...

Page 28: ... privileges are required to start Internet Explorer perform the following 1 Lower the UAC level for the user under User Accounts in the Control Panel For Windows Vista Turn off User Account Control with Turn User Account Control on or off For Windows 7 Select the lowest level with Change User Account Control settings 2 Restart the computer and then start Internet Explorer If you access the NSR wit...

Page 29: ...29 Overview Chapter 3 Monitoring from a Web Browser WebViewer 3 Enter the user ID and password select the network type and click OK The WebViewer page is displayed in the 1 1 1 screen layout ...

Page 30: ...ved in an AVI format file avi When motion detection is active also appears in the upper left corner of the monitor frame WebViewer does not record audio To record audio do so from the NSR S10 S20 unit C Snapshot This exports one scene of recorded images as a still image file Still images are exported in bitmap bmp format D Direct Draw Displays a cleaner version of the image from the web camera E D...

Page 31: ...date and time 16 thumbnails appear Place a red frame around the image to play back by clicking it and double click to start playback You can perform playback controls such as rewind to configure a start point and end point and export the image Download of images from the NSR S10 S20 unit to the computer may take several tens of seconds I Right click menu This is the menu that appears when you righ...

Page 32: ...ID Selects the cameras from which images are displayed in the monitor frames C Output Video Clip Export Allows you to export images in a file format dvr for video clips to a USB flash memory device D Print Prints the screen currently displayed E D interlace Switches the D interlace mode 1 Video without motion 2 Video with motion F LIVE Returns to the WebViewer page G Playback control buttons Used ...

Page 33: ...tting Recording data storage settings Screen display language Importing exporting configuration data Playback mode Date format AutoScan cycle Logon settings Date and time setting Firmware update page 35 Camera Setting Camera settings IP address camera name password etc Image quality settings Sensor input settings Relay settings page 40 Recording Setting Recording schedule Motion detection page 45 ...

Page 34: ...34 Displaying Setting screen Chapter 4 Detailed Descriptions of Settings and Windows Ex When System Setting was clicked The System Setting screen appears ...

Page 35: ...usly saved configuration data For details on each of the items refer to Importing Exporting Configuration Data page 36 The configuration data includes various settings of the NSR You can easily restore settings to a prior state by importing previously saved configuration data The configuration data should be saved periodically for example after changing the settings or upgrading the software D Thi...

Page 36: ...nit without a monitor connected it is recommended that you also confirm whether data is being written to the disk by checking whether the HDD LED on the front of the unit is flashing Importing Exporting Configuration Data You can save NSR configuration data onto external media and import previously saved configuration data The configuration data includes the various settings that can be configured...

Page 37: ...nder Configuration The Import screen appears 2 Enter the file name of the configuration data select the media on which the data is stored and then click OK A message indicating that this operation will restart the NSR appears 3 Click OK A confirmation message appears 4 Click OK The NSR will restart after import is complete and the imported configuration data will be restored ...

Page 38: ...tions Add Use this button to add a storage location When this button is clicked the Disk Management screen appears Select the disk drive that you want to add and then click OK to add that storage location to the list Delete This button deletes the storage location that is selected in the storage location list Delete recorded data after XX Days Select this check box when you want to ensure that sto...

Page 39: ...e Import screen appears Select the location where the configuration data is stored enter the file name and then click OK If configuration data is imported any recording operation that is currently in progress is automatically halted If a recording schedule had been set recording resumes automatically after importing is completed If manual recording had been in progress it is necessary to restart r...

Page 40: ...o standard time G Firmware This section is used to update the unit s firmware For details refer to Firmware Update page 63 Camera Setting Settings concerning cameras such as camera IP addresses and names image quality sensor input and relays are made on the Camera Setting screen Settings Related to the Cameras To display the Camera Setting screen click Camera Setting in the Setup screen The follow...

Page 41: ...P Camera Settings screen appears 3 Set each item For details on each of the items refer to Camera Settings screen page 43 If you want to detect Sony network cameras connected to the same network and change the IP addresses etc follow the procedure described below 1 Click Scan Sony network cameras connected to the same network are automatically located and displayed in the list 2 Select the camera ...

Page 42: ...ect the sensor ID 2 Enter the sensor name Use only alphanumeric characters and symbols excluding 3 Enter the sensor description 4 Click Test and confirm the sensor status Red indicates high and green indicates low 5 Click OK The settings are saved 5 To set a relay click Relay The Relay Setting screen appears 6 Make the relay settings 1 Select the relay ID 2 Enter the relay name Use only alphanumer...

Page 43: ...escription C IP Camera Information This section allows you to set the camera IP address image quality sensor input relays etc and to confirm information concerning the camera IP Setting This displays IP Camera Settings screen page 43 On the IP Camera Settings screen you can change the IP address of cameras locate Sony network cameras that are connected to the same network etc Details This displays...

Page 44: ...Rate Select the frame rate of the camera Bitrate Mode Select the bitrate mode of the camera Quality Select the image quality for images of the camera Video Format Select the video format for the camera B Display Settings This section can be used to configure settings related to preview images Video Size Select the resolution of the camera Frame Rate Select the frame rate of the camera Bitrate Mode...

Page 45: ...vidually or use any combination of the three modes You can also configure time periods during which actions such as alarms and system reboots are disabled Example 1 Configure Continuous Recording during the day on weekdays Motion Recording during nights and No Recording during weekends For details on this configuration refer to Recording Mode Combinations for Schedule Recording page 46 Example 2 C...

Page 46: ...week and time periods to perform schedule recording For example you can configure Continuous Recording during the day on weekdays Motion Recording during nights and No Recording during weekends 1 Click Details under Recording Mode The Recording Mode screen appears 2 Create a recording time table Example When combining continuous recording motion recording and no recording 1 Select Continuous Recor...

Page 47: ... The Schedule Setting screen appears 2 Set the schedule When setting a schedule that repeats weekly 1 Select the operation you want to set 2 Select WEEKLY 3 Click within the squares which will turn blue corresponding to the days of the week and the time periods that you wish to schedule 4 Click Save The settings are saved 5 Repeat steps B to D if you want to set another operation When specifying a...

Page 48: ...ng object was detected are to be stored This setting is applied to all cameras Images that precede the motion detection will be recorded at a maximum of 1 fps one frame per second In addition the duration of the recording that precedes motion detection may differ depending on the resolution and bitrate settings of the camera See the release notes for details Access the following URL to download th...

Page 49: ... click Network Setting in the Setup screen The following settings can be made on the Network Setting screen A This sets the NSR s server name B You can use this section to set the NSR s IP address the port number for the remote console etc C This sets the port number that is used for firmware updates over the network D This section is used to make settings concerning WebViewer access E This sectio...

Page 50: ...e Update Configuration intended for future expansions D WebViewer Configuration Make these settings when using the WebViewer function to access the NSR through a Web browser from a client computer Enable Anonymous Login Select this check box to enable anonymous logins If this check box is selected no password is required in order to access the NSR through a Web browser from a client computer WebVi...

Page 51: ...to set an upper limit on the bandwidth that is used to transfer images over the network connection If you want to set a separate limit for each individual channel select By Channel and then enter a limit for each channel If you want to set a total limit for all channels select All and then enter the total limit G Default This restores the default settings System IP setting Screen This screen is di...

Page 52: ...Enter the user name provided by the Internet service provider Password Enter the password provided by the Internet service provider Sensor Setting You can configure settings related to this unit s sensor inputs Sensor inputs can be specified and used for actions and schedule recording events Examples of sensor inputs Temperature humidity smoke vibration security infrared ultrasonic waves etc Make ...

Page 53: ... testing Relay Setting You can configure settings related to this unit s relay outputs Relays alarm outputs are used to transmit alarms to devices equipped with alarm input functions such as warning lamps and door opening devices Examples of applications for relays Warning siren warning lamp light door etc Make settings concerning relays in the Relay Setting screen Settings Related to Relays To di...

Page 54: ...rop down list shows the I O devices connected to the NSR system that were detected automatically Name Enter the relay name Use only alphanumeric characters and symbols excluding Enable Select the check box to enable the relay setting B Test Click Test to confirm the relay status Red indicates high and green indicates low Click Stop to stop testing ...

Page 55: ...ttings page 56 B This allows you to specify time periods during which the alarm settings are enabled C This section is used to specify the conditions that generate an alarm Camera and sensor states that can be used as alarm triggers and abnormalities of the NSR hardware can be specified as such conditions For details on each of the items refer to Conditions page 57 D This allows you to set sensor ...

Page 56: ...ick Add The setting is registered in the list 2 Enter the name and description of the alarm setting The number is assigned sequentially 3 Set the contents of the alarm For details on each of these items refer to Alarm Setting Screen Details page 57 4 Repeat steps 1 through 3 to register additional alarm settings 5 Click OK The alarm settings are saved ...

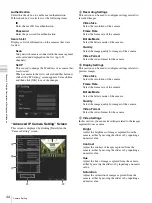
Page 57: ...during which the alarm settings are enabled by clicking in the squares corresponding to the desired time period Select the All check box to enable alarms for all time periods C Conditions This section is used to specify the conditions that generate an alarm Trigger if any This causes an alarm to be generated if any one of the set conditions is met Trigger if all This causes an alarm to be generate...

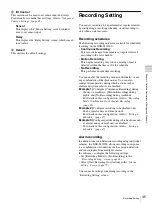
Page 58: ...an a hardware abnormality Abnormal Reboot This generates an alarm when the NSR system reboots due to a hardware abnormality Recording is switched off This generates an alarm when recording is switched off Hard Disk failed This generates an alarm when a hard disk error occurs D Alarm Reset This section sets sensor states which cause the alarm condition to be released High Select the cameras for whi...

Page 59: ...ount Drive For models without a built in HDD this unmounts the external drive when an alarm is generated A sound will be emitted for 30 seconds to notify you when a drive has been unmounted F Default This restores the default settings Enlarge Camera View Screen This screen is displayed by clicking Detail next to Enlarge Camera View under Action on the Alarm Setting screen Camera ID This selects th...

Page 60: ... the e mail Snapshot intended for future expansions Alarm Recording Setting Screen This screen is displayed by clicking Detail next to Start Recording under Action on the Alarm Setting screen Recording Cameras Select the cameras that are to start recording All Select this check box to start recording on all cameras Frame Rate Select the frame rate Camera Setting Records at the frame rate set for t...

Page 61: ... the Setup screen Add users to the user list on the User Setting screen 1 Click Add in the upper right corner of the screen The following screen appears 2 Set each item and click OK For details on each of the items refer to User Setting Screen Setting page 62 The user is added to the list User Setting Screen Details User Setting Screen User List User List This displays a list of the users register...

Page 62: ... the access time select the Infinite check box If you do want to limit the access time deselect the check box and enter the time limit in minutes D Viewable camera Select the cameras for which monitoring is permitted To permit monitoring of all cameras select the All check box E Account Information Configure settings such as the user name and password Name Enter the user name Description Enter the...

Page 63: ...ollowing URL to download the Release Note http www sony co jp Products NSR NSR S_ReleaseNote_E pdf 1 Copy the firmware to USB flash memory and then plug the USB flash memory into the NSR Never change the file name of the firmware 2 Click System Setup in the lower right corner of the Monitoring LIVE screen The Setup screen appears 3 Click System Setting The System Setting screen appears 4 Click Upd...

Page 64: ... into the upper or lower slot of the hole you want to connect a wire to AWG No 26 to 20 Hold down the screwdriver and insert the wire then release the screwdriver Do not use excessive force when inserting the screwdriver into the slot Doing so may result in damage Repeat this procedure to connect all required wires Caution Pin NO AUDIO 1 AUDIO IN used for future expansion 2 AUDIO IN GND used for f...

Page 65: ...ata to the device If errors occur when writing data use a USB flash memory device of a different type To ensure proper operation of USB devices do not connect the devices via a USB hub Connect the devices directly to the USB connectors on the unit Operation is not guaranteed when devices are connected via a USB hub USB switch or extension cable Refer to the documentation that came with the USB dev...

Page 66: ...Power 12 V DC Current consumption Max 4 0 A AC adapter 100 240 V AC to 50 60 Hz Dimensions 245 W 53 H 160 D mm 9 3 4 2 1 8 6 3 8 in excluding protrusions Weight approximately 1 4 kg 3 lb including 0 6 kg 1 3 lb for HDD Supplied accessories AC adapter 1 Power cord 1 SATA Cable only for models without internal HDDs SATA power cable 1 only for models without internal HDDs Cable clamp 1 Infrared remot...

Page 67: ......

Reviews: