1-3
13
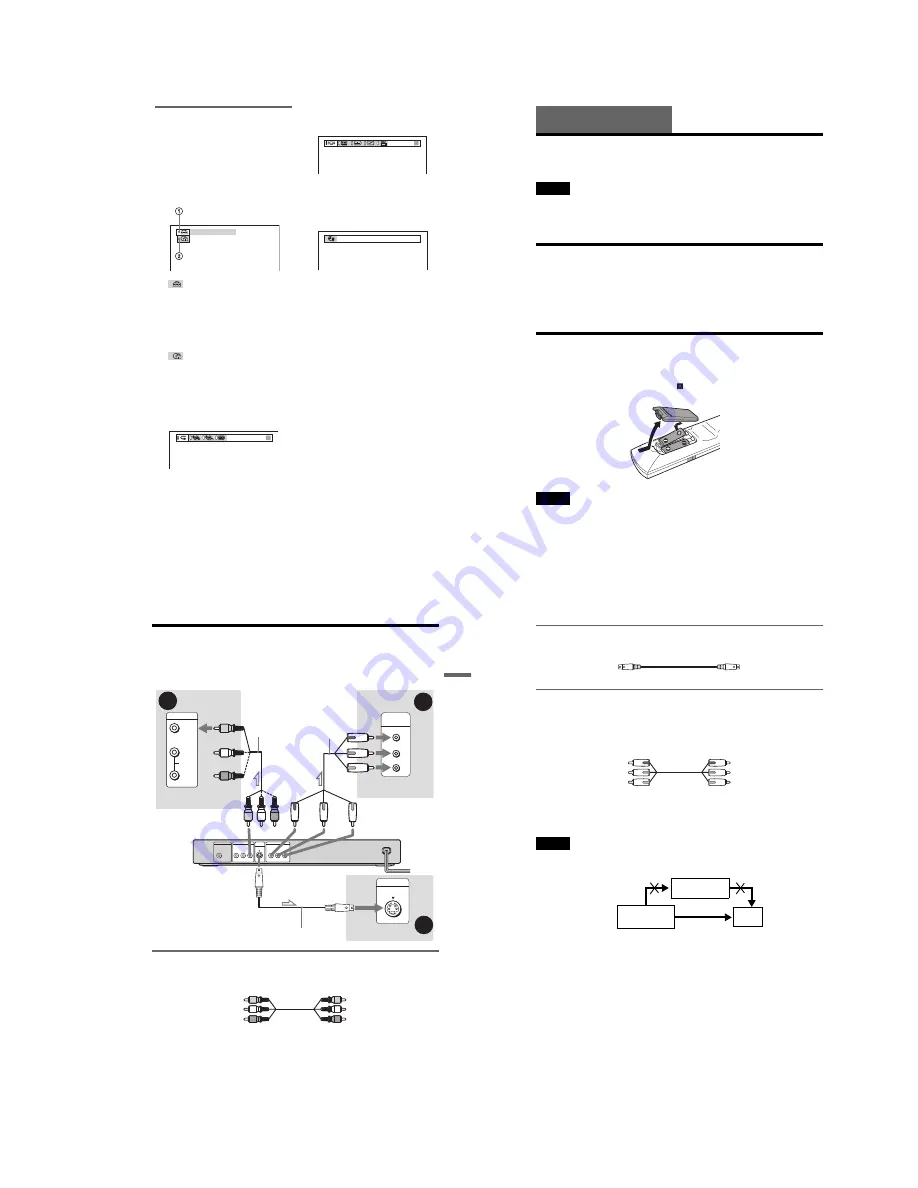
Displaying the Control Bar in
stop mode
The following displays appear when the
DISPLAY button is repeatedly pressed
during stop mode. You can make basic
adjustments and customize the player to suit
your viewing preferences.
◆
Display 1
The following settings can be made.
A
SETUP (53)
• Select QUICK to make the minimum
number of basic adjustments for using the
player.
• Select CUSTOM to make a full range of
adjustments.
• Select RESET to return the SETUP
adjustments to the default settings.
B
PARENTAL CONTROL (47)
• Set this to limit the playback of selected
discs on this player.
m
◆
Display 2
Shows the same information as Display 1
during playback.
m
◆
Display 3
Shows the same information as Display 2
during playback.
m
◆
Display 4
Shows the same information as Display 3
during playback.
m
◆
No display
m
◆
Return to Display 1
QUICK
CHAPTER
DVD T41 – 8 T 1:01:57
14
Hookups
Hooking Up the Player
Follow Steps 1 to 6 to hook up and adjust the settings of the player.
Notes
• Plug cords securely to prevent unwanted noise.
• Refer to the instructions supplied with the components to be connected.
• You cannot connect this player to a TV that does not have a video input jack.
• Be sure to disconnect the power of each component before connecting.
Step 1: Unpacking
Check that you have the following items:
• Audio/video cord (pinplug
×
3
y
pinplug
×
3) (1)
• Remote commander (remote) (1)
• Size AA (R6) batteries (2)
• A plug adaptor is included with some models.
Step 2: Inserting Batteries into the Remote
You can control the player using the supplied remote. Insert two Size AA (R6) batteries by
matching the
3
and
#
ends on the batteries to the markings inside the compartment. When
using the remote, point it at the remote sensor
on the player.
Notes
• Do not leave the remote in an extremely hot or humid place.
• Do not drop any foreign object into the remote casing, particularly when replacing the batteries.
• Do not expose the remote sensor to direct light from the sun or a lighting apparatus. Doing so may cause a
malfunction.
• If you do not use the remote for an extended period of time, remove the batteries to avoid possible damage
from battery leakage and corrosion.
15
Hookups
Step 3: Connecting the Video Cords
Connect this player to your TV monitor, projector, or AV amplifier (receiver) using a video cord.
Select one of the patterns
A
through
C
, according to the input jack on your TV monitor,
projector, or AV amplifier (receiver).
A
If you are connecting to a video input jack
Connect the yellow plug of the audio/video cord (supplied) to the yellow (video) jacks. You will
enjoy standard quality images.
Use the red and white plugs to connect to the audio input jacks (page 18). (Do this if you are
connecting to a TV only.)
A
C
P
R
P
B
Y
COMPONENT
VIDEO IN
VIDEO
AUDIO
INPUT
L
R
PCM/DTS/
DOLBY DIGITAL
COAXIAL
DIGITAL OUT
LINE OUT
R-AUDIO-L
VIDEO
PR
Y
COMPONENT VIDEO OUT
PB
S VIDEO
OUT
B
INPUT
S VIDEO
l
: Signal flow
Component
video cord
(not supplied)
Audio/video cord
(supplied)
CD/DVD player
to S VIDEO OUT
to LINE OUT (VIDEO)
TV, projector, or AV
amplifier (receiver)
TV, projector, or AV
amplifier (receiver)
(green)
(blue)
(red)
(yellow)
(blue)
(red)
TV, projector, or AV
amplifier (receiver)
(yellow)
S VIDEO cord (not supplied)
(green)
to COMPONENT
VIDEO OUT
Yellow (Video)
White (L)
Red (R)
Yellow (Video)
White (L)
Red (R)
,
continued
16
B
If you are connecting to an S VIDEO input jack
Connect the S VIDEO cord (not supplied). You will enjoy high quality images.
C
If you are connecting to a monitor, projector, or AV amplifier (receiver)
having component video input jacks (Y, P
B
, P
R
)
Connect the component via the COMPONENT VIDEO OUT jacks using a component video
cord (not supplied) or three video cords (not supplied) of the same kind and length. You will
enjoy accurate color reproduction and high quality images.
When connecting to a wide screen TV
Depending on the disc, the image may not fit your TV screen. If you want to change the aspect
ratio, please refer to page 55.
Note
Connect the player directly to the TV. If you pass the player signals via the VCR, you may not receive a clear
image on the TV screen.
Green
Blue
Red
Green
Blue
Red
VCR
CD/DVD player
TV
Connect
directly
Summary of Contents for DVP NS725P - Progressive-Scan DVD/CD Player
Page 7: ... 7 6 Set complete Fig 6 ...
Page 8: ... 8 MEMO 8E ...
Page 46: ...2 6 2 10 INTERNAL VIEWS MS128 MOUNT TOPVIEW BOTTOMVIEW Optical Device KHM 290AAA A 6061 908 A ...
Page 48: ...2 8 2 8E ...
Page 88: ...DVP NS325 NS330 NS333 NS430 NS433 NS530 NS725P NS730P 4 59 4 60E ...
Page 112: ...6 22 6 22E ...


