background image

42

Using V

arious Functions with the Contr

ol Menu

1 8 ( 3 4 )

1 2 ( 2 7 )

C    0 1 : 3 2 : 5 5

1: ENGLISH

DVD

1 2 3

ALL

Select:                 

SUBTITLE

ENTER

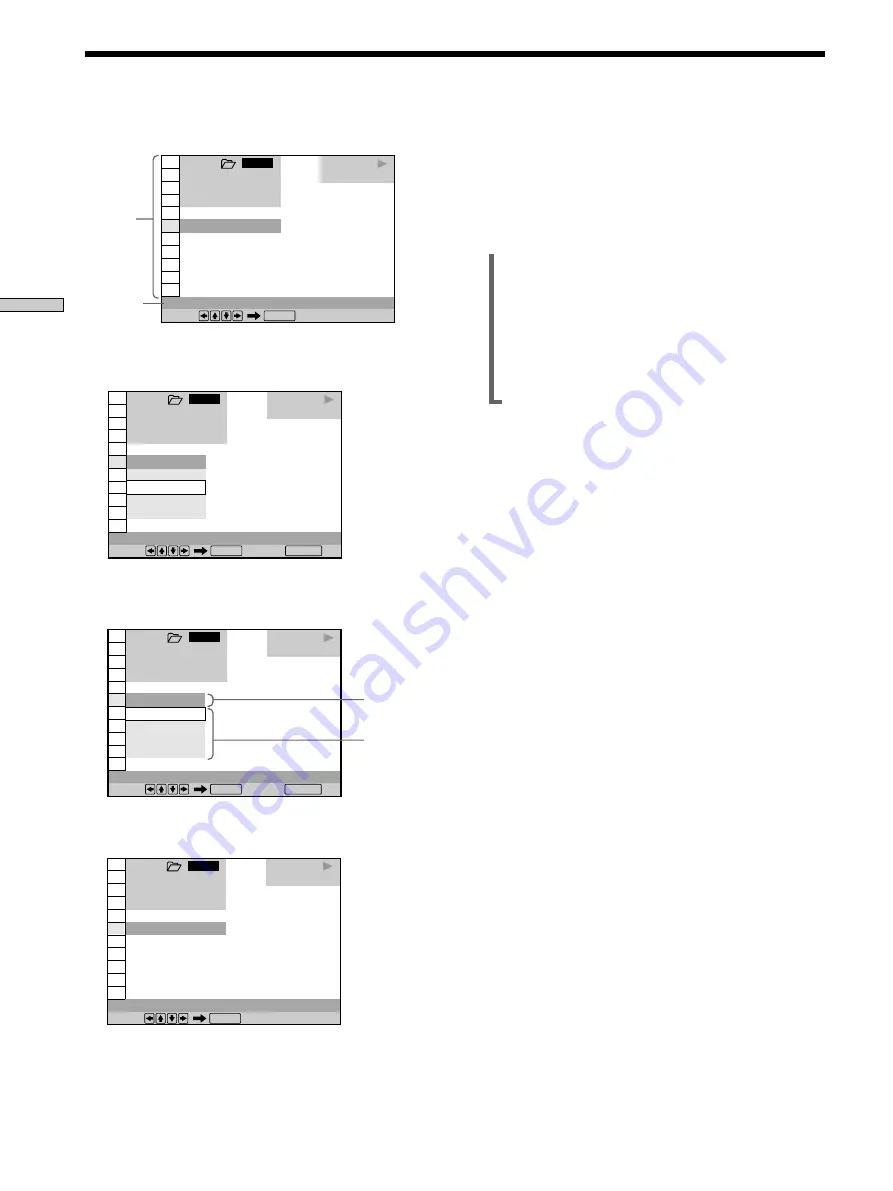
3

Select the item you want using 

M

/

m

.

4

Press ENTER.

5

Select the item you want using 

M

/

m

.

6

Press ENTER.

Items

Items

Selected
item

Selected
item

To cancel while making a selection

Press 

O

RETURN.

To display other items

Each time you press DISPLAY, the Control Menu display
changes as follows:

,

Control Menu display 1

m

Control Menu display 2
(The items except the first three items from the top
are changed to other items.)

m

ADVANCED display (see page 52)

m

Control Menu display off

The Control Menu display items are different depending
on the disc.

z

You can select some items directly

Some items can be selected by pressing the corresponding button
on the remote or on the player.  In this case, only the item you
selected is displayed.  For instructions on using the buttons, see
the pages of each relevant item.  For a list of available buttons on
the player and remote, see pages 88 to 91.

Note

Some Control Menu display items require operations other than
selecting the setting.  For details on these items, see the relevant
pages.

1 8 ( 3 4 )

1 2 ( 2 7 )

C    0 1 : 3 2 : 5 5

OFF
1: ENGLISH
2: FRENCH
3: SPANISH

1: ENGLISH

DVD

1 2 3

ALL

Select:                                  Cancel: 

SUBTITLE

ENTER

RETURN

OFF
1: ENGLISH
2: FRENCH
3: SPANISH

1: ENGLISH

1 8 ( 3 4 )

1 2 ( 2 7 )

C    0 1 : 3 2 : 5 5

DVD

1 2 3

ALL

Select:                                  Cancel: 

SUBTITLE

ENTER

RETURN

1 8 ( 3 4 )

1 2 ( 2 7 )

C    0 1 : 3 2 : 5 5

DVD

1 2 3

ALL

Select:                 

SUBTITLE

ENTER

OFF

Using the Control Menu Display

Summary of Contents for DVP-CX860

Page 1: ...CD DVD Player CD DVD Player 2000 Sony Corporation DVP CX860 3 064 299 32 3 Operating Instructions ...

Page 2: ...the United Kingdom and Republic of Ireland A moulded plug complying with BS1363 is fitted to this equipment for your safety and convenience Should the fuse in the plug supplied need to be replaced a 5 AMP fuse approved by ASTA or BSI to BS1362 i e marked with or mark must be used If the plug supplied with this equipment has a detachable fuse cover be sure to attach the fuse cover after you change ...

Page 3: ...or a Disc Title Chapter Track Index Scene 44 Checking the Playing Time and Remaining Time 45 Selecting a Starting Point Using the Time Code 46 Viewing the Disc Information 47 Changing the Sound 47 Displaying the Subtitles 49 Changing the Angles 50 Digital Cinema Sound Settings 51 Checking the Play Information 52 Locking Discs Custom Parental Control 53 Selecting the Disc Mode 1 Disc or All Discs 5...

Page 4: ...this player plays DVDs and VIDEO CDs according to the disc contents the software producers designed some playback features may not be available Also refer to the instructions supplied with the DVDs or VIDEO CDs About This Manual Conventions Instructions in this manual describe the controls on the player You can also use the controls on the remote if they have the same or similar names as those on ...

Page 5: ...ertain U S patents and other intellectual property rights owned by Macrovision Corporation and other rights owners Use of this copyright protection technology must be authorized by Macrovision Corporation and is intended for home and other limited viewing uses only unless otherwise authorized by Macrovision Corporation Reverse engineering or disassembly is prohibited DTS DTS Digital Surround and D...

Page 6: ... no audio signals If you do the speakers may be damaged when a peak level section is played On cleaning Clean the cabinet panel and controls with a soft cloth slightly moistened with a mild detergent solution Do not use any type of abrasive pad scouring powder or solvent such as alcohol or benzine On cleaning discs Do not use a commercially available cleaning disc It may cause a malfunction If you...

Page 7: ...n control TVs and AV receivers amplifiers using the supplied remote See page 77 Notes Do not leave the remote in an extremely hot or humid place Do not drop any foreign object into the remote casing particularly when replacing the batteries Do not expose the remote sensor to direct sunlight or lighting apparatuses Doing so may cause a malfunction If you do not use the remote for an extended period...

Page 8: ... sound imaging to create virtual rear speakers from the sound of built in TV speakers without using actual rear speakers VES TV Virtual Enhanced Surround TV For details see page 51 To mains TV Required cords SCART EURO AV connecting cord not supplied 2 Be sure to make connections firmly to avoid hum and noise Refer to the instructions supplied with the TV to be connected Notes When you set LINE to...

Page 9: ...or using the supplied S video cord instead of the video connecting cord You will get a better picture When connecting the cords be sure to match the color coded cord to the appropriate jacks on the components Yellow video to Yellow Red right to Red and White left to White Audio Video connecting cord supplied 1 x To listen to the sound through TV speakers x If your TV has an S video input connector...

Page 10: ...ON in the setup display For details see page 74 If you cannot view the pictures from a VCR through this player which is connected to a TV with RGB component connectors set to t Audio Video on your TV When you select RGB the TV cannot receive the signal from the VCR If you want to use your VCR s SmartLink function connect the VCR to your TV s SmartLink connector and connect the CD DVD player to the...

Page 11: ...68 To connect the player to a TV or VCR via a SCAR T EURO AV connector that conforms to the S video signals or RGB signals In the setup display set LINE in CUSTOM SETUP to S VIDEO or RGB For details see page 70 To connect the player to a monitor or pr ojector with component video input connectors that conform to the output signals fr om the COMPONENT VIDEO OUT Y CB CR connectors on the player In t...

Page 12: ...R L TV To audio input Signal flow Receiver Amplifier To mains To S VIDEO OUTPUT To DIGITAL OUT OPTICAL Take off the cap To DIGITAL OUT COAXIAL or or To optical digital input To coaxial digital input Receiver Amplifier with a digital connector MD deck DAT deck etc When connecting the cords be sure to match the color coded cord to the appropriate jacks on the components Red right to Red and White le...

Page 13: ... COAXIAL connector Dolby Digital signals when you set DOLBY DIGITAL in AUDIO SETUP to D PCM MPEG audio When you have made the connections using an optical or coaxial digital connecting cord do not set DOLBY DIGITAL to DOLBY DIGITAL MPEG to MPEG and DTS to ON If you do a loud noise will suddenly come out from the speakers affecting your ears or causing the speakers to be damaged Set the items as sh...

Page 14: ...eo cord supplied 1 When connecting the cords be sure to match the color coded cord to the appropriate jacks on the components Red right to Red and White left to White Be sure to make connections firmly to avoid hum and noise Monaural audio cord not supplied 1 One for a subwoofer White L Red R White L Red R CD L R S VIDEO VIDEO AUDIO INPUT L R AUDIO OUT DIGITAL OUT AUDIO IN OPTICAL COAXIAL PCM DTS ...

Page 15: ...built in DTS Dolby Digital or MPEG decoder not supplied The player outputs the surround sound signals from the DIGITAL OUT OPTICAL and COAXIAL connectors Using a receiver amplifier having the OPTICAL or COAXIAL connector and 6 speakers you can enjoy even greater real audio presence in the comfort of your own home Note When a DVD has a sound track with 7 1 channels recorded in MPEG audio format the...

Page 16: ...NT REAR 5 1 INPUT CENTER TV LD S VIDEO IN VIDEO AUDIO IN S LINK SPEAKERS INPUT S VIDEO IN AUDIO OUT DIGITAL OUT AUDIO IN OPTICAL COAXIAL PCM DTS MPEG DOLBY DIGITAL Y CB CR MEGA CONTROL S VIDEO OUTPUT VIDEO OUTPUT COMPONENT VIDEO OUT T LINE 1 RGB TV WOOFER OUT L R L R i LINE 2 Front speaker L Front speaker R Rear speaker R Rear speaker L Center speaker Subwoofer Active type AV Receiver Amplifier wi...

Page 17: ...ngM m then pr ess or ENTER The languages you can select are displayed 5 Select the desir ed language usingM m then pr ess ENTER 6 Press DISPLAY The setup display disappears 7 Press DISPLAY repeatedly to turn of f the on screen menu LANGUAGE SETUP OSD DVD MENU AUDIO SUBTITLE To set press then ENGLISH FRANÇAIS DEUTSCH ITALIANO ESPAÑOL NEDERLANDS DANSK SVENSKA ENTER ENGLISH To quit press DISPLAY Pour...

Page 18: ... OPEN CLOSE to open the front cover 3 Press and holdX on the player for mor e than thr ee seconds You will hear one beep and the Sound Feedback function is turned on To turn off the Sound Feedback Function When the front cover is open press and hold X on the player for more than three seconds You will hear two beeps and the Sound Feedback function is turned off X To return to the previous screen P...

Page 19: ...able turns and the disc slot at the loading position is set to the playing position z You can select a disc slot number by skipping by 10 slots When you select the disc slot number in Step 4 press DISC SKIP on the remote Ten disc slots each before and after from the current disc slot number will be skipped Notes When you insert an 8 cm 3 inch CD be sure to attach a Sony CD single adaptor not suppl...

Page 20: ...ayer and the EASY PLAY slot comes to the loading position the front cover opens EASY PLAY EASY PLAY slot 2 Insert the disc 3 Press EASY PLAY again The front cover closes and playback of the EASY PLAY disc starts If you press EASY PLAY when there is a disc in the EASY PLAY slot The player loads the disc information and starts playback of the disc z EZ appears in the front panel display when the EAS...

Page 21: ...Press AEJECT on the player The loading guide rises so that you can remove the disc easily 6 Remove the disc 7 Repeat Steps 4 to 6 to r emove other discs 8 Close the fr ont cover by pr essing OPEN CLOSE Loading guide If you replace a disc in Step 6 The loading guide automatically goes down after few seconds If you want to place another disc in the same slot wait until the loading guide goes down be...

Page 22: ...ayer The power indicator lights up in green 4 Press H The player starts playback Adjust the volume on the TV or the receiver amplifier To change the disc Press DISC CHANGE to turn the indicator on Then turn the dial until the desired disc number appears on the front panel display Press the dial to start playback Playing Discs Playing Discs This chapter describes how to play a DVD CD VIDEO CD H Pow...

Page 23: ... COAXIAL connectors If you play a CD with a DTS sound track a loud noise may come out fr om the AUDIO OUT connectors af fecting your ears orcausingthespeakerstobedamaged Notes on playing DTS sound tracks on a DVD ThesignalsoftheDTSsoundtracksar eoutputfr omthe DIGIT AL OUT OPTICAL and COAXIAL connectors only No sound will be output fr om the AUDIO OUT connectors Iftheplayerisconnectedtoanaudiocomp...

Page 24: ... Program Play using the on screen menu Control Menu For Control Menu operations see page 41 Operation On the player Press DISC CHANGE to turn the indicator on Then turn the dial until the desired disc number appears on the front panel display Press the dial to start playback Press DISC SKIP on the remote Press x Press X Press X or H On the player Press DIRECT SEARCH to turn it on and turn the dial...

Page 25: ...k speed goesto2 Mor 2matonce Playing at Various Speeds Frame by Frame Click shuttle JOG Click shuttle JOG 1 2 3 4 5 6 7 8 9 0 A B C D ALL DVD EDIT MEGA SORT FILE LOAD CD TIME FLIP FLIP 1 2 3 4 5 6 7 8 9 0 A B C D ALL DVD EDIT MEGA SORT FILE LOAD CD TIME Playing Side B FLIP You can play side B without ejecting the disc to turn it over Side B is the side facing right when you insert the disc into th...

Page 26: ... Ifyoudon toperatetheclickshuttleforabout20secondsafter pressingJOG itr eturnstoshuttlemode Ontheplayer itstays injogmode During pause 1ySlow playbackdir ection Y 2y Slow playback dir ection slower than 1 y Y X Pause Y 2 y Slow oppositedir ection slowerthan 1 y Y 1 y Slow oppositedir ection When you play back a CD VIDEO CD During playback 2MFastfor ward fasterthan 1 M Y 1MFastfor ward Y 2B abouttw...

Page 27: ... of the disc Whentheplayingtimeappearsonthefr ontpaneldisplaybefor e youstar tplaying pr ess xtoresettheplayingtime thenpr ess H Resuming Playback from the Point Where You Stopped the Disc Resume Play x H x H 1 2 3 4 5 6 7 8 9 0 A B C D ALL DVD EDIT MEGA SORT FILE LOAD CD TIME Notes Resume Play may not be available on some DVDs Resume Play is not available in Shuf fle or Program Play mode Dependin...

Page 28: ...DVD MENU ENTER 1 2 3 4 5 6 7 8 9 0 A B C D ALL DVD EDIT MEGA SORT FILE LOAD CD TIME 1 2 3 4 5 6 7 8 9 0 A B C D ALL DVD EDIT MEGA SORT FILE LOAD CD TIME Some DVDs have a title menu or a DVD menu that is provided with DVDs only Using the title menu A DVD is divided into long sections of a picture or a music feature called titles When you play a DVD which contains several titles you can select the t...

Page 29: ...ETURN ENTER M m H H ORETURN DIRECT SEARCH 1 2 3 4 5 6 7 8 9 0 A B C D ALL DVD EDIT MEGA SORT FILE LOAD CD TIME ENTER 4 Follow the instructions in the menu for interactive operations Refer to the instructions supplied with the disc as the operating procedure may differ according to the VIDEO CD To go back to the menu Press ORETURN or zTo cancel PBC playback of a VIDEO CD with PBC functions and play...

Page 30: ...1 You can check information about the disc such as the total number of titles or tracks or remaining time using the front panel display zTo change the brightness of the front panel display Press DIMMER on the player Each time you pr ess the button the frontpaneldisplayandindicatorsontheplayerbecomedark of f orbrightinsequence Thepowerindicatorisnottur nedof fby pressingDIMMERhowever Youcanchangeth...

Page 31: ...t or Disc Memo is recorded Current disc number Current folder Lights up while searching next disc Checking the remaining time Press TIME TEXT on the player or set the TV DISC BROWSER DVD switch to DVD or DISC BROWSER and press TIME on the remote Each time you pr ess TIME TEXT or TIME while playing the disc thedisplaychangesasshowninthefollowingchart Note While you ar e doing Shuf fle Play or Progr...

Page 32: ...D TEXT Disc Memo Current disc Current folder is highlighted FOLDER ALL 1 2 3 4 5 6 7 8 9 0 A B C D ALL DVD EDIT MEGA SORT FILE LOAD CD TIME FOLDER ALL FOLDER CD FOLDER A B C D FOLDER DVD FOLDER DVD FOLDER CD FOLDER A B C D Displaying the Disc Information Disc Browser LOAD Set the TV DISC BROWSER DVD switch to DISC BROWSER LOAD 1 2 3 4 5 6 7 8 9 0 A B C D ALL DVD EDIT MEGA SORT FILE LOAD CD TIME Yo...

Page 33: ...d then pressing it pressing DISC SKIP on the remote 3 Press ENTER The Disc Browser disappears and playback starts To cancel using the Disc Browser Press ORETURN Notes If you press a FOLDER button during playback the playback stopsandtheDiscBr owserappears Inthiscase theResume Play is not available Even if you have r emoved the disc fr om the player the disc informationofthediscr emainsontheDiscBr ...

Page 34: ...n press the DISC CHANGE button followed by turning and pressing the dial 4 Press ENTER To file more than one disc repeat Steps 3 and 4 5 Press FOLDER A FILE disappears from the Disc Browser Then the Disc Browser for Folder A containing the selected discs appears Set the TV DISC BROWSER DVD switch to DISC BROWSER Selected disc Cursor moves to the next disc 1 2 3 4 5 6 7 8 9 0 A B C D ALL DVD EDIT M...

Page 35: ...sappears from the folder FILE disappears from the Disc Browser To cancel the file mode Press ORETURN FILE disappears from the Disc Browser Selected disc Cursor moves to the next disc ALL DVD CD A B C D FILE 2 Music Madness 4 11 23 CD CD CD CD Select Cancel ENTER RETURN To cancel the file mode Press ORETURN FILE disappears from the Disc Browser z You can sort the discs by genre or text information ...

Page 36: ...c Browser Edit Mode Z Set the TV DISC BROWSER DVD switch to DISC BROWSER 1 2 3 4 5 6 7 8 9 0 A B C D ALL DVD EDIT MEGA SORT FILE LOAD CD TIME EDIT Click shuttle ENTER M m ALL DVD CD A B C D EDIT 2 Music Madness 4 23 CD CD CD Cancel ENTER RETURN Classical ORETURN You can label the disc with a personal title of 16 characters Disc Memo when DVD TEXT or CD TEXT is not recorded on the disc and the fold...

Page 37: ...display or the FOLDER NAME INPUT display disappears and the Disc Memo or folder name is stored To cancel the edit mode Press ORETURN EDIT disappears from the Disc Browser To correct the characters You can correct the characters using the dial on the player or on the remote To use the dial press DIRECT SEARCH to turn it on To erase the characters 1 Move the cursor to the character you want to erase...

Page 38: ... IBM compatible PC keyboard of the USA model not supplied on the DISC MEMO INPUT or FOLDER NAME INPUT display Powerconsumptionmustbe120mAorless KEYBOARD jack 1 Connect a keyboar d to the KEYBOARD jack on the front panel when the power of the player is not on 2 Turn on the player 3 Do Steps 1 and 2 of Labeling a disc or folder to display the DISC MEMO INPUT or FOLDER NAME INPUT display 4 Input the ...

Page 39: ... the selected disc is stored in memory If no jacket picture is recorded in the disc the genre picture in the memory of the player is displayed 5 Press ORETURN to r eturn to the original Disc Browser display To cancel the edit mode Press ORETURN EDIT disappears from the Disc Browser ALL DVD CD A B C D EDIT Skiing the World Music Madness 1 2 3 4 CD Action DVD CD VIDEO CD 5 VIDEO CD Cancel ENTER RETU...

Page 40: ...sorting item indicator moves to the selected item 5 Press ENTER The discs are sorted and re displayed The sorted order remains even if the power of the player is turned off z The disc order in the same genre Thediscsinthesamegenr earesor tedbynumericalor derofthe disc slot number ALL DVD CD A B C D SORT 1 Super Car Chase Skiing the World BRAHMS SYMPHONY4 Music Madness 2 3 4 5 Action Classical DVD ...

Page 41: ...ng angles make Digital Cinema Sound settings and other such operations The possible operations are different depending on the kind of disc For details on each Control Menu display item see pages 43 to 63 1 Select the desired folder 2 Press DISPLAY to show the Control Menu display on the TV screen DISPLAY ENTER M m DISPLAY ENTER M m ORETURN ORETURN Current item DVD 1 8 3 4 1 2 2 7 C 0 1 3 2 5 5 Sel...

Page 42: ... depending on the disc zYou can select some items directly Some items can be selected by pressing the corresponding button on the remote or on the player In this case only the item you selected is displayed For instructions on using the buttons see the pages of each relevant item For a list of available buttons on the player and remote see pages 88 to 91 Note Some Control Menu display items requir...

Page 43: ...u can change the angle of the scene VES DVD only page 51 Select a mode to enjoy multichannel surround sound such as Dolby Digital or MPEG Even if you connect only TV or front speakers Virtual Enhanced Surround VES lets you enjoy 3D sound by using 3D sound imaging to create virtual rear speakers from the sound of the front speakers L R without using actual rear speakers ADVANCED DVD only page 52 Yo...

Page 44: ...h PBC functions SCENE is displayed 1 Select DISC TITLE CHAPTER TRACK INDEX or SCENE using M m is highlighted refers to a number The number in parentheses indicates the total number of titles chapters tracks indexes or scenes DVD 1 8 3 4 1 2 2 7 C 0 1 3 2 5 5 1 2 3 ALL Select CHAPTER ENTER 1 8 3 4 1 2 2 7 DVD 1 2 3 ALL C 0 1 3 2 5 5 Select TITLE ENTER A B REPEAT page 60 You can play a specific port...

Page 45: ...Remaining Time You can check the playing time and remaining time of the current title chapter or track and the total playing time or remaining time of the disc Press DISPLAY Then press TIME TEXT on the player or set the TV DISC BROWSER DVD switch to DVD or DISC BROWSER and press TIME on the remote to change the time information You can also check the DVD TEXT CD TEXT or Disc Memo page 47 When play...

Page 46: ...TER Time code changes to T 3 Input the time code using the number buttons then press ENTER The player starts playback at the selected time code To cancel the number press CLEAR before pressing ENTER To cancel while making a selection Press ORETURN Note When you input the time code input the playing time of the title not the chapter or track time Selecting a Starting Point Using the Time Code Z DVD...

Page 47: ...ht channel monaural Changing the Sound DVD AUDIO 2 ENGLISH 3 FRENCH 1 ENGLISH 1 8 3 4 1 2 2 7 C 0 1 3 2 5 5 L R C DOLBY DIGITAL 3 2 1 PROGRAM FORMAT LFE LS RS 1 ENGLISH 1 2 3 ALL Select Cancel ENTER RETURN DVD 1 8 3 4 1 2 2 7 C 0 1 3 2 5 5 TIME MEMO BRAHMS SYMPHONY NO 4 1 2 3 ALL Disc Memo or DVD CD TEXT Viewing the Disc Information You can check the DVD TEXT CD TEXT or Disc Memo on the TV screen ...

Page 48: ...F in AUDIO SETUP the DTS track selection option will not appear on the screen even if the disc contains DTS tracks Displaying the audio information of the disc When you select AUDIO the channels being played are displayed on the screen For example in Dolby Digital format multiple signals ranging from monaural to 5 1 channel signals can be recorded on a DVD Depending on the DVD the number of the re...

Page 49: ...tles on even if they are recorded on the DVD Depending on the DVD you may not be able to turn the subtitles off The type and number of languages for subtitles vary from disc to disc Depending on the DVD you may not be able to change the subtitles even if multilingual subtitles are recorded on it While playing the DVD the subtitle may change when you open the front cover you change the title 1 8 3 ...

Page 50: ...e Angles Z 1 8 3 4 1 2 2 7 C 0 1 3 2 5 5 DVD 1 2 3 ALL 1 9 Select ANGLE ENTER Indicator 3 Select the angle number using the number buttons or M m then press ENTER The angle is changed to the selected angle zYou can select the angle directly Press ANGLE on the remote Each time you press the button the angle changes zYou can display different angles simultaneously ANGLE VIEWER You can display all th...

Page 51: ...each item The default setting is underlined OFF VES TV VES A VES B VIRTUAL SEMI MULTI DIMENSION 1 8 3 4 1 2 2 7 C 0 1 3 2 5 5 DVD 1 2 3 ALL VES A VES TV VES TV VES Select Cancel ENTER RETURN Indicator Effects of each item OFF Outputs 2 channel signals for stereo sound 5 channel signals for Dolby Digital sound of a DVD are mixed down to 2 channels VES Virtual Enhanced Surround TV Uses 3D sound imag...

Page 52: ...A VES B or VIRTUAL SEMI MULTI DIMENSION When you select VES TV VES A VES B or VIRTUAL SEMI MULTI DIMENSION set the surround settings of the connected units such as the amplifier to OFF L R You can check information such as the bit rate or the disc layer that is being played While playing a disc the approximate bit rate of the playback picture is always displayed as Mbps Mega bit per second and the...

Page 53: ...1 8 3 4 1 2 2 7 C 0 1 3 2 5 5 DVD 1 2 3 ALL OFF CUSTOM PARENTAL CONTROL Select ENTER 1 8 3 4 1 2 2 7 C 0 1 3 2 5 5 DVD 1 2 3 ALL OFF PASSWORD CUSTOM PARENTAL CONTROL Select Cancel ENTER RETURN ON Locking Discs Custom Parental Control Z Appears when the DVD has dual layers When you play MPEG audio sound tracks Bit rate refers to the amount of video audio data per second in a disc The higher the bit...

Page 54: ...pears 5 Enter the same 4 digit password using the number buttons then press ENTER Custom parental control is set appears and then the screen returns to the Control Menu display To return to the normal screen Press ORETURN To turn off the Custom Parental Control function 1 Select the disc for which you want to turn off the Custom Parental Control function 2 Select CUSTOM PARENTAL CONTROL using M m ...

Page 55: ...e remote or the player Each time you press the button 1 DISC or ALL DISCS mode is selected ALL DISCS ALL DISCS 1 DISC 1 8 3 4 1 2 2 7 DVD 1 2 3 ALL 1 ALL DISCS Select Cancel ENTER RETURN CUSTOM PARENTAL CONTROL Custom parental control is already set To play enter your password and press ENTER Playing the disc for which the Custom Parental Control is set 1 Select the disc The CUSTOM PARENTAL CONTRO...

Page 56: ...not be played during Program Play To play all the discs in the program select the ALL folder before you start Program Play Creating Your Own Program Program Play Z Creating the program 1 Select SET in PROGRAM The programming display appears and 1 is highlighted 2 Press ENTER It is ready to set the first disc of a title or track for Program Play 3 Select the disc you want to program using the numbe...

Page 57: ...ation Press LOAD when the player is in standby or stop mode so that the player reads and loads the disc information zDisc types are abbreviated on screen as follows DVD D VCD V CD C 4 Select the title chapter or track you want to program using M m then press ENTER You can also use the number buttons and ENTER button to make a selection In this case the selected number is displayed on the screen x ...

Page 58: ...aying order By selecting 1 ALL DISCS you can have the player shuffle one disc or all of the discs in the selected folder Select SHUFFLE after pressing DISPLAY When you select a shuffle mode other than OFF the SHUFFLE indicator lights up in green x SHUFFLE Selects the Shuffle Play setting The default settings are underlined When playing a DVD and when Program Play is set to OFF OFF does not play th...

Page 59: ...s in all discs in the folder when you select ALL DISCS TITLE repeats the current title on a disc CHAPTER repeats the current chapter When playing a VIDEO CD CD and when Program Play and Shuffle Play are set to OFF OFF does not play repeatedly DISC repeats all tracks on the selected disc when you select 1 DISC in 1 ALL DISCS and repeats all tracks in all discs in the folder when you select ALL DISC...

Page 60: ...c Portion A B Repeat You can play a specific portion of a title chapter or track repeatedly This function is useful when you want to do such things as memorize lyrics During PBC Playback of VIDEO CDs page 29 this function is available only while playing moving pictures Select A B REPEAT after pressing DISPLAY During A B Repeat Play the A B REPEAT indicator lights up in green x A B REPEAT The defau...

Page 61: ...nding on the disc there are some scenes you may not be able to watch with the strobe play function The sound is muted when using this function C 0 1 3 2 5 5 A 18 01 32 55 CHAPTER TIME Set point B with ENTER Cancel CLEAR A B REPEAT 1 8 3 4 1 2 2 7 DVD 1 2 3 ALL A 18 01 32 55 B 18 01 34 30 CHAPTER TIME ON Select ENTER A B REPEAT 3 During playback when you find the starting point point A of the porti...

Page 62: ...displayed on the front panel display To cancel scanning the title chapter or track Press ORETURN Notes Depending on the disc you may not be able to scan the title chapter or track The sound is muted when using this function Displaying different angles simultaneously With DVDs on which various angles multi angles for a scene are recorded you can display all of the angles recorded on the disc on the...

Page 63: ... you want Bookmark Up to 9 bookmarks per disc for up to 301 slots can be stored in memory Select BOOKMARK in VIEWER The bookmarks appear on the screen To start playback from the selected picture Select the picture using M m then press ENTER Playback starts from the selected picture To cancel scanning the bookmark pictures Press ORETURN To reset the bookmark Select the bookmark you want to reset us...

Page 64: ...y you can do the initial setup adjust the picture and sound and set the various outputs You can also set a language for the subtitles and the setup display limit playback by children and so on For details on each setup display item see pages 67 to 76 Note You can display the setup display only when the player is in stop mode 1 Press DISPLAY and select SETUP using M m DVD 1 2 3 ALL 1 8 3 4 1 2 1 C ...

Page 65: ...quit press 16 9 ON JACKET PICTURE STARTUP SCREEN STANDARD ENTER DISPLAY SCREEN SETUP TV TYPE SCREEN SAVER BACKGROUND To set press then To quit press 16 9 16 9 4 3 LETTER BOX STARTUP SCREEN 4 3 PAN SCAN ENTER DISPLAY SCREEN SETUP TV TYPE SCREEN SAVER BACKGROUND To set press then To quit press 4 3 PAN SCAN ON JACKET PICTURE STARTUP SCREEN STANDARD ENTER DISPLAY 6 Press ENTER 7 Select the setting you...

Page 66: ...PICTURE MEMORY STARTUP SCREEN STANDARD PICTURE MEMORY SCREEN SAVER ON OFF AUDIO SETUP page 74 CUSTOM SETUP page 70 AUTO PLAY OFF TIMER DEMO1 DEMO2 DIMMER BRIGHT DARK OFF PAUSE MODE AUTO FRAME PARENTAL CONTROL BOOKMARK RESET COMPONENT OUT OFF ON LINE VIDEO S VIDEO RGB DVD MENU OTHERS FRANÇAIS DEUTSCH NEDERLANDS ESPAÑOL DANSK ITALIANO SVENSKA SUOMI NORSK PORTUGUÊS CHINESE JAPANESE ENGLISH 4 3 LETTER...

Page 67: ... for the DVD menu ENGLISH English FRANÇAIS French DEUTSCH German ITALIANO Italian ESPAÑOL Spanish NEDERLANDS Dutch DANSK Danish SVENSKA Swedish SUOMI Finnish NORSK Norwegian PORTUGUÊS Portuguese Russian CHINESE Chinese JAPANESE Japanese OTHERS When you select OTHERS select and enter the language code from the list using the number buttons page 87 After you have made a selection the language code 4...

Page 68: ... The default settings are underlined Select SCREEN SETUP in the setup display x TV TYPE Selects the aspect ratio of the TV to be connected 16 9 select this when you connect a wide screen TV to the player 4 3 LETTER BOX select this when you connect a normal TV to the player Displays a wide picture with bands on the upper and lower portions of the screen 4 3 PAN SCAN select this when you connect a n...

Page 69: ...UND Selects the background color or picture on the TV screen in stop mode or while playing a CD JACKET PICTURE The jacket picture appears in the background but only when the jacket picture is already recorded on the disc PICTURE MEMORY Your favorite picture appears in the background For an explanation of how to store your favorite scene recorded on the disc for the background picture see the follo...

Page 70: ...press then To quit press VIDEO COMPONENT OUT OFF OFF BRIGHT AUTO TRACK SELECTION OFF ON ENTER PARENTAL CONTROL DISPLAY PLAYBACK MEMORY BOOKMARK RESET x AUTO PLAY Selects the Auto Play setting when you connect the AC power cord to the AC outlet mains OFF does not use TIMER DEMO1 or DEMO2 to start playback TIMER starts playing when the player is turned on or at any time you want when connected to a ...

Page 71: ...limitation level Select CUSTOM SETUP in the setup display 1 Select PARENTAL CONTROL using M m then press ENTER x When you have not entered a password The display for entering a password appears CUSTOM SETUP LINE AUTO PLAY DIMMER PAUSE MODE To set press then To quit press VIDEO COMPONENT OUT OFF OFF BRIGHT AUTO TRACK SELECTION OFF ON ENTER PARENTAL CONTROL DISPLAY PLAYBACK MEMORY BOOKMARK RESET CUS...

Page 72: ... Playing a disc which is blocked by the playback limitation level 1 Insert the disc and press H The PARENTAL CONTROL display appears 2 Enter your 4 digit password using the number buttons then press ENTER The player starts playback When you stop playing the DVD the level returns to the original level zIf you forget your password Enter the 6 digit number 199703 whenever the PARENTAL CONTROL display...

Page 73: ...u play a DVD on which multiple audio formats PCM DTS MPEG audio or Dolby Digital format are recorded OFF No priority given AUTO Priority given Notes When you set this item to AUTO the language may change depending on the AUDIO settings in LANGUAGE SETUP The TRACK SELECTION setting has higher priority than the AUDIO settings in LANGUAGE SETUP page 67 If you set DTS in AUDIO SETUP to OFF the DTS sou...

Page 74: ...MIX Switches the mixing down methods when you play a DVD on which rear signal components such as LS RS or S are recorded in Dolby Digital format For details on the rear signal components see Displaying the audio information of the disc page 48 The DOWNMIX setting affects the following connectors AUDIO OUT connectors DIGITAL OUT OPTICAL and COAXIAL connectors when you set DOLBY DIGITAL to D PCM in ...

Page 75: ...gnal Switches the methods of outputting audio signals when you connect 1 a digital component such as a receiver amplifier having a digital connector 2 an audio component having a built in decoder Dolby Digital MPEG or DTS 3 a DAT or MD via the DIGITAL OUT OPTICAL or COAXIAL connector using an optical or coaxial digital connecting cord For connection details see pages 12 and 16 When you select ON s...

Page 76: ...signal select this If you feel a lack of bass frequencies from the front speakers when you select this select MIDDLE Notes If an LFE signal is not recorded on the disc no sound will be output from the subwoofer even if you select LARGE When you play MPEG audio sound track an LFE signal is not output from the WOOFER OUT connector MIDDLE If you connect large speakers that will effectively reproduce ...

Page 77: ...via the SCART EURO AV connectors the input source for the TV is set to the player automatically when you start playback or press any button except for 1 In this case press TV DVD to return the input to the TV Notes Depending on the TV you may not be able to control your TV or to use some of the buttons above If you use number buttons to select the TV s program position press followed by the number...

Page 78: ...r amplifier Manufacturer Code number Sony 91 default 89 Denon 84 85 86 Kenwood 92 93 Onkyo 81 82 83 Pioneer 99 Sansui 87 Technics 97 98 Yamaha 94 95 96 Notes If you enter a new code number the code number previously entered will be erased When you replace the batteries of the remote the code number may be reset to the default setting Reset the appropriate code number Controlling the AV receiver am...

Page 79: ...ted below are effective while the MEGA CONTROL button is lit 1 Set the command mode selector of the CD changer to CD 3 2 Set the TV DISC BROWSER DVD switch to DISC BROWSER or DVD 3 Turn on the player and the CD changer 4 Press MEGA CONTROL on the player or MEGA on the remote The MEGA CONTROL button on the front panel lights up and the display shows the current disc number in the CD changer 5 Selec...

Page 80: ... the remote Press 6 Press H on the player to start playing Playback starts and the display shows the current disc and track numbers and the playing time of the track While the MEGA CONTROL button on the front panel is lit you can control the CD changer with the controls on the player as follows Controlling the CD Changer Mega Control Notes Connect only a Sony 5 50 200 300 CD changer to the MEGA CO...

Page 81: ...tup display set LINE and COMPONENT OUT in CUSTOM SETUP to the appropriate item conforms to your system page 70 OFF in COMPONENT OUT under CUSTOM SETUP is selected when you have connected the player to a monitor or projector via only the COMPONENT VIDEO OUT connectors To view the picture connect the monitor via LINE 1 VIDEO OUTPUT or S VIDEO OUTPUT Picture noise appears Clean the disc If the video ...

Page 82: ...IAL connector page 23 Sound is noisy Clean the disc When you play a CD with DTS sound tracks noise will come from any connector other than the DIGITAL OUT OPTICAL or COAXIAL connector page 23 Sound distortion occurs In the setup display set AUDIO ATT in AUDIO SETUP to ON page 74 The sound loses its stereo effect when you play a VIDEO CD or a CD Set AUDIO to STEREO in the Control Menu display page ...

Page 83: ... on the DVD Changing the language for the track is prohibited on the DVD The subtitle language cannot be changed when you play a DVD Multilingual subtitles are not recorded on the DVD Changing the language for the subtitles is prohibited on the DVD The subtitles cannot be turned off when you play a DVD Depending on the DVD you may not be able to turn the subtitles off The angles cannot be changed ...

Page 84: ...ly opens and the player enters standby mode When you contact your Sony dealer or local authorized Sony service facility remove all of the discs in the player and give the 5 character service number example E 61 10 C 13 00 Specifications CD DVD player Laser Semiconductor laser Signal format system PAL NTSC Audio characteristics Frequency response DVD PCM 96 kHz 2 Hz to 44 kHz 1 0 dB DVD PCM 48 kHz ...

Page 85: ...d in a home It simulates the sound of a movie editing studio instead of the usual concert hall so that you can enjoy the surround sound of a movie theater in the comfort of your own home The VES Virtual Enhanced Surround system contained in DCS programs can create the sound image of virtual rear speakers from the sound of the front speakers L R without using actual rear speakers Dolby Digital page...

Page 86: ... limit playback of the disc according to the age of the user and the limitation level in each country The limitation varies from disc to disc when it is activated playback is completely prohibited violent scenes are skipped or replaced with other scenes and so on Playback Control PBC page 29 Signals encoded on VIDEO CDs Version 2 0 to control playback By using menus recorded on VIDEO CDs with PBC ...

Page 87: ...h 1150 Estonian 1151 Basque 1157 Persian 1165 Finnish 1166 Fiji 1171 Faroese 1174 French 1181 Frisian 1183 Irish 1186 Scots Gaelic 1194 Galician 1196 Guarani 1203 Gujarati 1209 Hausa 1217 Hindi 1226 Croatian 1229 Hungarian 1233 Armenian 1235 Interlingua 1239 Interlingue 1245 Inupiak 1248 Indonesian 1253 Icelandic 1254 Italian 1257 Hebrew 1261 Japanese 1269 Yiddish 1283 Javanese 1287 Georgian 1297 ...

Page 88: ...button and indicator 24 Press to use the dial to locate the chapter or track 9 OPEN CLOSE button 19 Opens or closes the front cover q DISC CHANGE button and indicator 19 22 Press to use the dial to rotate the disc slots or select disc 1 2 3 4 5 6 7 8 9 q qa qs qd qf qg qh qj qk ql w wa ws wd wf wg wh wj ea e wk wl qa EASY PLAY button and indicator 20 Press to play the EASY PLAY disc or bring the E...

Page 89: ... LINE 2 7 VIDEO OUTPUT connectors 9 Connect to the video input connector on your TV or monitor 8 S VIDEO OUTPUT connectors 12 14 16 Connect to the S video input connector on your TV or monitor 9 COMPONENT VIDEO OUT connectors 10 Connects to a monitor or projector having component video input connectors Y CB CR that conform to output signals from the player q MEGA CONTROL connector 79 Connect to th...

Page 90: ...n the player or place it in standby mode after power is connected by pressing on the player qd VOL buttons 77 78 When 1 is set to DISC BROWSER or DVD controls the AV receiver amplifier volume When 1 is set to TV controls the TV volume qf PROG DISC SKIP buttons 24 77 When 1 is set to DISC BROWSER or DVD searches the discs in the folder DISC SKIP When 1 is set to TV selects the program position of t...

Page 91: ...1 is set to TV switches the wide picture on or off WIDE MODE When 1 is set to DVD or DISC BROWSER press to control the connected CD changer MEGA wl TV DVD button 77 Switches the TV s input source between the TV and CD DVD player e SUBTITLE EDIT button 36 49 When 1 is set to DVD or TV displays the SUBTITLE display on the TV screen SUBTITLE When 1 is set to DISC BROWSER enters the EDIT mode to label...

Page 92: ...Disc Browser 32 Disc Memo 36 Display Control Menu display 41 Front panel display 30 Setup display 64 DOLBY DIGITAL 12 75 DOWNMIX 74 DTS 15 75 DVD 4 22 DVD menu 28 DVD MENU 67 E EASY PLAY 20 EDIT 36 F Fast Forward 25 Fast Rewind 25 FILE 34 Folder 32 34 Front panel display 30 G GENRE 38 H Handling discs 6 Hooking up 8 12 14 15 I Index 5 44 INDEX 44 J Jacket Picture 33 69 K Keyboard 38 L LANGUAGE SET...

Page 93: ...fle Play 58 Side B 25 Slow motion Play 26 SORT 39 SPEAKER SETUP 76 STARTUP SCREEN 69 STROBE PLAYBACK 61 SUBTITLE 49 68 T TIME MEMO 45 46 47 TIME TEXT 45 46 47 Title 5 44 86 TITLE 44 Title menu 28 TITLE VIEWER 61 Track 5 44 86 TRACK 44 TRACK SELECTION 73 TRACK VIEWER 61 Troubleshooting 81 TV TYPE 68 U Usable discs 4 V W X Y Z VES 51 VIDEO CD 4 22 VIEWER 61 ...

Page 94: ......

Page 95: ......

Page 96: ...Sony Corporation Printed in Japan ...

Reviews: