background image

14

Setting Up

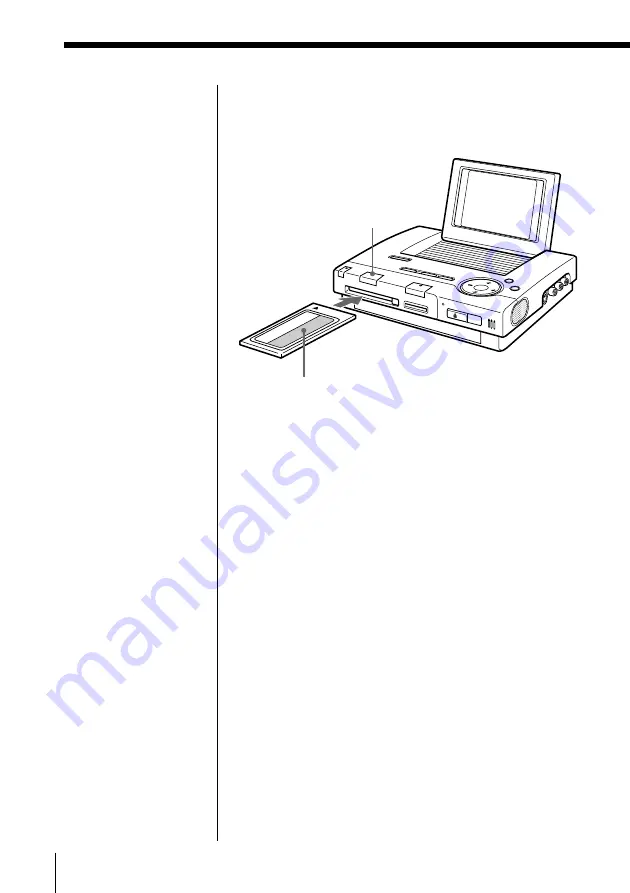
Inserting a PC card

With the arrow facing upward and on the left, insert
the PC card into the PC card insertion slot until it clicks
into place.

Notes

• While this system is

reading/writing data
(PC CARD indicator
flashes), do not eject the
PC card. Otherwise, the
data may be erased or
damaged.

• While this system is

operating, do not move,
lift it up, or disconnect
the AC power cord.

• If the PC card does not

fit into the slot
properly, check the
direction of the arrow
on the PC card.  Then
re-insert it into the slot.

• Do not attempt to force

the PC card into or out
of the slot.  Otherwise,
the PC card or the file
may be damaged.

Ejecting the PC card

Check that the PC CARD indicator is not flashing, then
press the PC card eject button.  After the PC card pops
out, remove it slowly.

PC card

Connecting the filing system 

(continued)

PC CARD
indicator

Summary of Contents for DPF-P7

Page 1: ...DPF P7D DPF P7 3 062 862 11 1 2000 Sony Corporation Digital Picture Filing System Operating Instructions Before operating this unit please read this manual thoroughly and retain it for future reference ...

Page 2: ...r shock hazard do not expose the unit to rain or moisture To avoid electrical shock do not open the cabinet Refer servicing to qualified personnel only This symbol is intended to alert the user to the presence of uninsulated dangerous voltage within the product s enclosure that may be of sufficient magnitude to constitute a risk of electric shock to persons This symbol is intended to alert the use...

Page 3: ... 33 Adding memos to images 35 Adding voice over audio onto images 36 Deleting images 38 Entering folder titles changing the folder cover 40 Entering a folder title 40 Changing the folder cover 47 Rearranging images in the folder 49 Copying images to a folder 52 Copying images onto a Memory Stick or a PC card 55 Deleting folders 58 Using the trash box 59 Other Operations and Settings Enjoying vario...

Page 4: ...ges on the LCD screen as well Recording images onto a CD R RW making a Folder You can record images from a Memory Stick or PC card to a CD R RW with the push of a button direct copy The images are recorded on a CD R RW as a folder Editing images in a folder You can edit images recorded on a CD R RW in various ways such as rotating trimming and post recording voice Inputting folder titles changing ...

Page 5: ...r filing system Audio Video AC adapter 1 connection cable 1 AC power cord 1 Remote RMT V304 1 Batteries AA R6 2 CD R 1 Instruction Manual 1 Warranty 1 Inserting batteries into the remote Insert two AA batteries into the remote by matching the and ends on the batteries to the markings inside the compartment PAGE DISPLAY OK RETURN MENU POWER ...

Page 6: ...cator pages 20 22 5 PC CARD button PC cardtCD R RW direct copy button indicator pages 14 25 See the pages given in parentheses for details Main unit 6 MEMORY STICK button Memory Stick tCD R RW direct copy button indicator pages 13 25 7 RETURN button pages 21 28 8 MENU button pages 69 71 9 PAGEU button page 19 0 PAGEu button pages 19 20 qa C X x c OK button ...

Page 7: ... page 14 2 PC card eject button page 14 3 Memory Stick insertion slot page 13 4 Manual ejection hole page 16 5 CD R CD RW indicator page 16 6 Built in microphone monaural page 37 7 remote sensor page 9 8 A EJECT button pages 15 16 9 Disc tray page 15 continued ...

Page 8: ...g Started 1 Built in speaker 2 S VIDEO OUT S video output connector page 11 3 AUDIO OUT audio output connector page 11 4 VIDEO OUT video output connector page 11 1 DC IN connector page 12 Side panel Back panel ...

Page 9: ... RETURN button pages 21 28 2 C X x c OK button 3 DISPLAY button pages 21 24 Remote 4 POWER button pages 20 22 5 MENU button pages 69 71 6 PAGE U u button pages 19 20 PAGE DISPLAY OK RETURN MENU POWER Point the remote at the remote sensor ...

Page 10: ...LCD screen to view images Opening the LCD screen Press the OPEN button to open the LCD screen Adjusting the brightness You can adjust the brightness of the LCD screen by using the Option setting screen For details please see Changing the settings of this system page 71 OPEN button ...

Page 11: ... the S video connector Note Before connecting the filing system to your TV turn off the power of both the filing system and the TV When you connect the system to a monaural TV connect only the left audio cord white plug of the video connecting cord to the TV Connecting the filing system Main unit To S VIDEO input To VIDEO OUT To S VIDEO OUT with the arrow facing downward To AUDIO OUT L To AUDIO in...

Page 12: ...etting Up Connecting an AC adapter Connect the supplied AC adapter to the filing system Back panel To DC IN AC adapter supplied To an AC outlet AC power cord supplied Connecting the filing system continued ...

Page 13: ...ICK indicator is not flashing then press the Memory Stick lightly After the Memory Stick pops out remove it slowly Notes While this system is reading writing data MEMORY STICK indicator flashes do not eject the Memory Stick Otherwise the data may be erased or damaged While this system is operating do not move lift it up or disconnect the AC power cord If the Memory Stick does not fit into the slot...

Page 14: ...s operating do not move lift it up or disconnect the AC power cord If the PC card does not fit into the slot properly check the direction of the arrow on the PC card Then re insert it into the slot Do not attempt to force the PC card into or out of the slot Otherwise the PC card or the file may be damaged Ejecting the PC card Check that the PC CARD indicator is not flashing then press the PC card ...

Page 15: ... recorded with this system all of the data will be deleted at once page 69 1 Press A Eject The disc tray is ejected 2 Place a disc on the center of the disc tray and while supporting the bottom of the disc tray press gently on the center of the disc until it clicks into place Note If you attempt to close the disc tray while the disc is not correctly in place the disc tray may become stuck or the d...

Page 16: ... a disc Confirm that the CD R CD RW indicator is not flashing and press the A Eject button When you cannot remove a disc by pressing the A Eject button Confirm that the CD R CD RW indicator is not flashing and insert a pin into the manual ejection hole After the disc tray pops out remove the disc Manual ejection hole Connecting the filing system continued ...

Page 17: ...ize recorded on the image appear here appears when you select an image which has voice memo data page 64 appears when you select an image which has voice over audio data page 67 appears when you select an image which has movie data page 65 To check the capacity of the CD R RW You can check the capacity of the disc with the capacity indicator Blank disc Full How to read the screen continued Beautif...

Page 18: ...ed with this system Volume 65 66 68 You can adjust the volume of the voice memo and the post recorded audio data Record to CD R You can record images onto a CD R RW Copy to new folder 27 You can copy images to a new folder Change folder title 28 41 You can change the folder title Change folder cover 28 48 You can change the folder cover picture Copy to folder 29 You can copy images to an existing ...

Page 19: ... x the page jumps and the image on the upper left of the selected page is displayed 3 Press OK The selected page is displayed 4 Select the exact page you want to view by pressing PAGE U u Copy to memory card 57 You can copy images to a Memory Stick or memory card Delete folder 58 You can delete a folder and move it to the trash box Empty the trash box 60 You can empty the trash box Close You can q...

Page 20: ... system by pressing POWER 4 Select Memory Stick or PC card by pressing C X x c then press OK The images recorded on the media you selected are displayed on a 4 image viewer When more than four images are recorded press PAGE u The screen changes to the next four images When many images are recorded you can jump pages quickly by using the scroll bar page 19 Tip When you turn on the system the data w...

Page 21: ...age you want to display by pressing C X x c then press OK The selected image is displayed in full size on the screen To display information about the image press DISPLAY To go back to the previous image press RETURN Displaying the 12 image viewer Select 12 image viewer by pressing C X x c then press OK 12 images are displayed at one time on the screen To go back to the 4 image viewer select 4 imag...

Page 22: ...displayed To view the next page press PAGE u Tip Folders are displayed in chronological order starting from the newest one Notes This system cannot display images larger than 3200 x 2400 This system may not display images stored on CD R RWs recorded by other CD R RW drives Memories of Holland Graduation World Champion Folder Trash box 004 Folder 4 1 2000 2 29 2000 3 10 2000 2 20 2000 1 15 2000 005...

Page 23: ...orded in the selected folder are displayed on the 4 image viewer When more than four images are recorded press PAGE u The screen changes to the next four images When many images are recorded you can jump pages quickly by using the scroll bar page 19 Date Total No Open the folder Title Memories of Holland 4 1 2000 22 Select Open OK Beautiful tulip 3 20 2000 1600X1200 Select Display full size OK con...

Page 24: ...revious image press RETURN Displaying the 12 image viewer Select 12 image viewer by pressing C X x c then press OK 12 images are displayed at one time on the screen To go back to the 4 image viewer select 4 image viewer then press OK Date 5 18 2000 Size 1600X1200 100 5 100 Beautiful tulip 3 20 2000 1600X1200 Select Display full size OK current image number total number of images photographed date ...

Page 25: ...K button on this system When you want to record from a PC card press the PC CARD button on this system The recording process starts While recording the CD R CD RW light flashes After recording is complete the confirmation dialog box is displayed 4 Press OK The new folder is displayed as the first folder in the folder list Record to a CD R Recording Please wait Notes While this system is operating ...

Page 26: ...ods Record to a new folder Add to an existing folder page 28 Recording to a new folder 1 Insert a CD R RW page 15 2 Insert a Memory Stick or PC card page 13 3 Display the Memory Stick or PC card images on the 4 image 12 image viewer page 20 4 Select Record to CD R by pressing C X x c then press OK Beautiful tulip 3 20 2000 1600X1200 Select Display full size OK Select the image s you want to copy R...

Page 27: ...image darkened then press OK A dialog box appears To cancel the selection select Cancel then press OK To rotate the image select 90 right or 90 left then press OK To go back to the previous screen select Back then press OK 6 Select Copy to new folder by pressing C X x c then press OK The confirmation dialog box is displayed You can cancel the selection Record to CD R 90 left 90 right Back Cancel T...

Page 28: ...RETURN Each time you press the button you will return to the previous step Inputting the folder title After step 7 screen showing the cover of the new folder select change folder title then press OK The Enter folder title screen appears For details about this procedure refer to Entering a folder title page 40 Changing the folder cover After step 7 screen showing the cover of the new folder select ...

Page 29: ...ng C X x c then press OK A number is assigned to the selected image and the image becomes dark If you want to choose two or more images repeat step 5 Canceling the selected image or recording a rotated image Move the cursor to the selected image darkened then press OK To cancel the selection select Cancel then press OK To rotate the image select 90 right or 90 left then press OK To go back to the ...

Page 30: ...ct Yes by pressing C c then press OK The image is added at the insertion bar position and it is recorded to the CD R RW After recording is complete the screen returns to the existing folder list Returning to the previous step Press RETURN Each time you press the button you will return to the previous step Indicate where you want to insert the image Copy to folder Memories of Holland Graduation Fol...

Page 31: ...an also record the edited images back to the CD R RW Rotating images to the left or right You can rotate an image to the left or right in 90 increments 1 Select and display the image you want to edit page 24 2 Press OK The operation icons appear 3 Select Edit images by pressing C c then press OK The edit icons appear Editing images in a folder Slide show Rotate 90 left Note This system cannot edit...

Page 32: ...e edited image is recorded to the same folder After recording is complete the editing screen appears To go back to a single image screen select Close then press OK Returning to the previous step Press RETURN Each time you press the button you will return to the previous step Tip When you record the edited image the original image moves to the trash box automatically page 59 Notes If you rotate GIF...

Page 33: ...3 Select Edit image by pressing C c then press OK The edit icons appear 4 Select Trim by pressing C c then press OK The edit icons disappear and the trimming screen appears 5 Select the area you want to trim Select the starting and ending points The selected area will be saved and the surrounding areas will be cut away 1 Select the starting point by pressing C X x c then press OK Slide show Rotate...

Page 34: ... press OK The edited image is recorded After recording is complete the screen returns to the editing screen To go back to a single image screen select Close then press OK Returning to the previous step Press RETURN Each time you press the button you will return to the previous step Tip When you record the edited image the edited image is added to the end of the folder The original image remains in...

Page 35: ... to add a memo page 24 2 Press OK The operation icons appear 3 Select Edit images by pressing C c then press OK The edit icons appear 4 Select Add memo by pressing C c then press OK The Add memo screen appears For details about inputting characters see step 4 of Entering a folder title page 41 5 To record the memo select Record to CD R by pressing C X x c then press OK The confirmation dialog box ...

Page 36: ... time you press the button you will return to the previous step Adding voice over audio onto images You can record up to 10 seconds of audio data onto the image After you have recorded audio onto the image appears at the bottom of the single image screen whenever you press DISPLAY 1 Select and display the image onto which you want to add voice over audio data 2 Press OK The operation icons appear ...

Page 37: ...pressing C c then press OK The voice over icons appear 5 Select Record by pressing C c then press OK The recording starts Input audio data using the built in microphone on this filing system A time indicator appears on the screen Recording stops when you press OK or when the recording time reaches its limit Record Stop continued ...

Page 38: ...d After recording is complete the screen returns to the editing screen To go back to a single image screen select Close then press OK Returning to the previous step Press RETURN Each time you press the button you will return to the previous step Deleting images You can delete images The deleted image is moved to the trash box automatically 1 Select and display the image you want to delete page 24 ...

Page 39: ... OK The image is deleted After deleting the next image is displayed on the screen Returning to the previous step Press RETURN Each time you press the button you will return to the previous step Tips You can restore the image you deleted as long as you do not empty the trash box see Restoring the images in the trash box to a folder page 59 You can also delete images on the 4 image and 12 image view...

Page 40: ...you want by pressing C X x c then press OK The selected folder cover appears Entering folder titles changing the folder cover Graduation Folder Trash box 004 Folder 4 1 2000 2 29 2000 3 10 2000 2 20 2000 1 15 2000 005 Select Enlarge the folder cover OK Memories of Holland World Champion Date Total No Open the folder Title Folder 004 2 20 2000 34 Select Open OK Note You cannot enter a title for a f...

Page 41: ...s you can enter up to 3 lines of 28 characters each For individual pictures you can add memos page 35 of up to 50 characters x Character screen You can enter letters upper case and lower case and numbers continued erase the letter before the cursor insert a blank space select upper case letters select lower case letters switch to the word registration screen Enter folder title Character Registered...

Page 42: ...tter before the cursor registered word screen move the cursor delete registered words view the previous page view the next page character screen switch to the word registration screen Change folder title Europe The impression of the city The first voyage My memory REGISTER NEXT PAGE PREV PAGE DELETE ERASE My railroad trip in Europe Character Registered word Select Complete the selected operation O...

Page 43: ...ursor is deleted Inputting a blank space Select SPACE then press OK A blank space is input continued Enter folder title Character Registered word REGISTER LOWER UPPER SPACE ERASE A B C D E H I J K L O P Q R S V W X Y Z _ F G 7 8 9 M N 4 5 6 T U 1 2 3 0 Select Complete the selected operation OK E Enter folder title Character Registered word REGISTER LOWER UPPER SPACE ERASE a b c d e h i j k l o p q...

Page 44: ...rn to the previous screen OK Entering folder titles changing the folder cover continued 6 To record select Yes by pressing C c then press OK The edited folder title is recorded onto the CD R RW After recording is complete the screen returns to step 3 Returning to the previous step Press RETURN Each time you press the button you will return to the previous step Saving your own words into My Memory ...

Page 45: ...LETE ERASE My railroad trip in Character Registered word Select Complete the selected operation OK continued 1 Perform steps 1 to 4 of Entering the folder title pages 40 to 43 to enter a phrase such as My railroad trip in 2 Select Registered word by pressing C X x c then press OK The My Memory screen appears 3 Select the place where you want to add the word from My Memory by pressing then press OK...

Page 46: ...ss OK Saving words input to your PC into My Memory You can automatically register text files created on your PC to My Memory Making the text file Enter the characters you want to save into My Memory as a text file and save it as PPMYWORD TXT Please note the following The characters must be contained in a single line When you input more than 50 characters the 51st and subsequent characters cannot b...

Page 47: ... The selected folder cover is displayed Graduation Folder Trash box 004 Folder 4 1 2000 2 29 2000 3 10 2000 2 20 2000 1 15 2000 005 Select Enlarge the folder cover OK Memories of Holland World Champion Date Total No Open the folder Title Memories of Holland 4 1 2000 22 Select Open OK continued The confirmation dialog box appears Select Yes by pressing C c then press OK Registration starts When the...

Page 48: ...t the image you want to use as a folder cover by pressing C X x c then press OK The confirmation dialog box appears 6 Select Yes to record by pressing C c then press OK The new folder cover is recorded onto the CD R RW After recording is complete the screen returns to step 3 Returning to the previous step Press RETURN Each time you press the button you will return to the previous step Select a fol...

Page 49: ... want to rearrange the images by pressing C X x c then press OK The selected folder cover is displayed Rearranging images in the folder Graduation Folder Trash box 004 Folder 4 1 2000 2 29 2000 3 10 2000 2 20 2000 1 15 2000 005 Select Enlarge the folder cover OK Memories of Holland World Champion Date Total No Open the folder Title Memories of Holland 4 1 2000 22 Select Open OK Note You cannot rea...

Page 50: ...y pressing C X x c then press OK After pressing OK a number is assigned to the selected image and it becomes dark If you want to select two or more images repeat step 6 To view the next page press PAGEu You can also skip pages by using the scroll bar page 19 Tip The insertion bar and selection cursor appear alternately when you press C c in step 6 Beautiful tulip 3 20 2000 1600X1200 Select Display...

Page 51: ...OK The selected image or images move to the insertion bar s position 9 Select Record to CD R by pressing C X x c then press OK The confirmation dialog box appears 10 Select Yes to record by pressing C c then press OK The rearranged folder is recorded onto the CD R RW After recording is complete the screen returns to step 4 Returning to the previous step Press RETURN Each time you press the button ...

Page 52: ...ears 3 Select the folder you want by pressing C X x c then press OK The selected folder cover appears Copying images to a folder Graduation Folder Trash box 004 Folder 4 1 2000 2 29 2000 3 10 2000 2 20 2000 1 15 2000 005 Select Enlarge the folder cover OK Memories of Holland World Champion Date Total No Open the folder Title Memories of Holland 4 1 2000 22 Select Open OK Note You cannot copy image...

Page 53: ...ges appears 6 Select the image you want by pressing C X x c then press OK After pressing OK a number is assigned to the selected image and it becomes dark If you want to copy two or more images repeat step 6 To view the next page press PAGEu You can also skip pages by using the scroll bar page 19 Beautiful tulip 3 20 2000 1600X1200 Select Display full size OK Select the image s you want to copy Co...

Page 54: ...K When you select Copy to new folder The confirmation dialog box appears Select Yes then press OK A new folder is made and the selected image is copied When you select Copy to folder The existing folder list appears 1 Select the folder you want then press OK Images in the selected folder are displayed on the 6 image screen 2 Press C X x c to move the insertion bar to the position where you want to...

Page 55: ...slot page 13 3 Select CD R RW by pressing C X x c then press OK The folder list appears 4 Select the folder you want by pressing C X x c then press OK The selected folder cover appears Graduation Folder Trash box 004 Folder 4 1 2000 2 29 2000 3 10 2000 2 20 2000 1 15 2000 005 Select Enlarge the folder cover OK Memories of Holland World Champion Date Total No Open the folder Title Memories of Holla...

Page 56: ...ou want by pressing C X x c then press OK After pressing OK a number is assigned to the selected image and it becomes dark If you want to copy two or more images repeat step 7 To view the next page press PAGEu You can also skip pages by using the scroll bar page 19 Copying all images at once Select Select all images then press OK Beautiful tulip 3 20 2000 1600X1200 Select Display full size OK Sele...

Page 57: ... c then press OK The selected image is recorded onto a Memory Stick or a PC card After recording is complete the screen returns to step 5 Tip If some images are already recorded on the Memory Stick or the PC card the copied image is added at the end Notes If both a Memory Stick and a PC card are inserted in this system the memory media selection screen appears after step 8 Select the media you wan...

Page 58: ...er cover appears 4 Select Delete folder by pressing C X x c then press OK The confirmation dialog box appears Select Yes then press OK The folder is deleted Deleting folders Note The capacity of a CD R RW doesn t increase even if you delete some images For details please see page 59 of Using the trash box Graduation Folder Trash box 004 Folder 4 1 2000 2 29 2000 3 10 2000 2 20 2000 1 15 2000 005 S...

Page 59: ...ppear on the screen 2 Select Copy images by pressing C X x c then press OK The Copy images screen appears 3 Select the image you want to restore by pressing C X x c then press OK The selected image is copied into a new folder or an existing folder For details about this procedure please see step 6 and 7 of Copying images to a folder pages 53 to 54 Beautifil tulip 3 20 2000 1600X1200 Select Display...

Page 60: ... cannot restore the images in the trash box after emptying the trash box The capacity of a CD R RW doesn t increase even if you empty the trash box When you use a CD RW and run the Erase all of the data on the CD RW function in the Option settings screen you can erase all of the recorded data on the CD RW and use it as a blank disc page 69 However both the images in the trash box and the images in...

Page 61: ...lay voice overed audio data CD R RW only Images taken by a Sony digital still camera only as of May 2000 Viewing a slide show You can view all of the images recorded on a Memory Stick or PC card or all images in a folder on a CD R RW one by one like a slide show 1 Display images on a 4 image viewer 12 image viewer or single image screen 2 Select Slide show by pressing C X x c then press OK The sli...

Page 62: ...he slide show repeatedly During the slide show press OK The operation icons appear Select Repeat by pressing C c The default setting is OFF ON Repeat play continues until you press RETURN or select Close OFF Play the slide show once then go back to the previous screen Viewing enlarged images You can enlarge the images 1 Display the image you want to enlarge on a single image screen Tip You can sel...

Page 63: ...of the image After step 3 select Close then press OK The operation icons disappear Move the enlarged image in any direction by pressing C X x c This allows you to view the hidden areas of the image To go back to original size press RETURN Tip When you press DISPLAY after step 3 the magnification ratio as compared to the original image is displayed on the screen Notes If you enlarge images that are...

Page 64: ...th a voice memo attached on a single image screen 2 Press OK The operation icons appear 3 Select Playback voice memo by pressing C c then press OK The voice memo starts to play After playback ends the screen returns to the single image screen Pausing the voice memo While playing press OK The system enters the pause mode and the operation icons appear Select Playback voice memo to play again Playba...

Page 65: ...ages on a 4 image or 12 image viewer 2 Select the movie you want by pressing C X x c then press OK Playback starts The millennium air show 3 3 2000 1600X1200 Select Display full size OK appears when this system can play the movie continued Select Volume then adjust the volume by pressing X x Select Playback voice memo to play again Playback starts from the beginning of the memo ...

Page 66: ...f the movie While playing press OK The movie pauses and the operation icons appear Select Volume then adjust the volume by pressing X x Rotating the image to the left or right by 90 Memory Stick PC card only You can rotate the image to the left or right in 90 increments You cannot record the rotated image 1 Display the image you want to rotate on the single image screen 2 Press OK The operation ic...

Page 67: ...stem For details about recording audio please see Adding voice over audio onto images page 36 1 Display the image with audio data on the single image screen 2 Press OK The operation icons appear 3 Select Playback recording by pressing C c then press OK Playback of the voice over audio data starts After playback ends the screen goes back to the previous single image screen When you press DISPLAY is...

Page 68: ...g to play again Playback starts from the beginning of the voice over Adjusting the volume of the voice over While playing press OK This system is enters the pause mode and the operation icons appear Select Volume then adjust the volume by pressing X x Select Playback recording to play again Playback starts from the beginning of the voice over Enjoying various playing modes continued ...

Page 69: ...e 70 Label the CD R RW You can change the label of the CD R RW The default label is PICTURE_PARK You can input letters uppercase numbers and _ under score For details please see step 4 of Entering a folder title page 41 Make a write protected disc You can write protect a CD R RW making it a CD ROM Erase all of the data on the CD RW You can erase all of the data on the CD RW and then use it as a bl...

Page 70: ... Netscape Netscape Navigator and the Netscape N and Ship s Wheel logos are registered trademarks of Netscape Communications Corporation in the United States and other countries Changing the settings of a CD R RW continued Tip Recommended browsers are as follows Microsoft Internet Explorer Ver 3 0 or higher Netscape Navigator Ver 3 0 or higher Notes If you add other images to the CD R RW using this...

Page 71: ...t to assign a print mark to the image The default setting is OFF If you select ON you can assign up to 999 print marks to the images When using a DPOF compatible printer images containing the print mark will be automatically printed DPOF Digital Print Order Format is the format used for automatic printing LCD brightness DPF P7D only You can adjust the brightness of the LCD screen Changing the sett...

Page 72: ...se a malfunction The filing system is designed to operate horizontally Never attempt to operate the filing system in a tilted position Do not place heavy objects on the filing system If the filing system is brought directly from a cold location to warm location or placed in an extremely warm or humid room moisture may condense inside the unit In such cases the filing system will probably not work ...

Page 73: ...y cause malfunction Do not place heavy objects or drop anything on the LCD screen Do not put pressure on the screen with your hands or elbow If the filing system is brought directly from a cold location to warm location moisture may condense on the LCD screen If moisture condensation occurs wipe the surface of the screen with dry tissue paper When the surface of the screen is cold moisture may con...

Page 74: ...t in a car parked in direct sunlight After playing the disc store it in its case Stacking discs without cases or leaving a disc exposed may cause the disc to warp About special shape CDs You can use only round CDs Do not use special shape CDs for example star or heart shaped It may cause a malfunction Precautions continued ...

Page 75: ...reduced sound quality Clean the disc with a cleaning cloth Wipe the disc from the center out If soiled clean the disc with a soft cloth slightly moistened with water then remove the moisture with a soft dry cloth Do not use solvents such as benzine thinner commercially available cleaners or anti static spray intended for vinyl LPs Do not clean CD R RW discs with a cleaning cloth before recording U...

Page 76: ...on technology You can use both types of Memory Stick with this unit However because this unit does not support the MagicGate standards data recorded with this unit is not subject to MagicGate copyright protection MagicGate is copyright protection technology that uses encryption technology Memory Stick and are trademarks of Sony Corporation MagicGate MagicGate Memory Stick and are trademarks of Son...

Page 77: ...mory Stick keep it in its original case to ensure protection of important data Avoid removing the Memory Stick from the insertion slot while the access indicator is lit the filing system is reading or writing the data on the Memory Stick In the following cases the stored data may be damaged or erased when turning off the power of the filing system or when removing the Memory Stick from the inserti...

Page 78: ...lide the switch left to the write enable position You can then read write and delete data on the Memory Stick Formatting the Memory Stick is also enabled When storing video pictures on the Memory Stick set the switch to the write enable position Write protect position Slide the switch right to the write protect position It is now impossible to write or delete data on the Memory Stick We suggest yo...

Page 79: ...d removing the PC card from the insertion slot while the filing system is accessing the PC card Otherwise data may be rendered unreadable When using a compact flash card or Smart Media use a commercially available PC card adaptor that is compatible with the card Attach the card to the adaptor and then insert it into the filing system For instructions on how to install the card and adaptor refer to...

Page 80: ...the television c Connect the filing system to the television securely page 11 The remote does not function c Replace all of the batteries in the remote with new ones if they are weak c Insert the batteries in the correct position in the remote c Make sure that you are pointing the remote at the remote sensor on the filing system page 9 No image is displayed even if a disc is placed in the filing s...

Page 81: ...ready been stored Use a new CD R RW Your PC cannot read the CD R RW written by this filing system c Change the CD R RW format on the Option settings screen so that it is compatible with your PC page 70 If an error message appears Please insert CD R RW Memory Stick or PC card c A CD R RW a Memory Stick or a PC card is not inserted Insert a CD R RW a Memory Stick or a PC card into each corresponding...

Page 82: ...erted PC card is defective or not of a compatible type Format the PC card using a Sony digital still camera PC card is full c There is not enough space to record the image or the maximum number of image files have already been stored Use a new PC card PC card is in write protect status c The PC card is in the write protect status Set it in the write enable status and then record the image Cannot d...

Page 83: ...problem with the previous operation or the disc s recording surface is contaminated Start to restore the disc c This message is displayed when the filing system cannot record the data onto the disc properly or the disc is dirty To start restoring the disc select YES Cannot read the disc c The disc is not of a compatible type A writing error occurred Will start restoring the disc now c This message...

Page 84: ...balanced sync negative AUDIO OUTPUT connector phono jack x 2 327 mVrms impedance less than 10 kilohms Slot Memory Stick insertion slot 1 PC card insertion slot 1 CD R RW drive Data transfer rate Max 20 speed reading CD ROM CD R 14 speed reading CD RW 4 speed writing LCD screen DPF P7D only Screen size 3 5 inches measured diagonally Picture size 2 7 8 2 1 8 inches 70 4 52 7 mm LCD panel TFT drive T...

Page 85: ...wer 20 23 I J K Images copying 52 deleting 38 editting 31 rearranging 49 viewing 17 L LCD screen 10 adjusting the brightness 71 M N Maintenance 75 Memo 35 Memory Stick 76 Inserting 13 Notes on using 76 Moisture condensation 72 Movie 65 My memory 44 O Option setting 69 71 P Q PC card 79 Inserting 14 Notes on using 79 Precautions 72 Print mark 71 R Remote 5 9 Rotating images 31 66 S Scroll bar 19 Si...

Page 86: ...86 For Your Information ...

Page 87: ...87 For Your Information For Your Information ...

Page 88: ...Sony Corporation Printed in Japan ...

Reviews: