background image

63

Advanced Recording Operations

(

1

)

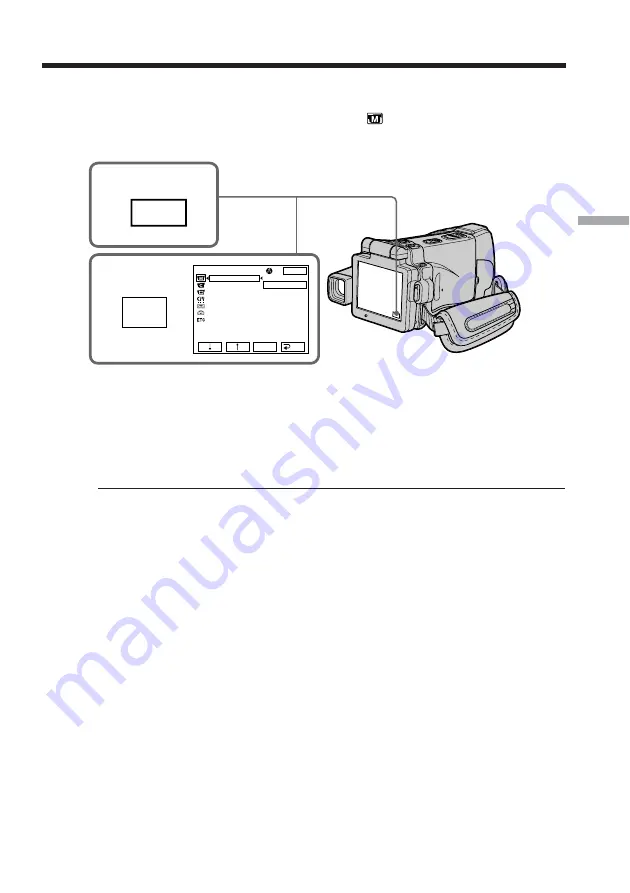
Set the POWER switch to CAMERA or MEMORY.

(

2

)

Press FN to display PAGE1.

(

3

)

Press MENU, then select PROGRAM AE in 

 in the menu settings to select a

desired mode (p. 178).

To return to FN

Press EXIT.

To turn the PROGRAM AE off

Select AUTO in PROGRAM AE in the menu settings.

Notes

•Because your camcorder is set to focus only on subjects in the middle to far distance,

you cannot take close-ups in the following modes:
– Spotlight
– Sports lesson
– Beach & ski

•Your camcorder is set to focus only on distant subjects in the following modes:

– Sunset & moon
– Landscape

•The following functions do not work in PROGRAM AE:

– Color Slow Shutter
– BOUNCE
– Slow shutter
– OLD MOVIE

•The PROGRAM AE does not work in the following cases (The indicator flashes):

– NightShot
– NightFraming
– To record images on a “Memory Stick” using the MEMORY MIX.

•When you set the POWER switch to MEMORY, sports lesson does not work. (The

indicator flashes.)

Using the PROGRAM AE

2

FN

3

MANUAL  SET

PROGRAM AE
P  EFFECT
RED  EYE  R
FLASH  LVL
WHT  BAL
SHARPNESS
AUTO  SHTR

EXIT

RET.

EXEC

AUTO
SPOTLIGHT
PORTRAIT
SPORTS
BEACH&SKI
SUNSETMOON
LANDSCAPE

MENU

Summary of Contents for DCR-IP210

Page 1: ...the unit please read this manual thoroughly and retain it for future reference Owner s Record The model and serial numbers are located on the bottom Record the serial number in the space provided below Refer to these numbers whenever you call upon your Sony dealer regarding this product Model No DCR IP Model No AC Serial No Serial No ...

Page 2: ... harmful to eyes do not attempt to disassemble the cabinet Refer servicing to qualified personnel only For customers in the U S A and CANADA CAUTION TO PREVENT ELECTRIC SHOCK MATCH WIDE BLADE OF PLUG TO WIDE SLOT FULLY INSERT RECYCLING LITHIUM ION BATTERIES Lithium Ion batteries are recyclable You can help preserve our environment by returning your used rechargeable batteries to the collection and...

Page 3: ...tter Note This equipment has been tested and found to comply with the limits for a Class B digital device pursuant to Part 15 of the FCC Rules These limits are designed to provide reasonable protection against harmful interference in a residential installation This equipment generates uses and can radiate radio frequency energy and if not installed and used in accordance with the instructions may ...

Page 4: ...uring images on your computer Viewing moving pictures recorded on tapes using the i LINK cable p 153 The i LINK of your camcorder adopts the format only It does not adopt the or the MPEG2 format of Viewing images recorded on a Memory Stick using the USB cable p 169 174 Viewing moving pictures recorded on tapes using the USB cable p 164 Capturing images on your computer from your camcorder using th...

Page 5: ...justing the exposure manually p 65 Flexible Spot Meter p 66 HOLOGRAM AF p 117 NightFraming p 119 Functions to give images more impact Digital zoom p 33 The default setting is set to OFF To zoom greater than 10 select the digital zoom power in D ZOOM in the menu settings Fader p 56 Picture effect p 58 Digital effect p 59 Title p 88 94 MEMORY MIX p 125 Functions to give a natural appearance to your ...

Page 6: ...ffects Digital effect 59 Using the PROGRAM AE 62 Adjusting the exposure manually 65 Using the spot light metering mode Flexible Spot Meter 66 Focusing manually 67 Using the spot focus mode Spot Focus 69 Advanced Playback Operations Playing back a tape with picture effects 70 Playing back a tape with digital effects 71 Enlarging images recorded on tapes Tape PB ZOOM 72 Searching for a scene MULTI P...

Page 7: ...on a Memory Stick on your computer For Windows users 169 Connecting your camcorder to your computer using the USB cable For Macintosh users 172 Viewing images recorded on a Memory Stick on your computer For Macintosh users 174 Using the Network function DCR IP220 only Accessing the network 175 For the details refer to the Network Function Operating Instructions supplied with your camcorder Customi...

Page 8: ...R switch in the direction of the arrow Each time you slide it down the mode changes as follows and corresponding mode lamp also lights up CAMERA Use this mode when you record on a tape MEMORY NETWORK DCR IP220 or MEMORY DCR IP210 MEMORY Use this mode when you record on a Memory Stick or play back or edit an image in a Memory Stick NETWORK DCR IP220 only Use this mode when you use the network funct...

Page 9: ...er body Notes The LCD panel rotates 180 degrees anticlockwise and 90 degrees clockwise When using the LCD panel except in the mirror mode p 35 the viewfinder automatically turns off When you set the LCD screen outdoors in direct sunlight The LCD screen may be difficult to see If this happens we recommend that you use the viewfinder When you adjust the angle of the LCD panel Make sure if the LCD pa...

Page 10: ...ssette in a straight line deeply with the cassette window facing the cassette lid 3Close the cassette compartment by pushing down the cassette lid halfway After the cassette compartment goes down completely close the lid until it clicks OPEN EJECT Z 1Slide OPEN Z EJECT in the direction of the arrow and open the lid Connecting the power cord p 21 Use the battery pack when using your camcorder outdo...

Page 11: ... Viewfinder When the LCD panel is closed with the LCD screen facing inwards use the viewfinder Adjust the viewfinder lens to your eyesight p 32 2Set the POWER switch to CAMERA The CAMERA lamp lights up MEMORY NETWORK CAMERA POWER CHG OFF ON MODE VCR 4Press START STOP Your camcorder starts recording To stop recording press START STOP again 1Set the POWER switch to VCR The VCR lamp lights up MEMORY ...

Page 12: ...ttery pack when using your camcorder outdoors p 17 This chapter introduces you to the basic features to record on a Memory Stick of your camcorder See the page in parentheses for more information Open the jack cover Connect the plug with its v mark facing down AC power adaptor supplied Memory Stick slot Open the LCD panel and slide the MEMORY EJECT lever in the direction of the arrow MEMORY EJECT ...

Page 13: ...t the POWER switch to MEMORY or VCR The MEMORY or VCR lamp lights up 2Press PLAY or PB The last recorded image is displayed Note Do not pick up your camcorder by the LCD panel or the jack cover 1Remove the lens cap 3Open the LCD panel The picture appears on the LCD screen 4Press PHOTO lightly 5Press PHOTO deeper When the green z mark stops flashing then lights up you can record a still image The i...

Page 14: ...he MICROMV format You can only use MICROMV cassettes with your camcorder Records and plays back for about 60 minutes with equal quality when compared to DV digital video The micro Cassette Memory feature is provided with all MICROMV cassettes Your camcorder can access any scene easily using the memory MULTI PICTURE SEARCH function Adopts the MPEG2 format as a data compression method This format is...

Page 15: ...way Do not let your camcorder get wet Keep your camcorder away from rain and sea water Letting your camcorder get wet may cause your camcorder to malfunction Sometimes this malfunction cannot be repaired a Never leave your camcorder exposed to temperatures above 60 C 140 F such as in a car parked in the sun or under direct sunlight b Be careful when placing the camera near a window or outdoors Exp...

Page 16: ...ake sure that the following accessories are supplied with your camcorder Contents of the recording cannot be compensated if recording or playback is not made due to a malfunction of the camcorder storage media etc 6 0 8 3 qd qs qa 7 2 1 5 9 4 7 Lens hood 1 p 32 8 Memory Stick 1 p 100 9 USB cable 1 p 151 q CD ROM SPVD 008 USB Driver 1 p 154 172 qa CD ROM Movie Shaker Ver 3 1 for MICROMV 1 p 153 qs ...

Page 17: ...tment lid 2 Insert the battery pack with its terminal side facing your camcorder 3 Close the battery compartment lid To take out the battery pack Open the battery compartment lid and slide the lever to take out the battery pack Note Your camcorder operates only with the NP FF70 battery pack You cannot use the NP FF50 battery pack Step 1 Preparing the power supply 1 2 3 Lever ...

Page 18: ... with the plug s v mark facing down 2 Connect the power cord to the AC power adaptor 3 Connect the power cord to a wall outlet 4 Set the POWER switch to CHG OFF The battery CHG lamp lights up when the charge begins After charging is completed the battery CHG lamp goes off full charge After charging the battery pack Disconnect the AC power adaptor from the DC IN jack on your camcorder Step 1 Prepar...

Page 19: ...y pack Full charge NP FF70 supplied 150 Approximate minutes at 25 C 77 F to charge an empty battery pack The charging time may increase if the battery s temperature is extremely high or low because of the ambient temperature Recording time Battery Recording with the Recording with the LCD screen pack viewfinder Backlighting on Backlighting off Continuous Typical Continuous Typical Continuous Typic...

Page 20: ...ion on the battery remaining indicator is correct Recommended charging temperature We recommend charging the battery pack in an ambient temperature of between 10 C to 30 C 50 F to 86 F What is InfoLITHIUM The InfoLITHIUM is a lithium ion battery pack which can exchange data such as battery consumption with compatible electronic equipment This unit is compatible with the InfoLITHIUM battery pack NP...

Page 21: ...tlet PRECAUTION The set is not disconnected from the AC power source house current as long as it is connected to the wall outlet even if the set itself has been turned off Notes The AC power adaptor can supply power even if the battery pack is inserted in your camcorder The DC IN jack has source priority This means that the battery pack cannot supply any power if the power cord is connected to the...

Page 22: ...attery then set your area the daylight saving time DST the year the month the day the hour and the minute 1 Set the POWER switch to CAMERA or MEMORY The CAMERA or MEMORY lamp lights up 2 Press FN Function to display PAGE1 p 27 3 Press MENU to display the menu 4 Press r R to select then press EXEC 5 Press r R to select CLOCK SET then press EXEC 6 Press r R to select your area then press EXEC 7 Pres...

Page 23: ... LANGUAGE DEMO MODE 5 SETUP MENU CLOCK SET USB STREAM LANGUAGE DEMO MODE 10 EXIT RET EXEC R r EXIT RET EXEC R r EXEC R r EXEC R r EXEC R r r R EXEC EXEC 6 7 EXEC R r EXEC R r EXEC R r SETUP MENU CLOCK SET USB STREAM LANGUAGE DEMO MODE EXIT RET EXEC R r NOV 15 2002 5 30 00 PM EXIT EXIT EXIT EXIT EXIT EXIT DST OFF DATE Y M D GMT 0 0 Lisbon London CLOCK SET AREA 1 R r R r CLOCK SET AREA26 GMT 5 0 New...

Page 24: ...erlin Paris Helsinki Cairo Moscow Nairobi Tehran Abu Dhabi Baku Kabul Karachi Islamabad Calcutta New Delhi Almaty Dhaka Rangoon Bangkok Jakarta HongKong Singapore Seoul Tokyo Adelaide Darwin Melbourne Sydney Area Time zone Area setting code differences 1 2 3 4 5 6 7 8 9 10 11 12 13 14 15 16 GMT 01 00 02 00 03 00 03 30 04 00 04 30 05 00 05 30 06 00 06 30 07 00 08 00 09 00 09 30 10 00 Area Time zone...

Page 25: ...compartment by pushing down the cassette lid halfway The cassette compartment automatically goes down 5 After the cassette compartment goes down completely close the lid To eject a cassette Follow the procedures above and take out the cassette after the cassette compartment opens completely in step 2 Note Do not press the cassette compartment down Doing so may cause a malfunction To prevent accide...

Page 26: ...els may cause a malfunction of your camcorder Therefore be sure not to Stick on any labels other than the one supplied Stick the label onto any part of the cassette other than the label position a Step 3 Inserting a cassette a ...

Page 27: ...reen 5 Press PAGE2 to go to PAGE2 The operation buttons of PAGE2 appear on the LCD screen 6 Press PAGE3 to go to PAGE3 The operation buttons of PAGE3 appear on the LCD screen 7 Press a desired operation item See relevant pages of this manual for each function To return to FN Press EXIT To execute settings Press EXEC or OK The display returns to PAGE1 2 or 3 To cancel settings Press OFF The display...

Page 28: ...NEL on your camcorder When the operation buttons do not work even if you press them an adjustment is required CALIBRATION p 204 When the LCD screen gets dirty use the supplied cleaning cloth When executing each item The green bar appears above the item If an item is not available The color of the items changes to gray Press FN to display the following buttons In CAMERA mode PAGE1 SPOT FOCUS MENU S...

Page 29: ...h to CAMERA The CAMERA lamp lights up and your camcorder is set to the recording standby mode 4 Open the LCD panel The picture disappears from the viewfinder and appears on the LCD screen 5 Press START STOP Your camcorder starts recording The REC indicator appears The camera recording lamp located on the front of your camcorder lights up To stop recording press START STOP again 5 MEMORY NETWORK CA...

Page 30: ...ion Recording data The recording data date time or various settings when recorded are not displayed during recording However they are recorded automatically onto the tape To display the recording data press DATA CODE during playback You can also use the Remote Commander for this operation p 43 If you leave your camcorder in the standby mode for five minutes while the cassette is inserted Your camc...

Page 31: ... returns to PAGE2 PAGE3 To return to FN Press EXIT after step 4 The color of the LCD screen You can adjust the color of the LCD screen Select LCD COLOR in the menu settings p 180 Even if you adjust the LCD screen using LCD BRT LCD COLOR or the LCD screen backlight The recorded picture will not be affected The setting of the LCD BACKLIGHT switch Normally set it to ON When you use your camcorder in ...

Page 32: ...ven if you adjust the viewfinder backlight The recorded picture will not be affected Attaching the supplied lens hood To record fine pictures under strong light we recommend attaching the lens hood Also the lens cap can be attached even with the lens hood on Note You cannot attach filters or other objects onto the lens hood If you forcibly attach these objects onto the lens hood you will no longer...

Page 33: ...ject If you cannot get a sharp focus move the power zoom lever to the W side until the focus is sharp You can shoot a subject that is at least about 80 cm about 2 feet 5 8 inch away from the lens surface in the telephoto position or about 1 cm about 1 2 inch away in the wide angle position Notes on digital zoom Digital zoom starts to function when zoom exceeds 10 Up to 20 or 120 zoom is performed ...

Page 34: ...S to ZOOM The indicator appears on the LCD screen Turn the zoom ring at the desired speed to zoom in or out Notes Do not rotate the zoom ring too quickly Rotating it too quickly will prevent correct focusing Your camcorder changes to the autofocus mode when FOCUS is set to ZOOM Recording a picture FOCUS ZOOM AUTO MANUAL Zoom ring Telephoto Wide ...

Page 35: ...r clockwise The indicator appears in the viewfinder and on the LCD screen Xz appears in the standby mode and z appears in the recording mode Some other indicators appear mirror reversed and others are not displayed Note You can only rotate the LCD panel counter clockwise Picture in the mirror mode The picture on the LCD screen is a mirror image However the picture will be normal when recorded Duri...

Page 36: ...ata The recording data date time or various settings when recorded are not displayed during recording However they are recorded automatically onto the tape To display the recording data press DATA CODE during playback You can also use the Remote Commander for this operation p 43 Recording a picture 0 00 01 45min 50min REC FN NOV 15 2002 12 05 56 PM micro Cassette Memory Remaining battery time STBY...

Page 37: ... mode p 65 or SPOT METER p 66 Shooting in the dark NightShot Super NightShot Color Slow Shutter Using NightShot NightShot enables you to shoot a subject in a dark place For example you can satisfactorily record the environment of nocturnal animals for observation when you use this function 1 Set the POWER switch to CAMERA or MEMORY 2 Set NIGHTSHOT NIGHTFRAMING to NIGHTSHOT The and NIGHTSHOT indica...

Page 38: ...ow Shutter enables you to record color images in a dark place 1 Set the POWER switch to CAMERA 2 Set NIGHTSHOT NIGHTFRAMING to the center position green z position 3 Press COLOR SLOW S The and COLOR SLOW SHUTTER indicators flash on the LCD screen To cancel Color Slow Shutter press COLOR SLOW S again Notes Do not use the NightShot in bright places ex outdoors in the daytime This may cause your camc...

Page 39: ...ding with the flash Fader Digital effect PROGRAM AE Exposure Flexible Spot Meter Memory overlap of MEMORY MIX While using Super NightShot or Color Slow Shutter The shutter speed will be automatically adjusted depending on the brightness of the background The motion of the moving picture may slow down When the POWER switch is set to MEMORY You cannot use following functions Super NightShot Color Sl...

Page 40: ... beep sound In the last two seconds of the countdown the beep sound gets faster then recording starts automatically To stop the countdown Press START STOP To restart the countdown press START STOP again To cancel self timer recording Press SELFTIMER so that the self timer indicator disappears from the LCD screen while your camcorder is in the standby mode You cannot cancel self timer recording usi...

Page 41: ...tch to CAMERA 2 Press FN to display PAGE1 p 27 3 Press END SCH The last five seconds of the recorded section are played back and your camcorder returns to the standby mode You can monitor the sound from the speaker or headphones To return to FN Press EXIT after step 3 To stop searching Press END SCH again Even once you eject the cassette The end search function works Checking the recording END SEA...

Page 42: ...6 Adjust the volume following the steps below 1 Press FN to display PAGE1 p 27 2 Press VOL The screen for the volume adjustment appears 3 Press to adjust the volume To decrease the volume To increase the volume 7 Press OK The display returns to PAGE1 To return to FN Press EXIT after step 7 To stop playback Press on the LCD screen or STOP on the Remote Commander If you leave the power on for a long...

Page 43: ...press FN and go to PAGE3 2 Press DATA CODE 3 Select CAM DATA or DATE DATA then press OK 4 Press EXIT Using the Remote Commander Press DATA CODE on the Remote Commander in the playback mode The display changes as follows date time t various settings SteadyShot off exposure white balance gain shutter speed aperture value t no indicator To not display various settings Set DATA CODE in to DATE in the ...

Page 44: ...r noise The tape was recorded by a camcorder without the date and time set Data code When you connect your camcorder to a TV the data code also appears on the TV screen Remaining battery time indicator during playback The indicator shows the approximate continuous playback time The indicator may not be correct depending on the conditions in which you are playing back When you close the LCD panel a...

Page 45: ...igh speed picture while fast forwarding or rewinding the tape skip scan Keep pressing while rewinding or while advancing the tape To resume rewinding or advancing release the button Keep pressing REW on the Remote Commander while rewinding the tape or keep pressing FF on the Remote Commander while advancing the tape To resume normal rewinding or advancing release the button To view the picture at ...

Page 46: ... on the VCR with the A V connecting cable supplied with your camcorder Set the input selector on the VCR to LINE If your TV or VCR is a monaural type Connect the yellow plug of the A V connecting cable to the video input jack and the white or red plug to the audio input jack on the VCR or the TV If you connect the white plug the sound is an L left signal If you connect the red plug the sound is an...

Page 47: ... and then press and hold PHOTO lightly 3 Press PHOTO deeper Recording is complete when the bar scroll indicator disappears The image when you pressed PHOTO deeper will be recorded on the Memory Stick Notes Do not shake or strike your camcorder when you record still images Mosaic pattern image may appear You cannot record still images on a Memory Stick during following operations indicator flashes ...

Page 48: ...ormation To record still images on a Memory Stick during tape recording You cannot check an image on the LCD screen by pressing PHOTO lightly During and after recording still images on a Memory Stick your camcorder continues recording on tape When you press PHOTO on the Remote Commander to record still images The image when you press PHOTO will be recorded on the Memory Stick To record images with...

Page 49: ...he most appropriate setting for FLASH LVL Notes The recommended shooting distance using the built in flash is 0 3 m to 2 5 m 31 32 feet to 8 1 3 feet Attaching the lens hood supplied or a conversion lens optional may block the light from the flash or cause lens shadow to appear Auto red eye reduction and Forced red eye reduction may not produce the desired effect depending on individual difference...

Page 50: ...ecording on the tape Super NightShot Color Slow Shutter END SEARCH Wide mode Fader Picture effect Digital effect MEMORY MIX The flash does not fire even if you select auto no indicator and auto red eye reduction during the following operations NightShot Spotlight of PROGRAM AE Sunset moon of PROGRAM AE Landscape of PROGRAM AE Exposure Flexible Spot Meter Recording still images on a Memory Stick in...

Page 51: ...own from about 10 with a beep In the last two seconds of the countdown the beep gets faster then the recording starts automatically To cancel self timer recording Press SELFTIMER so that the self timer indicator disappears from the LCD screen while your camcorder is in the standby mode You cannot cancel the self timer recording using the Remote Commander Note The self timer recording is automatica...

Page 52: ...ingle colored subject or background OUTDOOR Recording a sunset sunrise just after sunset just before sunrise neon signs or fireworks Under a daylight fluorescent lamp INDOOR n When lighting conditions change quickly In too bright places such as photography studios Under sodium lamps or mercury lamps To return to FN Press EXIT To return to the automatic white balance mode Set WHT BAL to AUTO in the...

Page 53: ... correctly in the INDOOR mode In the AUTO mode Point your camcorder at the white subject for about 10 seconds after setting the POWER switch to CAMERA to get better adjustment when You take out the battery for replacement You bring your camcorder from indoors to outdoors holding the exposure or vice versa In the HOLD mode Set the white balance to AUTO and reset to HOLD after a few seconds when You...

Page 54: ...se direction If you set the screen mode of the wide screen TV to the full mode you can watch pictures of normal images d 1 Set the POWER switch to CAMERA 2 Press FN to display PAGE1 3 Press MENU then set 16 9WIDE in to ON in the menu settings p 179 To return to FN Press EXIT To cancel the wide mode Set 16 9WIDE to OFF in the menu settings Using the wide mode a c b d 16 9WIDE 2 FN 3 MENU D ZOOM 16 ...

Page 55: ...tures recorded in the 16 9WIDE mode automatically appear on the TV screen at full size when You connect your camcorder to a TV that is compatible with the video ID ID 1 ID 2 system You connect your camcorder to the S video jack on the TV ID 1 system The ID 1 system sends aspect ratio screen horizontal vertical ratio information 16 9 4 3 or letter box with video signals ID 2 system The ID 2 system ...

Page 56: ...picture gradually changes from black and white to color When fading out the picture gradually changes from color to black and white 1 You can use the BOUNCE function when D ZOOM is set to OFF in the menu settings 2 Fade in only Using the fader function M FADER mosaic BOUNCE1 2 a REC STBY REC STBY b FADER ...

Page 57: ...fader function Before pressing START STOP press FADER until the indicator disappears Note You cannot use the following functions while using the fader function Also you cannot use the fader function while using the following functions Super NightShot Color Slow Shutter Recording still images Digital effect Memory overlap of MEMORY MIX While using the BOUNCE function you cannot use the following fu...

Page 58: ...A 2 Press FN to display PAGE1 3 Press MENU then select P EFFECT in in the menu settings to select a desired picture effect mode p 178 To return to FN Press EXIT To turn the picture effect function off Select OFF in P EFFECT in the menu settings While using the picture effect function you cannot use following functions Recording still images BOUNCE OLD MOVIE When you turn the POWER switch to the ot...

Page 59: ...als LUMI LUMINANCE KEY You can swap the brighter area in a still image with a moving picture TRAIL You can record a picture so that an incidental image like a trail is left SLOW SHTR SLOW SHUTTER You can slow down the shutter speed The slow shutter mode is good for recording dark pictures more brightly OLD MOVIE You can add an old movie type atmosphere to pictures Your camcorder automatically sets...

Page 60: ... the still image which is to be swapped with a moving picture TRAIL The vanishing time of the incidental image SLOW SHTR Shutter speed The larger the shutter speed number the slower the shutter speed OLD MOVIE No adjustment necessary 6 Press OK The display returns to PAGE2 To return to FN Press EXIT after step 6 To cancel the digital effect Press OFF in step 3 The display returns to PAGE2 Using sp...

Page 61: ...g functions do not work in the OLD MOVIE mode Wide mode Picture effect PROGRAM AE When you turn the POWER switch to the other position The digital effect will be automatically canceled When recording in the slow shutter mode Auto focus may not be effective Focus manually using a tripod Shutter speed Shutter speed number Shutter speed SLOW SHTR 1 1 30 SLOW SHTR 2 1 15 SLOW SHTR 3 1 8 SLOW SHTR 4 1 ...

Page 62: ...mizes shake on fast moving subjects such as in tennis or golf BEACH SKI This mode prevents people s faces from appearing dark in strong light or reflected light such as at a beach in midsummer or on a ski slope SUNSETMOON Sunset moon This mode allows you to maintain atmosphere when you are recording sunsets general night views fireworks displays and neon signs LANDSCAPE This mode is for when you a...

Page 63: ...rts lesson Beach ski Your camcorder is set to focus only on distant subjects in the following modes Sunset moon Landscape The following functions do not work in PROGRAM AE Color Slow Shutter BOUNCE Slow shutter OLD MOVIE The PROGRAM AE does not work in the following cases The indicator flashes NightShot NightFraming To record images on a Memory Stick using the MEMORY MIX When you set the POWER swi...

Page 64: ...just the following functions while using the PROGRAM AE Exposure Flexible Spot Meter If you record under a discharge tube such as a fluorescent lamp sodium lamp or mercury lamp Flickering or changes in color may occur in the following modes If this happens turn the PROGRAM AE off Soft portrait Sports lesson Using the PROGRAM AE ...

Page 65: ...XPOSURE screen appears 4 Press MANUAL 5 Adjust the exposure using To dim To brighten 6 Press OK The display returns to PAGE1 To return to FN Press EXIT after step 6 To return to the automatic exposure mode Press AUTO in step 5 The display returns to PAGE1 Note When you adjust the exposure manually the following functions do not work Backlight Color Slow Shutter Your camcorder automatically returns...

Page 66: ...4 Press the desired area in the frame on the LCD screen The SPOT METER indicator flashes on the LCD screen The exposure of the point you selected is adjusted 5 Press OK The display returns to PAGE1 To return to FN Press EXIT after step 5 To return to the automatic exposure mode Press AUTO in step 3 The display returns to PAGE1 Note The following functions do not work during the Flexible Spot Meter...

Page 67: ... sky When you want to change the focus from a subject in the foreground to a subject in the background Shooting a stationary subject when using a tripod 1 Set the POWER switch to CAMERA or MEMORY 2 Set FOCUS to MANUAL The 9 indicator appears 3 Turn the focus ring to sharpen focus To return to the autofocus mode Set FOCUS to AUTO About expanded focus If you set EXPANDED F in to ON in the menu setti...

Page 68: ...e to focus on Focal distance information is displayed for about three seconds on the LCD screen in the following cases When switching the focus adjustment mode from autofocus to manual When turning the focus ring Focal distance information This information aids focusing if it is not easy to focus on the subject for example when recording in the dark Use this information as a rough guide to get a s...

Page 69: ...ea in the frame on the LCD screen The SPOT FOCUS indicator flashes on the LCD screen When the point you selected is correctly focused the SPOT FOCUS indicator stops flashing 6 Press OK to return to PAGE1 To return to FN Press EXIT after step 6 To return to the autofocus mode Set FOCUS to AUTO Note When adjusting Spot Focus the following modes do not work Backlight Fader Focal distance information ...

Page 70: ...ally input scenes using the picture effect function You cannot record images on a tape on your camcorder while you are processing the image using the picture effect function However you can record images on a Memory Stick p 121 133 or on a VCR using your camcorder as a player Pictures processed by the picture effect function Pictures processed by the picture effect function are not output through ...

Page 71: ...ct function Press OFF in step 2 The display returns to PAGE2 Notes You cannot process externally input scenes using the digital effect function You cannot record images on a tape on your camcorder while you are processing the image using the digital effect function However you can record images on a Memory Stick p 121 133 or on a VCR using your camcorder as a player Pictures processed by the digit...

Page 72: ...e in the frame on the PB ZOOM screen The area you pressed moves to the center of the LCD screen and the playback image is enlarged to twice the size If you press the other area again the area moves to the center of the LCD screen 4 Adjust the zoom ratio by the zoom lever You can enlarge the image from 1 1 times up to five times its size W side Decrease the zoom ratio T side Increase the zoom ratio...

Page 73: ...ssing the picture using the tape PB ZOOM function The PB ZOOM function is automatically canceled when you operate the following functions Turn the POWER switch to the other position Stop playing back Insert a Memory Stick Images in the PB ZOOM Images in the PB ZOOM mode are not output through the i LINK MICROMV Interface and USB jack In the PB ZOOM mode If you press DISPLAY TOUCH PANEL the frame o...

Page 74: ...s function using the Remote Commander 1 Set the POWER switch to VCR 2 Press FN to display PAGE1 3 Press MULTI SCH The MULTI SCH screen appears 4 Press to select the direction to scan Your camcorder starts scanning in the selected direction When you select the thumbnails are displayed from the upper left window and when you select they are displayed from the lower right window When scanning is comp...

Page 75: ...and the white portion of the bar indicates the recorded portion When you want to change the thumbnail Press RET and then select the thumbnail you want to play back again then press EXEC c The title date The title turns to the date indication after five seconds d The actual point you are trying to search for yellow v mark e The present point on the tape yellow bar Searching for a scene MULTI PICTUR...

Page 76: ...ndition of the tape This is not a malfunction Noise may appear on the thumbnails However this has no effect on the recorded images If the tape has a blank portion in the beginning of the tape or between recorded portions The multi picture search function may not work correctly The number of thumbnails stored in one cassette About 400 thumbnails can be stored The number of thumbnails that can be di...

Page 77: ...s recordings When you have erased all the micro Cassette Memory of the tape p 99 To select the thumbnail with the Remote Commander Press X x C c on the Remote Commander When you press DATE or q POS You can switch to the title date display or the tape bar display that shows the present point on the tape While your camcorder is searching for the image or scene the tape bar display appears even if yo...

Page 78: ...he scene with the title selected Even if you do not press EXECUTE searching the boundaries starts automatically in two seconds after you select the title a Actual point you are trying to search for b Present point on the tape To stop searching Press STOP on the Remote Commander If a tape has a blank portion in the beginning of the tape or between recorded sections The title search function may not...

Page 79: ...e for playback then press EXECUTE on the Remote Commander Searching the boundaries starts and playback automatically starts at the scene with the date selected Even if you do not press EXECUTE searching the boundaries starts automatically in two seconds after you select the date a Actual point you are trying to search for b Present point on the tape To stop searching Press STOP on the Remote Comma...

Page 80: ...y will not be superimposed on the edited tape On your camcorder DISPLAY TOUCH PANEL On the Remote Commander DISPLAY DATA CODE SEARCH MODE MULTI SRCH 1 Insert a blank tape or a tape you want to record over into the VCR and insert the recorded tape into your camcorder 2 Prepare the VCR for recording then set the input selector to LINE Refer to the operating instructions of the VCR 3 Set the POWER sw...

Page 81: ...e audio input jack on the VCR When the white plug is connected the left channel audio is output and when the red plug is connected the right channel audio is output If your VCR has an S video jack Connect using the S video plug to faithfully obtain original pictures With this connection you do not need to connect the yellow video plug of the A V connecting cable Connect the S video plug to the S v...

Page 82: ...g on the VCR Refer to the operating instructions of the VCR When you have finished dubbing a tape Stop recording on the VCR and stop playback on your camcorder You can connect one VCR only using the i LINK cable See page 198 for more information about i LINK Pictures processed by the picture effect the digital effect or PB ZOOM function These pictures are not output through the i LINK MICROMV Inte...

Page 83: ...e to select one of the jacks in the menu settings The default setting is VIDEO If the setup is not necessary go to 2 Making a recording on page 84 1 Set the POWER switch to VCR 2 Press FN to display PAGE1 3 Press MENU then select VIDEOINPUT in in the menu settings then press EXEC 4 Select VIDEO When using a video plug or S VIDEO When using an S video plug then press EXEC To return to FN Press EXIT...

Page 84: ...E 4 Start playback on VCR if you record a tape from VCR Select a TV program if you record from TV The picture from VCR or TV appears on the LCD screen or in the viewfinder 5 Press REC START at the scene where you want to start recording from Recording video or TV programs 3 5 3 FN PAGE1 PAGE2 PAGE3 EXIT DATA CODE COUNT RESET REC CTRL REC PAUSE REC CTRL RET PAGE3 zX 0 01 18 S VIDEO VIDEO AUDIO OUT ...

Page 85: ... on the VCR or the TV When the white plug is connected the left channel audio is output and when the red plug is connected the right channel audio is output If your TV or VCR has an S video jack Connect using the S video plug to faithfully obtain original pictures With this connection you do not need to connect the yellow video plug of the A V connecting cable Connect the S video plug to the S vid...

Page 86: ...sert the recorded tape into VCR 2 Set the POWER switch to VCR 3 Start playback on VCR The picture from the VCR appears on the LCD screen of your camcorder 4 Set your camcorder in the recording pause mode Press FN and go to PAGE3 then press q REC CTRL Next press REC PAUSE 5 Press REC START at the scene where you want to start recording 4 5 PAGE1 PAGE2 PAGE3 EXIT REC PAUSE RET REC START 4 FN PAGE3 R...

Page 87: ...rns to the recording pause mode If no signal is input into your camcorder the message NO INPUT appears and the camcorder cannot start recording Note on playback pause pictures When you record a playback pause picture The recorded picture becomes rough when recorded through the i LINK MICROMV Interface The picture may jitter when you play back the tape on other video equipment And there may be a ti...

Page 88: ...r R The PRESET TITLE screen appears Press EXEC 5 Press r R to select a desired title then press EXEC The title is displayed on the LCD screen 6 If necessary change the color size or position by pressing COLOR SIZE POS r or POS R 7 Press TITLE OK The screen to save a title appears on the LCD screen 8 Press SAVE TITLE The TITLE indicator appears And when you press START STOP to start recording TITLE...

Page 89: ...perimposed the title may be detected as an index signal when searching a recording with other video equipment 3 4 5 7 8 VACATION COLOR RET POS r SIZE TITLE OK EXIT POS R PRESET TITLE HELLO HAPPY BIRTHDAY HAPPY HOLIDAYS CONGRATULATIONS OUR SWEET BABY WEDDING VACATION THE END EXIT RET EXEC R r PRESET TITLE HELLO HAPPY BIRTHDAY HAPPY HOLIDAYS CONGRATULATIONS OUR SWEET BABY WEDDING VACATION THE END EX...

Page 90: ...nnot input 13 characters or more in LARGE size If you select the title size SMALL you have nine choices for the title position If you select the title size LARGE you have eight choices for the title position The number of titles recordable on one cassette You can record up to 20 titles when each title consists of 12 characters When 20 titles are already superimposed The message TITLE FULL appears ...

Page 91: ...are displayed from the lower right window After the scanning is completed the thumbnails are displayed on the index screen 6 Select the thumbnail on which you want to superimpose a title then press EXEC or the thumbnail again The title menu appears 7 Perform step 4 to 7 in Superimposing a title on starting a recording on page 88 8 Press SAVE TITLE TITLE SAVE appears on the LCD screen for about fiv...

Page 92: ...ear on the thumbnails However this has no effect on the recorded images You cannot execute TITLE SAVE until the playback picture is displayed in step 8 To use a custom title If you want to use a custom title select in step 7 On a blank portion of the tape You cannot superimpose a title on the tape Superimposing a title ...

Page 93: ...sage ERASING flashes while erasing After the erasing is completed the message COMPLETE appears To return to FN Press EXIT To cancel erasing Press CANCEL in step 4 3 4 5 2 FN CM SET TITLEERASE TITLE DSPL TAPE TITLE ERASE ALL qINFODSPL READY TITLE ERASE 1 HELLO 2 CONGRATULATIONS 3 HAPPY NEW YEAR 4 PRESENT 5 GOOD MORNING 6 WEDDING TITLE ERASE 4 PRESENT EXIT RET EXEC R r END EXEC R r TITLE ERASE 1 HEL...

Page 94: ...dure as steps 6 and 7 to complete your title 8 Press SET The title is stored in memory Making your own titles 5 4 3 6 7 TITLE SET CUSTOM1 SET CUSTOM2 SET TITLE SET CUSTOM1 SET CUSTOM2 SET TITLE SET CUSTOM1 SET CUSTOM2 SET 2 EXIT RET EXEC R r EXIT RET EXEC R r EXIT RET EXEC R r ABC DEF T t 678 90 123 45 MNO JKL GHI SET WXY Z TUV PQR S ____________________ EXIT TITLE SET ABC DEF T t 678 90 123 45 MN...

Page 95: ...n the standby mode while a cassette is in your camcorder The power automatically goes off The characters you have entered remain stored in memory Set the POWER switch to CHG OFF and start again from step 1 to complete your title We recommend setting the POWER switch to VCR p 96 or removing the cassette so that your camcorder does not automatically turn off while you are entering title characters T...

Page 96: ...in CAMERA mode on page 94 7 Press SET The title is stored in memory To return to FN Press EXIT To superimpose your own title on tape Follow the procedure in Superimposing a title on starting a recording on page 88 Making your own titles 5 7 3 TITLE END INPUT TITLE TITLE SET TITLE SET CUSTOM1 SET CUSTOM2 SET TITLE SET CUSTOM1 BASEBALL CUSTOM2 SET ABC DEF T t 678 90 123 45 MNO JKL GHI SET WXY Z TUV ...

Page 97: ...tings Cassette label c The first recorded date in this cassette d The last recorded date in this cassette e The recorded area is indicated by the white bar Recorded areas A blank portion between recorded area is also indicated as a recorded area To not display the cassette information Set qINFODSPL to OFF in the menu settings When is flashing Eject the cassette and insert it again If the message i...

Page 98: ...the key 6 Press t to move the cursor for the next character Repeat the same procedure as steps 5 and 6 to complete the label 7 Press SET The label is stored in memory The micro Cassette Memory 3 FN 4 5 7 ABC DEF T t 678 90 123 45 MNO JKL GHI SET WXY Z TUV PQR S EXIT TAPE TITLE ABC DEF T t 678 90 123 45 MNO JKL GHI SET WXY Z TUV PQR S GRADUATION_ _ _ _ _ _ _ _ _ EXIT TAPE TITLE CM SET TITLEERASE TI...

Page 99: ...ite protection To erase the character Press T The last character is erased To enter a space Press t To enter the character on the same button in succession Press t to move the cursor to the next position and enter the character Erasing all the data in micro Cassette Memory You can delete all the data in micro Cassette Memory at once 1 Set the POWER switch to CAMERA or VCR 2 Press FN to display PAG...

Page 100: ...ot record or erase images when the write protect tab on the Memory Stick is set to LOCK The position and shape of the write protect tab may be different depending on the model We recommend backing up important data on the hard disk of your computer Image data may be damaged in the following cases If you remove the Memory Stick turn the power off or take out the battery for replacement when the acc...

Page 101: ... Technology Industries Association On your camcorder you cannot play back still images recorded on other equipment DCR TRV890E TRV900 TRV900E or DSC D700 D770 that does not conform to this universal standard These models are not sold in some areas If you cannot use the Memory Stick that is used with other equipment format it with your camcorder p 182 Note that formatting erases all information on ...

Page 102: ...Do not shake or strike your camcorder because your camcorder is reading the data from the Memory Stick or recording the data on the Memory Stick Do not turn the power off eject a Memory Stick or take out the battery pack Otherwise image data breakdown may occur If MEMORY STICK ERROR is displayed Reinsert a Memory Stick a few times The Memory Stick may be damaged if the indicator is still displayed...

Page 103: ... PAGE1 appear on the LCD screen 4 Press PAGE2 to go to PAGE2 The operation buttons of PAGE2 appear on the LCD screen 5 Press PAGE3 to go to PAGE3 The operation buttons of PAGE3 appear on the LCD screen 6 Press a desired operation item See relevant pages of this manual for each function Using a Memory Stick Introduction FN 1 3 5 2 FN INDEX PLAY NETWORK FN INDEX CAM PLAY INDEX PAGE1 PAGE2 PAGE3 PAGE...

Page 104: ...ar You can control the display with DISPLAY TOUCH PANEL on your camcorder When operation buttons do not work even if you press them an adjustment is required CALIBRATION p 204 When the LCD screen gets dirty use the supplied cleaning cloth When executing each item The green bar appears above the item If the items are not available The color of the items changes to gray Press FN to display the follo...

Page 105: ...he menu settings then press EXEC p 181 4 Press r R to select QUALITY then press EXEC 5 Press r R to select the desired image quality then press EXEC To return to FN Press EXIT Using a Memory Stick Introduction 2 FN 3 5 1 MEMORY NETWORK CAMERA CHG OFF ON MODE VCR POWER EXIT RET EXEC SUPER FINE FINE STANDARD REMAIN 23 MEMORY SET STILL SET BURST QUALITY IMAGESIZE EXIT RET EXEC OFF MEMORY SET STILL SE...

Page 106: ...ng Differences in image quality Recorded images are compressed in JPEG format before being stored in memory The memory capacity allocated to each image varies depending on the selected image quality mode and image size Details are shown in the table below You can select 1600 1200 or 640 480 image size in the menu settings 1600 1200 image size Image quality mode Memory capacity SUPER FINE About 124...

Page 107: ... MENU then select MOVIE SET in in the menu settings then press EXEC p 181 4 Press r R to select MOVIEMODE then press EXEC 5 Press r R to select the desired image quality then press EXEC 2 FN MEMORY SET MOVIE SET MOVIEMODE REMAIN SUPER FINE REMAIN 45sec MEMORY SET MOVIE SET MOVIEMODE REMAIN MEMORY SET MOVIE SET MOVIEMODE REMAIN FINE REMAIN 1min SUPER FINE FINE STANDARD LIGHTMODE REMAIN 1min EXIT RE...

Page 108: ...y however declines Frame rate A moving picture consists of continuous still images Frame rate indicates the number of images played back in one second The more the number increases the more natural the moving picture becomes You can play back a maximum of 30 still images per second with your camcorder 30 fps frame per second Bit rate The higher the bit rate the more natural the moving picture beco...

Page 109: ...ct IMAGESIZE then press EXEC 5 Press r R to select the desired image size then press EXEC The indicator changes as follows 1600 640 Note When still images recorded on your camcorder in 1600 1200 size are played back on other equipment that does not support 1600 1200 size the full image may not appear Using a Memory Stick Introduction 2 FN 3 5 1 EXIT RET EXEC 1600 1200 640 480 REMAIN 40 MEMORY SET ...

Page 110: ...0 images 160 images 325 images 650 images 1310 images STANDARD 1600 1200 18 images 37 images 75 images 150 images 300 images 640 480 120 images 240 images 485 images 980 images 1970 images The table above shows approximate number of still images you can record on a Memory Stick formatted by your camcorder Approximate time of moving pictures you can record on a Memory Stick The time of moving pictu...

Page 111: ...he image Recording does not start yet 3 Press PHOTO deeper The image displayed on the LCD screen will be recorded on a Memory Stick You can record still images on a Memory Stick in the recording standby mode or while recording on tape in CAMERA mode For the details see page 47 Recording still images on a Memory Stick Memory photo recording 3 2 1 12 FN INDEX PLAY FN INDEX PLAY SFN 1600 SFN 1600 NET...

Page 112: ...y in step 2 The image momentarily flickers This is not a malfunction Recording data The recording data date time or various settings when recorded are not displayed while recording However they are recorded automatically onto the Memory Stick To display the recording data press DATA CODE during playback You can also use the Remote Commander for this operation p 43 When the POWER switch is set to M...

Page 113: ...00 1200 size or 25 still images in 640 480 size at about 0 5 sec intervals HIGH SPEED a Your camcorder shoots up to 32 still images in 640 480 size at about 0 07 sec intervals EXP BRKTG Exposure Bracketing Your camcorder automatically shoots three images at about 0 5 sec intervals at different exposures MULTI SCRN Multi Screen b Your camcorder shoots nine still images at about 0 5 sec intervals an...

Page 114: ...ending on the image size and the capacity of the Memory Stick During recording still images continuously The flash does not work When shooting with the self timer function or the Remote Commander Your camcorder automatically records up to the maximum recordable number of still images When selecting HIGH SPEED Flickering or changes in color may occur Also your camcorder prevents focusing on near ob...

Page 115: ...of EXP BRKTG The effect of EXP BRKTG may not be noticeable on the LCD screen We recommend viewing images on a TV or computer to realize the effect When selecting NORMAL or HIGH SPEED Recording continues up to the maximum number of still images during pressing PHOTO deeper Release PHOTO to stop recording ...

Page 116: ...enu settings p 178 Try recording various images to find the most appropriate setting for FLASH LVL Notes The recommended shooting distance using the built in flash is 0 3 m to 2 5 m 31 32 feet to 8 1 3 feet Attaching the lens hood supplied or a conversion lens optional may block the light from the flash or cause lens shadow to appear Auto red eye reduction and Forced red eye reduction may not prod...

Page 117: ... holograms is a new AF optical system that enables still image shooting in dark places Having gentler radiation than conventional high brightness LEDs or lamps the system satisfies Laser Class 1 specification and thus maintains higher safety for human eyes No safety problems will be caused by directly looking into the HOLOGRAM AF emitter at a close range However it is not recommended to do so beca...

Page 118: ... if the light emitted from the HOLOGRAM AF is blocked by an obstruction Focus is achieved as long as HOLOGRAM AF light reaches to the subject even if its light is slightly out of the middle position of the subject If HOLOGRAM AF light is dim it sometimes becomes difficult to focus If this happens wipe the HOLOGRAM AF emitter with a soft dry cloth The HOLOGRAM AF does not emit when The POWER switch...

Page 119: ...cording starts To cancel NightFraming set NIGHTSHOT NIGHTFRAMING to the center position green z position While using NightFraming you cannot use the following functions White balance PROGRAM AE Exposure Flexible Spot Meter Spot Focus Continuous photo recording While using NightFraming Even if FOCUS is set to MANUAL focus is automatically adjusted Even if HOLOGRAM F is set to OFF in the menu settin...

Page 120: ...wo seconds of the countdown the beep sound gets faster then recording starts automatically To cancel self timer recording Press SELFTIMER in PAGE2 screen so that the self timer indicator disappears from the LCD screen You cannot cancel self timer recording using the Remote Commander Note The self timer recording mode is automatically canceled when Self timer recording is finished You turn NIGHTSHO...

Page 121: ... image on a Memory Stick Before operation Insert a recorded tape into your camcorder Insert a Memory Stick into your camcorder 1 Set the POWER switch to VCR 2 Press The picture recorded on the tape is played back 3 Keep pressing PHOTO lightly until the picture from the tape freezes CAPTURE appears on the LCD screen Recording does not start yet 4 Press PHOTO deeper The image displayed on the LCD sc...

Page 122: ...ress PHOTO lightly in the playback mode Your camcorder stops momentarily Sound recorded on a tape You cannot record audio from a tape Titles which have already been recorded on tapes You cannot record the titles on the Memory Stick The title does not appear while you are recording a still image with PHOTO Recording date time The date time when it is recorded on a Memory Stick is recorded Various s...

Page 123: ...m The image of the other equipment is displayed on the LCD screen or in the viewfinder 4 At the point where you want to record follow the steps 3 and 4 on page 121 Using the A V connecting cable If your TV or VCR has an S video jack Connect using the S video plug to faithfully obtain original pictures With this connection you do not need to connect the yellow video plug of the A V connecting cable...

Page 124: ...ample a tape that is worn out from repeated dubbing recording is interrupted or REC ERROR appears and recording cannot be carried out Record distortion free images i LINK MICROMV Interface i LINK MICROMV Interface Signal flow i LINK cable optional Recording an image from a tape as a still image ...

Page 125: ...ding a title on a Memory Stick before a trip or event C CHROM Camera chroma key You can superimpose a moving picture on top of a still image such as an image which can be used as background Shoot the subject against a blue background Only the blue area of the moving picture will be swapped with a still image M OVERLAP Memory overlap You can fade from a still image recorded on a Memory Stick into a...

Page 126: ...o superimpose To see the previous image To see the next image 5 Press a desired mode The still image is superimposed on the moving picture 6 Press on the left lower corner of the LCD screen to adjust the effect then press OK to return to PAGE2 M CHROM Blue chroma key only blue background portion to extract a still image and superimpose it on a moving picture M LUMI Brightness level used when extra...

Page 127: ...still image has a large amount of white the thumbnail image of the picture may not be clear During recording you cannot reselect the mode setting Press OFF to return to PAGE2 Image data modified on your computer or shot with other equipment You may not be able to play modified images back with your camcorder When you select M OVERLAP You cannot change the still image Press OFF to cancel the M OVER...

Page 128: ...The still image is superimposed on the moving picture 6 Press on the left lower corner of the LCD screen to adjust the effect then press OK The display returns to PAGE2 M CHROM Blue chroma key blue background to extract a still image and superimpose it on a moving picture M LUMI Brightness level used when extracting a still image and superimposing it on a moving picture C CHROM Blue chroma key blu...

Page 129: ...PAGE2 Image size of still images Image size is automatically set to 640 480 Image data modified with your computers or shot with other equipment You may not be able to play them back with your camcorder When recording images on a Memory Stick using MEMORY MIX The PROGRAM AE does not work The Memory Stick supplied with your camcorder stores 20 images For M CHROM 18 images such as a frame 100 0001 t...

Page 130: ... your camcorder lights up Quality mode Maximum recordable time SUPER FINE 45 s FINE 1 min 10 s STANDARD 2 min 20 s LIGHTMODE 4 min 40 s To stop recording Press START STOP Recording moving pictures on a Memory Stick MPEG MOVIE recording a Recording time indicator can be recorded on the Memory Stick b This indicator is displayed for five seconds after pressing START STOP This indicator is not record...

Page 131: ...e SteadyShot When using an external flash optional Turn the power of the external flash off when recording moving pictures on a Memory Stick Otherwise the charging sound of the flash may be recorded Recording date time The date time are not displayed while recording However they are automatically recorded onto the Memory Stick To display the recording date time press DATA CODE during playback Vari...

Page 132: ...then recording starts automatically To stop the countdown Press START STOP To restart the countdown press START STOP again To cancel the self timer recording Press SELFTIMER in PAGE2 screen so that the self timer indicator disappears on the LCD screen You cannot cancel the self timer recording using the Remote Commander Note The self timer recording mode is automatically canceled when Self timer r...

Page 133: ...o is converted to monaural sound when recording from a tape When the Memory Stick access lamp is lit or flashing Do not shake or strike the unit As well do not turn the power off eject a Memory Stick or take out the battery pack Otherwise the image data breakdown may occur Titles which have already been recorded on tapes You cannot record the titles on the Memory Stick The title does not appear wh...

Page 134: ...e other equipment is displayed on the LCD screen or in the viewfinder 4 Press START STOP at the scene where you want to start recording from Using the A V connecting cable If your TV or VCR has an S video jack Connect using the S video plug to faithfully obtain original pictures With this connection you do not need to connect the yellow video plug of the A V connecting cable Connect the S video pl...

Page 135: ...ion for example a tape that is worn out from repeated dubbing recording is interrupted or REC ERROR appears and recording cannot be carried out Record distortion free images Recording a picture from a tape as a moving picture i LINK MICROMV Interface i LINK MICROMV Interface i LINK cable optional Signal flow ...

Page 136: ... your camcorder When playing back image data modified on your computers When playing back image data shot with other equipment Playback still images recorded on the Memory Stick Playback images are not output from the i LINK MICROMV Interface File name The directory number may not be displayed and only the file name may be displayed if the structure of the directory does not conform to the DCF sta...

Page 137: ...or PAGE3 Screen indicators during still image playback When no images are recorded on the Memory Stick When you press MEMORY PLAY on the Remote Commander NO FILE appears Recording data To display the recording data date time or various settings when recorded press DATA CODE during playback You can also use the Remote Commander for this operation p 43 To make LCD screen indicators disappear Press D...

Page 138: ...ex screen mode To display the previous six images press T To display the following six images press t You can also use on the Remote Commander To return to FN Press EXIT To return to the normal playback screen single screen Press the image you want to display Note When displaying the index screen the number appears above each image This indicates the order in which images are recorded on the Memor...

Page 139: ...he LCD screen facing inwards no sound is heard from your camcorder To pause MPEG MOVIE playback Press MPEG N X To resume playback press MPEG N X again To change the screen size Press SCRN SIZE The screen size changes as follows Notes on the screen size The picture may not be displayed at the middle of the LCD screen depending on the movie Even if you switch the screen size the picture may not be d...

Page 140: ...n PAGE1 PAGE2 or PAGE3 When no images are recorded on the Memory Stick When you press MEMORY PLAY on the Remote Commander NO FILE appears Screen indicators during moving picture playback Recording date time To display the recording date time press DATA CODE during playback You can also use the Remote Commander for this operation p 43 To make screen indicators disappear Press DISPLAY TOUCH PANEL Vi...

Page 141: ...e desired images and stop playback 3 Press PB The last recorded image is displayed 4 Press to select the desired image To see the previous image To see the next image 5 Press FN and go to PAGE3 6 Press q REC CTRL then REC START Copying starts Press REC PAUSE at the scene where you want to stop recording 7 If you have more to copy repeat steps 4 to 6 To stop copying in the middle Press on the LCD s...

Page 142: ...pe when NOT REC is displayed You cannot copy the index screen to the tape During copying You cannot operate the following functions MEMORY PLAY MEMORY INDEX MEMORY DELETE MEMORY MEMORY MIX Image data modified on your computer or shot with other equipment You may not be able to copy modified images with your camcorder Copying still images recorded on a Memory Stick to a tape REC ...

Page 143: ...ea that you want to enlarge in the frame on the PB ZOOM screen The area you pressed moves to the center of the LCD screen and the playback image is enlarged at twice the size If you press the other area the area moves to the center of the LCD screen 4 Adjust the zoom ratio by the zoom lever You can select the image from 1 1 times up to five times its size W side Decrease the zoom ratio T side Incr...

Page 144: ...Edge of an enlarged image The edge of an enlarged image cannot be displayed in the center of the LCD screen Moving pictures recorded on the Memory Stick The PB ZOOM function does not work To record an image processed by PB ZOOM on the Memory Stick Press PHOTO to record the image processed by PB ZOOM Images are recorded at 640 480 size When FOCUS is set to ZOOM You can change the zoom ratio using t...

Page 145: ...op the slide show Press END To pause during a slide show Press PAUSE To return to FN Press END then press EXIT To start the slide show from a particular image Select the desired image using buttons before step 4 To view the recorded images on TV Connect your camcorder to a TV with the A V connecting cable supplied with your camcorder p 46 before operation If you change the Memory Stick during oper...

Page 146: ...e appears 5 Press the image you want to protect The appears above the protected image To return to FN Press EXIT To cancel image protection Press the image you want to cancel image protection in step 5 again The disappears Note Formatting erases all information on the Memory Stick including the protected image data Check the contents of the Memory Stick before formatting If the write protect tab o...

Page 147: ... delete 3 Press FN to display PAGE1 4 Press DELETE DELETE appears on the LCD screen 5 Press OK The selected image is deleted To return to FN Press EXIT after step 5 To cancel deleting an image Press CANCEL in step 5 Notes To delete a protected image first cancel image protection Once you delete an image you cannot restore it Check the images to delete carefully before deleting them If the write pr...

Page 148: ...ge you want to delete The number of the selected image is highlighted 5 If there is other image you want to delete press the image 6 After selecting the image to be deleted press EXEC DELETE appears on the LCD screen 7 Press OK The selected images are deleted To return to FN Press EXIT after step 7 To cancel deleting an image Press CANCEL in step 7 Deleting images DELETE 3 INDEX 4 1 3 2 4 5 6 EXIT...

Page 149: ...nges to EXECUTE 5 Press EXEC DELETING appears on the LCD screen When all the unprotected images are deleted COMPLETE is displayed To return to FN Press EXIT To cancel deleting all the images Press R r to select RETURN in step 5 then press EXEC While DELETING appears Do not turn the POWER switch to the other position or press any buttons Deleting images DELETE 3 2 FN STILL SET MOVIE SET SLIDE SHOW ...

Page 150: ...p 3 3 Press INDEX to display the index 4 Press MARK The screen to write a print mark appears 5 Press the image you want to write a print mark The appears on the selected image To return to FN Press EXIT To cancel writing print marks Press the image you want to cancel the print mark in step 5 again The disappears If the write protect tab on the Memory Stick is set to LOCK You cannot write print mar...

Page 151: ...tion of the i LINK driver the USB driver or the application softwares before connecting your camcorder to the computer If you connect your camcorder to your computer first you will not be able to install the i LINK driver or the USB driver correctly For details about your computer s connectors and editing software contact the computer manufacturer Viewing Images Using your Computer Viewing images ...

Page 152: ...k Compressed files cannot be played back on your camcorder Software Depending on your application software the file size may increase when you open a still image file When you load an image modified using retouching software from your computer to your camcorder or when you directly modify the image on your camcorder the image format will differ so a file error indicator may appear and you may be u...

Page 153: ...ied with MovieShaker Ver 3 1 for MICROMV Recommended computer environment Recommended Windows environment OS Microsoft Windows Me Windows 2000 Professional Windows XP Home Edition Windows XP Professional Standard installation is required Operation is not assured if the above environment is an upgraded OS CPU Pentium III 600 MHz or faster Required Pentium III 800 MHz or faster Recommended Main memo...

Page 154: ... tape images on your computer OS Microsoft Windows 98SE Windows Me Windows 2000 Professional Windows XP Home Edition or Windows XP Professional Standard installation is required However operation is not assured if the above environment is an upgraded OS You cannot hear sound if your computer is running Windows 98 but you can read still images CPU Pentium III 500 MHz or faster 800 MHz or faster rec...

Page 155: ...ions are not guaranteed for the Windows environment if you connect two or more USB equipment to a single computer at the same time or when using a hub Some equipment may not operate depending on the type of USB equipment that is used simultaneously Operations are not guaranteed for all the recommended computer environments mentioned above Windows and Windows Media are registered trademarks of Micr...

Page 156: ...itle screen appears 3 Move the cursor to USB Driver and click This starts USB driver installation 4 Follow the on screen messages to install the USB driver 5 Remove the CD ROM and then restart the computer in accordance with the instructions on the screen Notes If you connect the USB cable before USB driver installation is complete the USB driver will not be properly registered Carry out installat...

Page 157: ...using Windows 2000 Professional log in with permission of administrators If you are using Windows XP log in with permission of computer administrators 1 Turn on your computer and allow Windows to load 2 Insert the supplied CD ROM in the CD ROM drive of your computer The application software starts up and the title screen appears 3 Move the cursor to Image Transfer and click This starts Image Trans...

Page 158: ... into the CD ROM drive of your computer The application software starts up and the title screen appears If the title screen does not appear double click My Computer and then ImageMixer CD ROM Drive The application software screen appears after a while 3 Move the cursor to PIXELA ImageMixer and click The Install Wizard program starts up and the Select Settings Language screen appears 4 Select the l...

Page 159: ...our camcorder and the Windows Add Hardware Wizard starts 4 Follow the on screen messages so that the Add Hardware Wizard recognizes that the USB drivers have been installed The Add Hardware Wizard starts three times because three different USB drivers are installed Be sure to allow the installation to complete without interrupting it For Windows 2000 Professional Windows XP users 5 After the Files...

Page 160: ...reen of your camcorder Your computer recognizes your camcorder and the Add Hardware Wizard starts 4 Follow the on screen messages so that the Add Hardware Wizard recognizes that the USB drivers have been installed The Add Hardware Wizard starts two times because two different USB drivers are installed Be sure to allow the installation to complete without interrupting it You cannot install the USB ...

Page 161: ...he AC power adaptor and set the POWER switch to VCR 3 Connect the USB connector on your computer to the USB jack on your camcorder using the USB cable supplied with your camcorder 4 Open your computer s Device Manager Windows XP Select Start t Control Panel t System t Hardware and click the Device Manager button If there is no System inside Pick a category after clicking Control Panel click Switch...

Page 162: ...rs Windows 2000 Professional Windows XP 6 Turn the POWER switch to CHG OFF on your camcorder and then disconnect the USB cable 7 Restart your computer Step 2 Install the USB driver on the supplied CD ROM Perform the entire procedure described in Installing the USB driver on page 156 ...

Page 163: ...er s Device Manager Windows 2000 Professional Select My Computer t Control Panel t System t Hardware and click the Device Manager button Other OS Select My Computer t Control Panel t System and click Device Manager 6 Select Other devices Select the device prefixed with the mark and delete Ex Sony Handycam 7 Turn the POWER switch to CHG OFF on your camcorder and then disconnect the USB cable 8 Rest...

Page 164: ...wing images recorded on a tape 1 Turn on your computer and allow Windows to load 2 Connect the AC power adaptor and insert a cassette into your camcorder 3 Set the POWER switch to VCR on your camcorder Select USB STREAM in to ON in the menu settings p 184 4 Select Start t Programs t PIXELA t ImageMixer t PIXELA ImageMixer Ver 1 0 for Sony The PIXELA ImageMixer Ver 1 0 for Sony startup screen appea...

Page 165: ...ndow on your computer Viewing pictures live from your camcorder 1 Follow the steps 1 2 on page 164 2 Set the POWER switch to CAMERA Select USB STREAM in to ON in the menu settings p 184 3 Follow the steps 4 to 7 on pages 164 165 The picture from your camcorder appears on the preview window on your computer USB connector USB cable supplied USB jack Preview window Viewing images recorded on a tape o...

Page 166: ...n is captured Captured images are displayed in the thumbnail list window Capturing moving pictures 1 Click 2 Looking at the preview window click at the first scene of the movie you want to capture changes to 3 Looking at the preview window click at the last scene you want to capture The moving picture is captured The captured images appear in the thumbnail list window Preview window Thumbnail list...

Page 167: ...r If you capture a fast moving picture the preview window may not move smoothly You can make the picture move more smoothly by shifting the slider on the bottom of the preview window to the left although this reduces the picture quality If image data cannot be transferred by the USB connection The USB driver has been registered incorrectly as your computer was connected to your camcorder before in...

Page 168: ...reen The ImageMixer s Manual screen appears 2 You can find the information you need from the list of contents To close on line help Click at the top right of the screen If you have any questions about PIXELA ImageMixer Ver 1 0 for Sony ImageMixer Ver 1 0 for Sony is a trademark of PIXELA corporation For more information refer to the operating instructions of the CD ROM supplied with your camcorder...

Page 169: ...2 Insert a Memory Stick into your camcorder and connect the AC power adaptor to you camcorder 3 Set the POWER switch to MEMORY 4 Connect the USB jack on your camcorder to the USB connector on your computer using the supplied USB cable 5 Image Transfer automatically starts up and the transfer of image data begins 6 ImageMixer automatically starts up enabling you to view the copied image 7 Select an...

Page 170: ...ng the supplied USB cable USB MODE appears on the LCD screen of your camcorder 5 Open My Computer on Windows and double click the newly recognized drive Example Removable Disk E The folders inside the Memory Stick are displayed 6 Select and double click the desired image file from the folder For the detailed folder and file name see Image file storage destinations and image files Desired file type...

Page 171: ...ss JPG Still image file MOV1ssss MPG Moving picture file Disconnect the USB cable and remove the Memory Stick or set the POWER switch to CHG OFF For Windows 2000 Professional Windows Me Windows XP users 1 Move the cursor to the Unplug or Eject Hardware icon on the Task Tray and click to cancel the applicable drive 2 After the Safe to remove message appears disconnect the USB cable and remove the M...

Page 172: ...nd a slot loading type CD ROM drive iBook or Power Mac G4 with the Mac OS 8 6 standard installation The USB connector must be provided as standard QuickTime 3 0 or newer must be installed to play back moving pictures Notes Operations are not guaranteed for the Macintosh environment if you connect two or more USB equipment to a single computer at the same time or when using a hub Some equipment may...

Page 173: ...he folder containing the six files related to Driver 4 Select the following two files and drag and drop them into the System Folder Sony Camcorder USB Driver Sony Camcorder USB Shim 5 When the message appears click OK The USB driver is installed on your computer 6 Remove the CD ROM from the computer 7 Restart your computer For Mac OS 9 1 9 2 Mac OS X v10 0 v10 1 The USB driver need not be installe...

Page 174: ...ck the desired image file from the folder Desired file type Double click in this order Still image Moving picture DCIM folder t 100MSDCF folder t Image file Copying a file to the hard disk of your computer before viewing it is recommended If you play back the file directly from the Memory Stick the image and sound may break off Disconnect the USB cable and remove the Memory Stick or set the POWER ...

Page 175: ...n under license All other product names mentioned herein may be the trademarks or registered trademarks of their respective companies Furthermore TM and are not mentioned in each case in this manual About Bluetooth lamp The blue lamp lights up when your camcorder is exchanging data with a device which has Bluetooth function Notes Make sure that your camcorder is in the standby mode with the POWER ...

Page 176: ...de are displayed on the LCD screen Press the buttons with the supplied stylus After using the stylus Put it back in the holder on the grip belt Insert it until it clicks as shown below Note While operating the network functions Press the buttons lightly with your finger or the supplied stylus supporting the back of the LCD panel Do not cover the part shown in the illustration or radio waves may be...

Page 177: ... details see Selecting the mode setting of each item p 178 Only the DCR IP220 has NETWORK mode MANUAL SET PROGRAM AE RED EYE R FLASH LVL WHT BAL SHARPNESS EXIT RET EXEC R r MANUAL SET STBY STBY PROGRAM AE P EFFECT RED EYE R FLASH LVL WHT BAL SHARPNESS AUTO SHTR EXIT RET EXEC R r MANUAL SET P EFFECT EXIT RET EXEC R r VCR MEMORY NETWORK CAMERA FN MENU r R EXEC OTHERS AREA SET DST SET BEEP COMMANDER ...

Page 178: ...nu settings Mode z OFF ON HIGH z NORMAL LOW z ON OFF Meaning To suit your specific shooting requirement p 62 To add special effects like those in films or on the TV to images p 58 70 Red eye reduction does not function Preliminary flash before recording prevents red eye To make the flash level higher than normal To use the normal setting To make the flash level lower than normal To adjust the whit...

Page 179: ...gital zoom Up to 10 zoom is carried out To activate the digital zoom More than 10 to 20 zoom is performed digitally p 33 To activate the digital zoom More than 10 to 120 zoom is performed digitally p 33 Not to activate the expanded focus While focusing manually the center of the screen is displayed at twice the size Not to record a 16 9 wide picture To record a 16 9 wide picture p 54 To compensate...

Page 180: ...e will not be affected Mode z VIDEO S VIDEO z BRT NORMAL BRIGHT z BRT NORMAL BRIGHT Meaning To use the video plug of the A V connecting cable when recording from a player To use the S video plug of the A V connecting cable when recording from a player To set the brightness on the LCD screen normal To brighten the LCD screen To adjust the color on the LCD screen with To set the brightness on the vi...

Page 181: ...images in the finest image quality mode p 105 To record still images in the fine image quality mode To record still images in the standard image quality mode To record still images at 1600 1200 size p 109 To record still images at 640 480 size To record moving pictures with super fine image quality p 107 To record moving pictures with fine image quality To record moving pictures with standard imag...

Page 182: ...sample images recorded on the supplied Memory Stick will be erased Formatting erases protected image data on the Memory Stick Mode z SERIES RESET z RETURN OK Meaning To play back images in a continuous loop p 145 To assign numbers to file in sequence even if the Memory Stick is changed To reset the file numbering each time the Memory Stick is changed To delete all the unprotected images p 149 To c...

Page 183: ...on of the tape This is displayed for five seconds in the following cases p 97 When inserting a cassette in CAMERA mode When setting the POWER switch to VCR To not display the cassette information of the tape To display the remaining tape bar For about eight seconds after a cassette is inserted and your camcorder calculates the remaining amount of tape For about eight seconds after the playback but...

Page 184: ...a cassette set the POWER switch to other than CAMERA or set DEMO MODE to OFF To set to STBY Standby again leave DEMO MODE at ON in the menu settings turn the POWER switch to CHG OFF and return the POWER switch to CAMERA Meaning To set the date or time p 22 To deactivate the USB Streaming function To activate the USB Streaming function p 164 To display the following information indicators in Englis...

Page 185: ...der the date time and various settings are displayed during playback p 43 The date and time are displayed during playback To set your area temporarily when using your camcorder in a new location p 24 To be used when your area is not in daylight saving time To be used when your area is in daylight saving time To output the melody when you start stop recording or when an unusual condition occurs on ...

Page 186: ...nearly dead c Insert a fully charged battery pack p 17 18 The viewfinder lens is not adjusted correctly c Adjust the viewfinder lens p 32 STEADYSHOT is set to OFF in the menu settings c Set it to ON in the menu settings p 179 The setting is the manual focus mode c Set FOCUS to AUTO p 67 Shooting conditions are not suitable for autofocus c Adjust to focus manually p 67 The LCD panel is open c Close...

Page 187: ... the beginning of the tape or between record portion There is no title in the tape c Superimpose the titles p 88 The tape has a blank portion in the beginning of the tape or between recorded portion TITLE DSPL is set to OFF in the menu settings c Set it to ON in the menu settings p 183 When playing back a transition of recordings the playback picture freezes for about one second This is not a malf...

Page 188: ...e the battery pack fully again so that the indication on the battery remaining indicator is correct p 18 A deviation has occurred in the remaining battery time c Charge the battery pack fully again so that the indication on the battery remaining indicator is correct p 18 The power source is disconnected c Connect it firmly p 21 The battery is exhausted c Use a charged battery pack p 17 18 Moisture...

Page 189: ...ick is set to LOCK c Release the lock p 100 The INDEX screen is not displayed c Press INDEX to display the index screen then protect the image p 146 The write protect tab on the Memory Stick is set to LOCK c Release the lock p 100 The INDEX screen is not displayed c The print marks cannot be written to the single screen p 150 You are trying to write a print mark on a moving picture c Print marks c...

Page 190: ...correctly in the menu settings c Set it to the appropriate setting p 180 VIDEOINPUT is not set correctly in the menu settings c Set it to the appropriate setting Moisture condensation has occurred c Remove the cassette and leave your camcorder for at least one hour to acclimatize p 201 Some troubles have occurred in your camcorder c Remove the cassette and insert it again then operate your camcord...

Page 191: ... using mirror mode This is not a malfunction The USB cable was connected before installation of the USB driver was completed c Uninstall the incorrect USB driver and reinstall the USB driver p 161 USB STREAM is set to OFF in the menu settings c Set it to ON p 184 Moisture condensation has started to condense in your camcorder p 201 While charging the battery pack inserted in your camcorder the bat...

Page 192: ...rce operate your camcorder A malfunction that you cannot service has occurred c Contact your Sony dealer or local authorized Sony service facility and inform them of the 5 digit code example E 61 10 If you are unable to rectify the problem even if you try corrective actions a few times contact your Sony dealer or local authorized Sony service facility Your camcorder has a self diagnosis display fu...

Page 193: ...t flashing The Memory Stick data is corrupted p 100 Memory Stick is not formatted correctly p 182 If indicators and messages appear on the LCD screen check the following See the page in parentheses for more information Warning indicators Warning indicator as to incompatible Memory Stick Slow flashing An incompatible Memory Stick is inserted Q Warning indicator as to tape Slow flashing The tape is ...

Page 194: ...gain p 124 135 Q Z TAPE END The tape has reached the end of the tape Q NO TAPE Insert a cassette DELETING You press PHOTO while deleting data in a Memory Stick FORMATTING You press PHOTO while formatting a Memory Stick NOW CHARGING Charging flash does not work correctly q Z CLEANING END The cleaning is complete Eject the cleaning cassette p 202 q Z CLEANING TAPE END The cleaning tape has run out T...

Page 195: ...r camcorder that contains copyright control signals for copyright protection of software COPY INHIBIT appears on the LCD screen or on the TV screen if you try to record such software Your camcorder does not record copyright control signals on the tape when it records Notes on the MICROMV cassette When affixing a label on the MICROMV cassette Be sure to affix a label only on the location illustrate...

Page 196: ... certain to turn the POWER switch to CHG OFF when not taking shots or playing back on your camcorder The battery pack is also consumed when your camcorder is in the standby mode or playback is paused Have spare battery packs handy for two or three times the expected recording time and make trial recordings before taking the actual recording Do not expose the battery pack to water The battery pack ...

Page 197: ...by little as you use it more and more and as time passes When the available battery time is shortened considerably a probable cause is that the battery pack has reached the end of its life Please buy a new battery pack The battery life varies depending on how it is stored and operating conditions and environment for each battery pack ...

Page 198: ...y the i LINK cable When connecting this unit to i LINK compatible equipment having two or more i LINK MICROMV Interface refer to the operating instructions of the equipment to be connected About the name i LINK i LINK is a more familiar term for IEEE 1394 data transport bus proposed by Sony and is a trademark approved by many corporations IEEE 1394 is an international standard standardized by the ...

Page 199: ...by Sony e g VAIO series personal computer other than video equipment Before connecting this unit to your computer make sure that application software supported by this unit is already installed on your computer For details on precautions when connecting this unit also refer to the operating instructions for the equipment to be connected Required i LINK cable Use the Sony i LINK 4 pin to 4 pin cabl...

Page 200: ...picture on a TV it must be an NTSC system based TV with VIDEO AUDIO input jack The following shows TV color systems used overseas NTSC system Bahama Islands Bolivia Canada Central America Chile Colombia Ecuador Guyana Jamaica Japan Korea Mexico Peru Surinam Taiwan the Philippines the U S A Venezuela etc PAL system Australia Austria Belgium China Czech Republic Denmark Finland Germany Holland Hong ...

Page 201: ...ear when the power is turned on again If moisture starts to condense your camcorder sometimes cannot detect condensation If this happens the cassette is sometimes not ejected for 10 seconds after the cassette lid is opened This is not a malfunction Do not close the cassette lid until the cassette is ejected Note on moisture condensation Moisture may condense when you bring your camcorder from a co...

Page 202: ... picture clear the video head may have worn out In such cases you must replace the video head For details contact your Sony dealer or local authorized Sony service facility Using a cleaning cassette 1 Set the POWER switch to CAMERA or VCR 2 Insert the cleaning cassette 3 Press OK on the LCD screen The message NOW CLEANING appears After the cleaning is finished the message q Z CLEANING END appears ...

Page 203: ...ble battery Connect your camcorder to a wall outlet using the AC power adaptor supplied with your camcorder and leave your camcorder with the POWER switch turned off for more than 24 hours Or insert the fully charged battery pack in your camcorder and leave your camcorder with the POWER switch turned off for more than 24 hours Removing dust from inside the viewfinder 1 Open the LCD panel 2 Remove ...

Page 204: ... out 4 Set the POWER switch to VCR while pressing DISPLAY TOUCH PANEL then keep pressing DISPLAY TOUCH PANEL for about five seconds 5 Follow the procedure below with your finger or the supplied stylus DCR IP220 only 1 Touch at the upper left corner 2 Touch at the lower right corner 3 Touch in the middle of the LCD screen If you do not press the right spot always returns to the position at the uppe...

Page 205: ...en may heat up This is not a malfunction Do not use the network function in a medical institution or in an aircraft DCR IP220 only On handling tapes Do not insert anything into the small holes on the rear of the cassette These holes are used to sense the type and thickness of the tape and if the recording tab is in or out Do not open the tape protect cover or touch the tape Avoid touching or damag...

Page 206: ...or cold Dusty or dirty Very humid Vibrating About care and storage of the lens Wipe the surface of the lens clean with a soft cloth in the following instance When there are fingerprints on the lens surface In hot or humid locations When the lens is used in environments such as the seaside Store the lens in a well ventilated location subject to little dirt or dust To prevent mold from occurring per...

Page 207: ...n of new and old batteries Do not use different types of batteries Current flows from batteries when you are not using them for a long time Do not use leaking batteries If batteries are leaking Wipe off the liquid in the battery compartment carefully before replacing the batteries If you touch the liquid wash it off with water If the liquid get into your eyes wash your eyes with a lot of water and...

Page 208: ...utput impedance more than 47 kΩ kilohms Input impedance with more than 47 kΩ kilohms Output impedance with less than 2 2 kΩ kilohms i LINK MICROMV Interface input output 4 pin connector S400 LANC jack Stereo mini minijack ø 2 5 mm USB jack mini B Headphone jack Stereo minijack ø 3 5 mm LCD screen Picture 6 2 cm 2 5 type Total dot number 211 200 960 220 Wireless communication DCR IP220 only Communi...

Page 209: ...g power cord Battery pack Maximum output voltage DC 8 4 V Output voltage DC 7 2 V Capacity 9 6 Wh 1 350 mAh Operating temperature 0 C to 40 C 32 F to 104 F Dimensions approx 40 8 24 1 49 1 mm 1 5 8 31 32 1 15 16 in w h d Mass approx 90 g 3 2 oz Type Lithium ion Specifications Memory Stick Memory Flash memory 8MB MSA 8A Operating voltage 2 7 3 6 V Power consumption Approx 45 mA in the operating mod...

Page 210: ...ifying the parts and controls 1 Lens cap p 29 2 FOCUS ZOOM switch p 34 67 3 BACK LIGHT button p 37 4 Viewfinder p 32 Camcorder 1 7 3 2 4 5 6 8 5 LCD screen Touch panel p 9 27 103 6 START STOP button p 29 130 7 Speaker 8 Eyecup ...

Page 211: ...fault qf USB jack p 151 q qa qs 9 qd qf qg qh qj qg LANC jack blue LANC stands for Local Application Control Bus System The control jack is used for controlling the tape transport of video equipment and other peripherals connected to the video equipment This jack has the same function as the jack indicated as CONTROL L or REMOTE qh i headphones jack green When you use headphones the speaker on you...

Page 212: ... lamp p 29 Identifying the parts and controls ws wa wd wk wl qk ql w CAMERA CHG OFF ON MODE VCR MEMORY NETWORK wh wf wg wj POWER wd POWER switch p 8 wf CHG lamp p 18 wg CAMERA lamp p 8 wh MEMORY NETWORK lamp DCR IP220 or MEMORY lamp DCR IP210 p 8 wj VCR lamp p 8 wk Bluetooth lamp DCR IP220 only p 175 wl HOLOGRAM AF emitter p 117 ...

Page 213: ...sh button p 49 116 ea Grip belt Identifying the parts and controls 4 3 2 1 Fastening the grip belt Fasten the grip belt firmly es OPEN Z EJECT switch p 25 ed Cassette lid p 25 ef Stylus DCR IP220 only p 176 eg Stylus holder DCR IP220 only p 176 ...

Page 214: ...ion It adopts the MTF measurement system for video camera and offers a quality as the Carl Zeiss lens The lens for your camcorder is also T coated to suppress unwanted reflection and faithfully reproduce colors MTF is an abbreviation of Modulation Transfer Function The value number indicates the amount of light of a subject penetrating into the lens eh ej ek el r ra Identifying the parts and contr...

Page 215: ...fying the parts and controls rg Battery compartment lid rh Tripod receptacle Make sure that the length of the tripod screw is less than 5 5 mm 7 32 inch Otherwise you cannot attach the tripod securely and the screw may damage your camcorder rj FADER button p 57 rk SUPER NS COLOR SLOW S button p 38 rl NIGHTSHOT NIGHTFRAMING switch p 37 119 ...

Page 216: ...er qa 4 3 2 1 9 q 8 7 6 5 1 PHOTO button p 47 111 2 DISPLAY button p 43 3 MEMORY control buttons 4 SEARCH MODE button p 78 79 5 MULTI SRCH button p 74 6 Transmitter Point toward the remote sensor to control your camcorder after turning on your camcorder 7 DATA CODE button p 43 8 START STOP button p 29 130 9 Power zoom button p 33 0 Video control buttons p 42 45 qa X x C c EXECUTE buttons ...

Page 217: ...es such as direct sunlight or overhead lighting Otherwise the Remote Commander may not function properly Your camcorder works in the commander mode VTR 2 Commander modes 1 2 and 3 are used to distinguish your camcorder from other Sony VCRs to avoid remote control misoperation If you use another Sony VCR in the Commander mode VTR 2 we recommend changing the commander mode or covering the sensor of ...

Page 218: ... 34 END SEARCH 12min MPEG IN 100 0001 AUTO 60 AWB F1 8 9dB 6 5 4 3 2 1 9 q qa w ql qk qf 7 8 qg qh qd wa wd ws qj qs Operation indicators LCD screen and viewfinder 1 micro Cassette Memory p 36 195 2 Remaining battery time p 36 44 3 Zoom p 33 Data file name p 100 4 Digital effect p 59 71 MEMORY MIX p 125 FADER p 56 5 16 9WIDE p 54 6 Picture effect p 58 70 7 Data code p 43 Date p 36 8 PROGRAM AE p 6...

Page 219: ...ack 211 LUMINANCE KEY 59 M N Manual focus 67 Memory chroma key 125 Memory luminance key 125 MEMORY MIX 125 Memory overlap 125 Memory PB ZOOM 143 Memory photo playback 136 Memory photo recording 111 Memory Stick 100 Menu settings 177 M FADER 56 micro Cassette Memory 14 195 Mirror mode 35 Moisture condensation 201 MONOTONE 56 MOSAIC 58 MPEG 100 MPEG MOVIE recording 130 MULTI PICTURE SEARCH 74 MULTI ...

Page 220: ...Printed in Japan Printed on 100 recycled paper using VOC Volatile Organic Compound free vegetable oil based ink ...

Reviews: