1-14
PFM-500A3WE/500A3WG/500A3WU/510A2WE/510A2WG/510A2WU
26
(GB)
6
Press
M
/
m
to move the cursor (
B
) to “V SIZE”
and press ENT.
The following menu appears on the monitor
screen.
V
S I Z E
:
0 0
7
Press
M
/
m
to resize the picture.
M
: to expand vertical size
m
: to reduce vertical size
The vertical picture size is indicated on the
monitor screen from MIN (–50) to MAX (+50).
The factory preset value is 00.
8
Press ENT.
The menu returns to the PIC SIZE menu.
Adjusting the Picture Position
1
In the PIC SIZE menu, press
M
/
m
to move the
cursor (
B
) to “H SHIFT” and press ENT.
The following menu appears on the monitor
screen.
H
S H I F T
:
0 0
2
Press
M
/
m
to shift the picture.
M
: to shift the picture to the right
m
: to shift the picture to the left
The horizontal picture position is indicated on the
monitor screen from MIN (–50) to MAX (+50).
The factory preset value is 00.
3
Press ENT.
The menu returns to the PIC SIZE menu.
4
Press
M
/
m
to move the cursor (
B
) to “V SHIFT”
and press ENT.
The following menu appears on the monitor
screen.
V
S H I F T
:
0 0
5
Press
M
/
m
to shift the picture.
M
: to shift the picture upward
m
: to shift the picture downward
The vertical picture position is indicated on the
monitor screen from MIN (–50) to MAX (+50).
The factory preset value is 00.
6
Press ENT.
The menu returns to the PIC SIZE menu.
Restoring the Original Picture Size
and Position
1
In the PIC SIZE menu, press
M
/
m
to move the
cursor (
B
) to “RESET” and press ENT.
The following menu appears on the monitor
screen.
ENTER
MENU
R E S E T
:
N O
S E L E C T
S E T
E N D
2
Press
M
/
m
.
“NO” changes to “YES”.
ENTER
MENU
R E S E T
:
Y E S
S E L E C T
S E T
E N D
Resizing and Positioning the Picture
27
(GB)
3
Press ENT.
The original picture size and position are restored.
To cancel the reset function, press MENU before
pressing ENT.
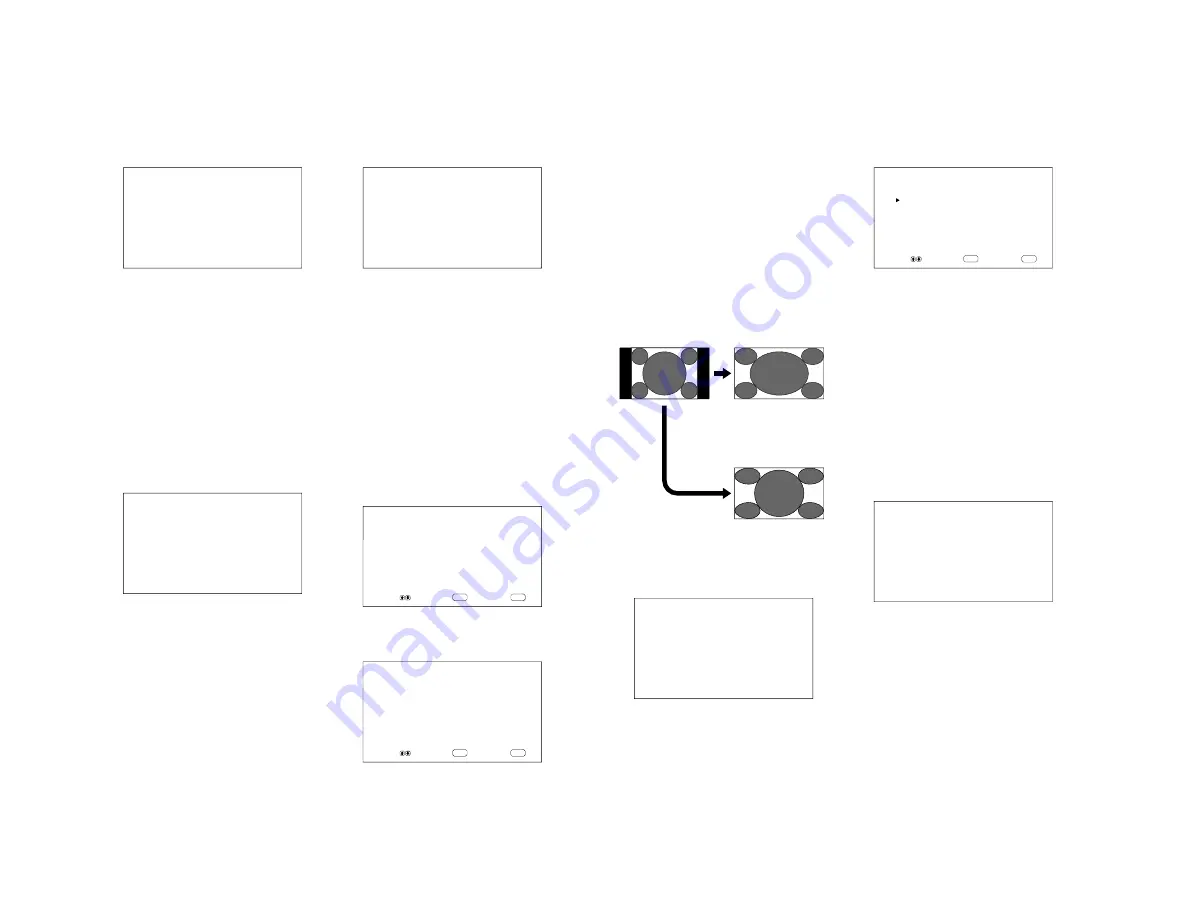
Enlarging a 4:3 Image to a 16:9
Screen Naturally (Wide Zoom Mode)
When you ordinarily watch a 4:3 standard image in
the 16:9 screen, the image is seen distorted in a
horizontal direction due to the difference in
proportion. If you use wide zoom mode, the center of
the monitor will not be distorted as much and the
corners of the monitor will be distorted instead. You
can change the linearities by adjusting the H
LINEARITY and V LINEARITY settings.
1
In the PIC SIZE menu, press
M
/
m
to move the
cursor (
B
) to “ASPECT” and press ENT.
The following menu appears on the monitor
screen.
A S P E C T
:
4 X 3
2
Press
M
/
m
to move the cursor (
B
) to “W ZOOM”
and press ENT.
The following menu appears on the monitor
screen.
ENTER
MENU
A S P E C T
: W
Z O O M
H
L I N E A R I T Y
:
0 0
V
L I N E A R I T Y
:
0 0
R E S E T
S E L E C T
S E T
E N D
3
If you do not change H LINEARITY or V
LINEARITY, press ENT.
The menu returns to the PIC SIZE menu.
When you change H LINEARITY or V
LINEARITY, follow the steps below.
4
Press
M
/
m
to move the cursor (
B
) to “H
LINEARITY” or “V LINEARITY” and press
ENT.
H LINEARITY: to change the linearity in the
horizontal direction
V LINEARITY: to change the linearity in the
vertical direction
The following menu appears on the monitor
screen. (The illustration below is for selecting the
H LINEARITY.)
A S P E C T
: W
Z O O M
H
L I N E A R I T Y
:
0 0
5
Adjust the screen size with
M
/
m
.
To restore wide zoom mode items to their
original settings
In the ASPECT menu, select W ZOOM and press
ENT. Press
M
/
m
to move the cursor (
B
) to “RESET”
and press ENT. Then select YES with
M
/
m
and press
ENT.
The 4:3 standard image
The 4:3 image after setting
ASPECT to W ZOOM and
both linearities to standard
(00)
The 4:3 image after setting
ASPECT to 16
×
9
Resizing and Positioning the Picture


