background image

22

MODULYS Green Power 

- Ref.: IOMMODGPXX01-GB  00

8. OPERATING PROCEDURES

Commissioning

8.5. 

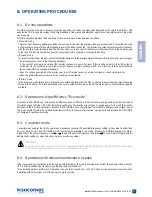
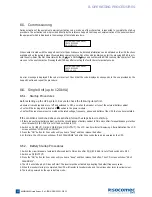
During activation of the equipment a warranty activation code, made up of four characters, is requested to complete the start-up 
procedure. The activation code is provided directly by the reference Support Centre upon communication of the serial number of 
the equipment which is displayed in the message at first start procedure.

SEE INSTALLATION MANUAL  
FOR PROCEDURE
SN: 0000000000

When contact is made with the Support Centre for the activation code, detailed information can be obtained on the UPS functions 
available and on the periodic preventive maintenance programmes. Once the code is obtained, enter it by pressing ENTER to acti-
vate the entry. Select the first character with the UP 

  and  DOWN 

 keys and confirm with ENTER to accept the character. Then 

move on to the next character. Pressing the ENTER key after selecting the fourth character activates code.

SEE INSTALLATION MANUAL  
FOR PROCEDURE 
CODE = A A A A

An error message is displayed if the code is incorrect. Check that the code displayed corresponds to the one provided by the 
Support Centre and repeat the procedure.

Single Unit (up to 120 kVA)

8.6. 

Startup Procedures

8.6.1. 

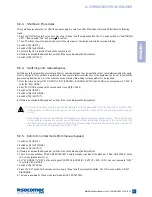
Before starting up the UPS system, be sure to check the following items first.

• Ensure all circuit breakers are cut off and switched to OFF, as well as the breaker or fuse of the external battery cabinet.

• Confirm if the locking latch is located at   position in the power module.

• Confirm if the input power source matches the rated voltage, frequency, phase and battery of the UPS that you have installed.

If the conditions mentioned above are satisfied, follow the steps below to start up.

1.  If there is an external battery cabinet, switch the circuit breaker of battery cabinet to ON and confirm if manual bypass protection 

circuit breaker Q5 (BY-PASS) is cut off and switched to OFF.

2.  Switch on Q1 (INPUT), Q4 (AUX MAINS) and Q3 (OUTPUT). The LCD monitor will start displaying. After initialization, the LCD 

screen will show ”LOAD NOT SUPPLIED”.

3.  Press the “ON” button for 3 seconds until you hear a “beep” and then release the button. 

4.  At this time, the LCD screen will show "SELF DIAGNOSIS" and after 30 seconds the load is powered by the UPS.

Battery Startup Procedures

8.6.2. 

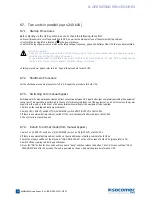
1. Switch the circuit breaker of external battery cabinet to ON and confirm if Q5 (BY-PASS) is cut off and switched to OFF.

2. Switch on Q3 (OUTPUT).

3. Press the “ON” button for 3 seconds until you hear a “beep” and then release the button. The LCD screen will show "SELF 

    DIAGNOSIS".

4. The UPS will start up by DC-bus soft start. The inverter will be activated by adopting the default frequency value.

5. When the inverter startup is completed, the UPS will transfer to Inverter mode and the luminous bar turns to yellow colour.

6. The load is powered by the ups in battery mode.

Summary of Contents for MODULYS Green Power

Page 1: ...ing manual GB Manual de instalaci n y uso ES Manuel d installation et d utilisation FR Manuale di installazione e uso IT Installatie en bedieningshandleiding NL Dokumentacja Techniczno Ruchowa PL Manu...

Page 2: ...ackaging and in the manual in cases of extended storage or UPS inactivity SOCOMEC UPS may at its own discretion opt for the repair of the product or for the replacement of the faulty or defective part...

Page 3: ...Status LED Indicators for Power Module 17 7 MIMIC PANEL 18 7 1 Mimic panel 18 7 2 Meaning of ideograms 19 7 3 Meaning of the luminous bar 19 7 4 LCD display hierachy 20 8 OPERATING PROCEDURES 21 8 1...

Page 4: ...ay be alive even when the UPS is not connected to the mains Risk of a possible electrocution is possible when the battery is connected to the UPS Therefore do not forget to disconnect the batteries be...

Page 5: ...tion of the symbols used on the labels applied to the unit 1 2 All the precautions and the warnings on the labels and plates on the inside and outside of the equipment should be respected DANGER HIGH...

Page 6: ...ure 2 1 1 A space of at least 5 cm must be left between the cabinets see figure 2 1 1 The UPS switches are accessed from the front however a space of at least 1 5 metres should be left at the front of...

Page 7: ...four pole selective S type differentials load leakage currents are added to those generated by the UPS and during transi tory phases power failure and power return short current peaks may occur If lo...

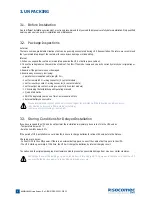
Page 8: ...module 1 CD including the Instalattion and Operating manuals 1 Quick Start Guide 1 SNMP adapter placed in one of two Communication Slots 1 External battery sensor cable Please immediately contact your...

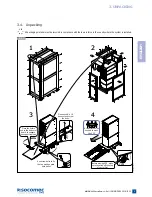
Page 9: ...where the system is installed 1 2 3 4 1 2 3 4 3 4 1 Place the fixture under the bottom of board to enhance the supporting force Please use No 19 wrench to unsvrew the bolts At least three men needed...

Page 10: ...use this may cause damage of UPS or tip over accident 3 Push the UPS from either front or rear side otherwise could cause tip over accident 4 When the UPS needs a long distance movement make use of a...

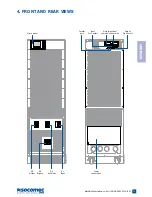
Page 11: ...EAR VIEWS 4 AUX MAINS Q2 INPUT Q2 OUTPUT Q3 Q4 BY PASS Q5 225A 225A 225A 225A Mimic panel Parallel port Input Dry Contact Output Dry Contact Q3 Output Power connections Q5 By pass Q4 Aux Mains Q1 Inpu...

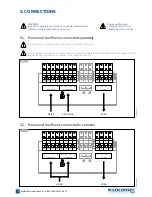
Page 12: ...it must be possible to make the neutral of the Emergency Mains line electrically common with the neutral of the main input feed line L1 X10 L2 MAINS SUPPLY L3 N1 L11 X40 X20 L21 AUXILIARY MAINS EXT B...

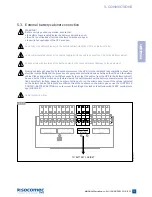
Page 13: ...nstaller s responsibility to check the electrical compatibility and the presence of appropriate protection devices between the UPS and the battery cabinet fuses and switches of sufficient capacity to...

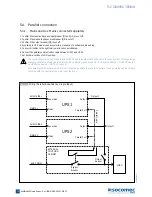
Page 14: ...oth dip switches to ON position The sum of AUX Mains cable length and OUTPUT cable length must be the same for each system This regulation prevents unbalanced load shared by two UPSs under by pass mod...

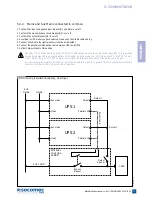
Page 15: ...sition The sum of AUX Mains cable length and OUTPUT cable length must be the same for each system This regulation prevents unbalanced load shared by two UPSs under by pass mode i e AUX Mains cable 1 O...

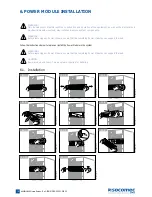
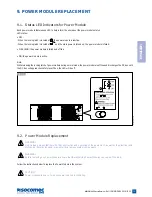
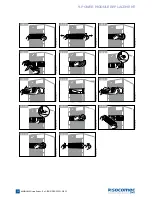
Page 16: ...llow the instructions below to replace or install the Power Module in the system WARNING Before removing any Power Module ensure that the remaining Power Modules can support the load CAUTION Power mod...

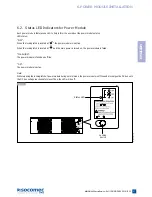
Page 17: ...nactive When the locking latch is located at and the main power is turned on the power module is failed FLASHING The power module is failed and off line ON The power module is active Note While releas...

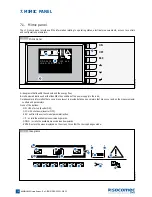
Page 18: ...s bar that identifies the condition of the power supply to the load C alphanumeric information that uses a menu layout to provide details on any alarms that may occur and on the measurements controls...

Page 19: ...de alarm Steady General alarm Flashing 17 Periodic maintenance alarm warning Flashing 18 LAN connection ready cable connected Steady Meaning of the luminous bar 7 3 The luminous bar figure 7 1 1 provi...

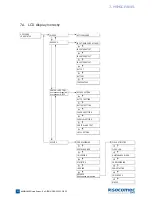
Page 20: ...D BYPASS ACTIVE ALARMS BYPASS SETTING COMMISSIONING CLEAR STATISTICS INVERTER OUTPUT OUTPUT SETTING SERIAL NUMBER CLEAR LOG INVERTER OUTPUT BATTERY SETTING FW VERSION MAINTENANCE ALARM INVERTER OUTPUT...

Page 21: ...o interruptions or extended black outs the UPS continues to power the load using the energy stored in the battery The mimic panel keeps the user constantly informed on the battery status and on the re...

Page 22: ...breakers are cut off and switched to OFF as well as the breaker or fuse of the external battery cabinet Confirm if the locking latch is located at position in the power module Confirm if the input po...

Page 23: ...wait about 30 seconds and close Q5 BY PASS 3 Switch off Q1 INPUT 4 Switch off Q4 AUX MAINS 5 Switch off Q3 OUTPUT 6 If there is an external battery cabinet switch off the circuit breaker of battery ca...

Page 24: ...Switching onto the manual bypass creates a direct connection between UPS input and output completely excluding the equipment control part This operation is performed in the event of ordinary maintena...

Page 25: ...e While releasing the locking latch of power module during normal mode the power module is off line and discharges the DC bus until the DC bus voltage reaches safety level Then the LED will be off Pow...

Page 26: ...9 2 11 9 2 6 9 2 4 9 2 7 9 2 2 9 2 10 9 2 10 9 2 1 9 2 9 9 2 5 9 2 8 012 DRWMODGP XX 029 DRWMODGP XX 032 DRWMODGP XX 019 DRWMODGP XX 021 DRWMODGP XX 013 DRWMODGP XX 030 DRWMODGP XX 016 DRWMODGP XX 018...

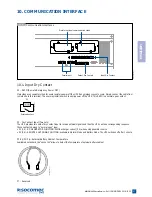
Page 27: ...act Input Two sets The UPS provides two sets of dry contact input to receive external signals and then the UPS can take corresponding response These contacts belong to normal open type P2 1 2 AC GENER...

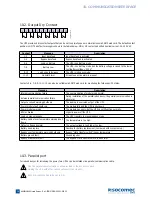
Page 28: ...e During installation of the parallel redundancy the parallel communication is abnormal Output overload warning shutdown The loading is over rated output of the UPS Power module fault shutdown The mod...

Page 29: ...packet to wake up PC Send the e mail and SNMP trap to notify users Provides JNC software to protect public operating systems Provides the InsightPower EzSetting software to easily configure for the f...

Page 30: ...80 A phase EMERGENCY OFF E P O Remote E P O ON OUTPUT BREAKER OFF Output breaker not turn on BYP OVERLOAD WARNING 104 overload when UPS is on bypass BAT CABINET OVER HEAT Battery cabinet over 35 C EXT...

Page 31: ...r maximum performance Furthermore during the operating life of the battery Modulys green power stores statistics on the conditions of use of the battery for analysis Since the expected life of the bat...

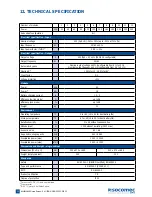
Page 32: ...20 Power 3 kW 18 Battery charging current A 1 2 5 Efficiency on line mode up to 96 Efficiency eco mode up to 98 Weight kg 30 Environment Operating temperture C 0 to 40 15 to 25 for best battery life S...

Page 33: ......
Page 34: ...ness Park Broadway Lane South Cerney Cirencester GL7 5XL Tel 44 0 1285 863300 info ups uk socomec com OTHER COUNTRIES Tel 34 935 407 575 info ups europe socomec com IN EASTERN EUROPE MIDDLE EAST AFRIC...

Reviews: