9 • UK
●
●
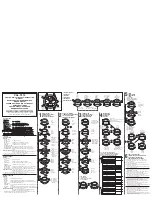
Set the YEAR by pressing S1 or S11 - then press S5 to enter.
●
●
Set the MONTH by pressing S1 or S11 - then press S5 to enter.
●
●
Set the DATE by pressing S1 or S11 - then press S5 to enter.
●
●
Set the 12/24H by pressing S1 or S11 - then press S5 to enter.
●
●
Press S5 to enter and go back to T1/T2 setting screen.
●
●
Press S7 to go back to TIME setting sub-menu, and press S7 again to return to TIME mode.
Backlight and NIGHT settings
NIGHT setting allows you to control how long the backlight comes on when you press the light button (S11) in TIME mode. NIGHT
setting also enables you to set up and use NIGHT mode.
How to set and use the backlight
Your SR200 has a backlight, so you can illuminate the screen to view the time if it’s dark. The backlight is activated by pressing the
light button (S11). You can set the backlight to come on for either 10 seconds or 20 seconds by following these instructions:
●
●
Press S7 and scroll through the modes until you see TIME.
●
●
Press and hold S11. The screen will display HOLD SET, then TIME will flash. Press S1 until you see NIGHT flashing on the screen,
then press S5 to enter.
●
●
10 SECONDS or 20 SECONDS will be displayed on the screen. Press S1 or S11 to select whether you would like the backlight to
come on for 10 seconds or 20 seconds, each time you press the light button (S11) and press S5 to confirm your selection.
●
●
Press S7 to return to the NIGHT mode sub-menu.
●
●
Press S7 again to exit and return to TIME mode.
How to set and use NIGHT mode
NIGHT mode enables you to set the backlight to come on automatically after you launch one of the training modes, such as RUN
or CHRONO within a pre-set time period. For example, say you set the NIGHT mode time period to start at 6pm and end at 11pm, if
you launched RUN or HRM mode within that time period, the backlight would automatically come on and stay on for as long as your
SR200 remained in that mode. The backlight will automatically illuminate your RUN or HRM data for the duration of your training
session.
●
●
Press S7, and scroll through the modes until you see TIME.
●
●
Press and hold S11. The screen will display HOLD SET and then TIME will flash. Press S1 or S11 until you see NIGHT flashing on the
screen, then press S5 to enter.
●
●
Press S1 or S11 until the screen displays NIGHT ON, then press S5 to enter.
●
●
The display will show TIME START followed by a time with the hour value flashing. Adjust the start time to your preferred setting,
starting with the hour value. Press S1 or S11 to select your setting, then press S5 to confirm.
●
●
The minute value will now flash. Press S1 or S11 to adjust the minute value to your preferred setting, then press S5 to save.
●
●
The display will show TIME START again. Press S1 or S11 to switch to TIME END.
●
●
Press S1or S11 to adjust the hour value, then press S5 to enter.
●
●
Press S1 or S11 to adjust the minute value, then press S5 to enter.
●
●
Press S7 to return to the NIGHT mode sub-menu.
●
●
Press S7 again to exit NIGHT mode and return to TIME mode.
How to adjust the LCD CONTRAST in TIME mode
●
●
Press S7 and scroll through the modes until you see TIME.
●
●
Press and hold S11. The screen will display HOLD SET and then TIME will flash.
●
●
Press S1 or S11 until you see CONT, then press S5 to enter.
●
●
The current contrast % will be displayed. Press S1 or S11 to adjust the contrast up or down between 10% and 100%, then press S5
to save.
●
●
Press S7 to return to the CONT sub-menu.
●
●
Press S7 again to exit and return to TIME mode.


