8 • UK
TIME mode functions
How to enter the TIME mode
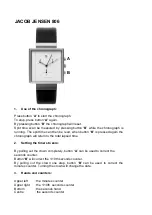
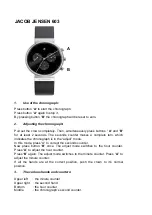
To enter the TIME mode and use your SR200 as a normal watch, press S7 and scroll through the modes until you see TIME.
In TIME mode your SR200 will automatically display the Time Zone ie LON (London) the day, date and the time.
TIME mode settings
The time on your SR200 will be set correctly when manufactured, so it will work out of the box.
User Tip: Your SR200 comes pre-set with T1 set to LON time and T2 set to NYC time - with DST (Daylight Saving Time) set to ON.
If you want to set the time yourself, the procedure is explained below.
How to set the time
From TIME mode, you can set two different TIME zones.
●
●
From TIME mode, press and hold S11. The display will show HOLD SET and then TIME will flash.
●
●
Press S5 to confirm. T1 (Time 1) will now be displayed.
●
●
If you want to set T1 press S5. If you want to set T2 press S1 to change T1 to T2, then press S5 to confirm.
●
●
The display will now show GPS and MANUAL. Press S1 to switch between GPS or MANUAL, then press S5 to confirm your selection.
User Tip: You have two options when setting your SR200 - GPS or MANUAL. If you select the GPS option, the time on your SR200
will automatically be set using GPS. If you select MANUAL, you can manually set the time. We recommend you use GPS to set
the time, as it is quicker and guaranteed to be accurate.
Setting time with the GPS option
●
●
Press S1 to select GPS.
●
●
When GPS is flashing, press S5 to select.
●
●
Next, press S1 or S11 to find the correct TIME ZONE for your location. There are 106 city codes to choose from.
●
●
When you have found the correct location, press S5 to confirm.
●
●
The display will now show DST (Daylight Saving Time) ON or DST OFF.
●
●
Press S1 to switch between DST ON and DST OFF, then press S5 to confirm your selection.
●
●
The display will now show either 12H or 24H.
●
●
Press S1 to switch between the two, then press S5 to confirm your selection.
●
●
The display will now show either D – M (Day – Month) or M – D (Month – Day) Press S1 to select how you want the Day and Month
to be displayed on the watch and press S5 to confirm.
●
●
Press S7 to go back to the TIME setting sub-menu and press S7 again to return to TIME mode.
●
●
The time will automatically be set next time your SR200 connects to GPS. Your SR200 will connect to GPS when you launch RUN or
CHRONO modes.
Setting time with the MANUAL option
●
●
Press S1 to select MANUAL.
●
●
While MANUAL is flashing, press S5 to enter.
●
●
Set the HOUR by pressing S1 or S11 - then press S5 to enter.
●
●
Set the MINUTE by pressing S1 or S11 - then press S5 to enter.
●
●
Set the SECOND by pressing S1 or S11 - then press S5 to enter.