background image

Basic Operation 


smart CX10/VX10 

  47 


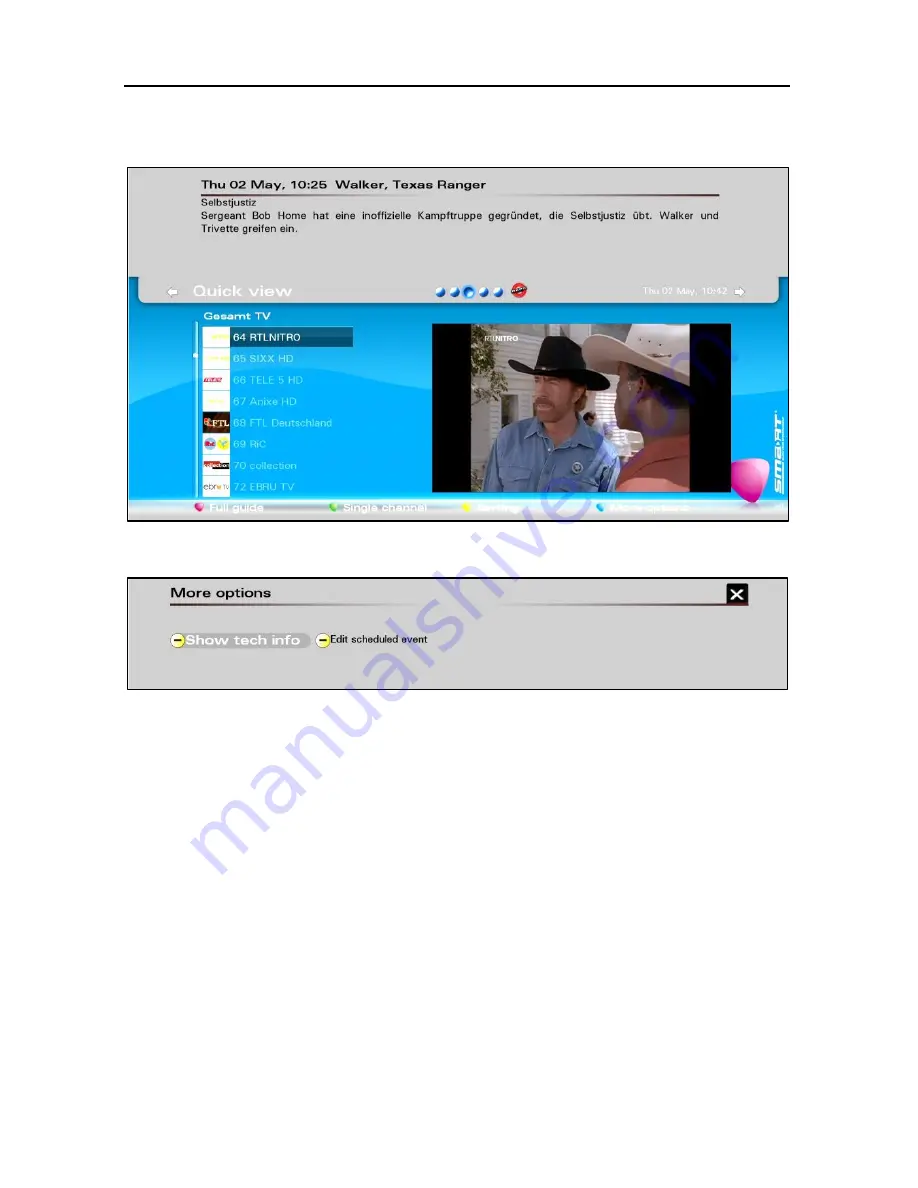
Press the 

red function key

, in order to switch between the window 

Quick view

 and the window 

Full Guide


Press the blue function key, in order to open the window More options: 


The possible display and edit functions are explained in section 7.11, 
on page 91. 


Press the 

green function key

, in order to switch between 

Full Guide


and 

Single Channel

The window 

Single Channel

 only shows the programs of one channel: 

Summary of Contents for CX10

Page 1: ...HDTV Satellite Receiver CX10 VX10 User Manual Version 14 05 2013 English ...

Page 2: ...erating the unit We hope you enjoy using your smart receiver Your smart electronic GmbH Industriestrasse 29 78112 St Georgen Germany Service Hotline 49 0 7724 94 78 555 Telefax 49 0 7724 94 78 333 E Mail service smart electronic de Internet www smart electronic de smart electronic GmbH 2013 All rights technical changes errors as well as printing mistakes reserved Any reproducing or copying of the ...

Page 3: ...16 3 1 Designated Use 16 3 2 Hazards during designated use 17 3 3 Grounding 17 3 4 Installation Location 17 3 5 Proper Handling of Batteries 18 3 6 Product Liability 18 4 Connecting smart CX10 VX10 18 4 1 Connection Diagram 19 4 2 Connecting the Satellite System 19 4 3 Connecting the TV Set 19 4 4 Connecting a Home Theater System optional 20 4 5 Connecting a Data Storage Device optional 21 4 6 Con...

Page 4: ...c HD 27 5 5 Network 28 5 6 Operation Mode 28 5 7 Open Close Menu 32 5 8 Menu Navigation 32 5 9 Watching TV 33 5 9 1 Channel Selection 33 5 9 2 Select Channel List 34 5 9 3 Recall 35 5 9 4 Teletext Videotext 35 5 9 5 Quick Access Menus 37 5 9 6 Adding a channel to a favorite 39 5 9 7 Subtitles 39 5 9 8 Aspect Ratio 40 5 9 9 TV Resolution 41 5 9 10 Soundtrack 42 5 9 11 Audio 42 5 9 12 Sleep Timer 43...

Page 5: ... 7 3 Manage Your Recordings 54 7 3 1 Display and Playback Recordings 54 7 3 2 Deleting a Recording File 55 7 3 3 Renaming a Recording File 56 7 3 4 Define default directories 56 7 3 5 Formatting a storage device 56 7 3 6 Mounting Unmounting an USB or eSATA device 57 7 3 7 Testing a Storage Device 58 7 4 Programming a Timer 58 7 4 1 Setting Start Time and End Time 59 7 4 2 Setting Start Date and En...

Page 6: ...ders and Drives with Windows XP 69 7 7 3 2 How to Share Folders and Drives with Windows 7 69 7 7 4 Example Music 71 7 7 5 Example Photos 72 7 8 Web 72 7 9 Control Panel 73 7 9 1 User Preferences 74 7 9 1 1 Default State of the Receiver After Power Up 74 7 9 1 2 Number of Channels in the Channel Memory 74 7 9 1 3 Setting the Energy mode 74 7 9 1 4 User Interface 75 7 9 1 5 Quick View Window Behavio...

Page 7: ...1 7 9 6 2 Wireless Network WLAN 83 7 9 6 3 Showing Network Connection Parameters 84 7 9 6 4 Activating a Network Quality Control 84 7 9 7 Channel Search 84 7 9 7 1 Satellite Search 84 7 9 7 2 Advanced Channel Search 85 7 9 8 Factory Settings 85 7 9 9 System Update 86 7 9 10 System information 86 7 9 11 Audio Video 86 7 9 11 1 Digital Audio Out 86 7 9 11 2 HDMI Output 87 7 9 11 3 TV Scart 87 7 9 11...

Page 8: ...ive 2 5 Inch 97 9 3 USB Hard Drive 3 5 Inch 97 9 4 Check the Read and Write Speed 97 9 5 File System 97 9 6 Partitions on the Storage Device 97 9 7 Memory Requirements for Recording 98 9 8 Troubleshooting USB Storage Devices 98 9 9 Error Checking in Windows 99 10 Cleaning 100 11 Transport and Shutdown 100 12 Troubleshooting 101 13 Disposal 102 14 Specifications 103 14 1 General 103 14 2 Remote Con...

Page 9: ...Contents smart CX10 VX10 9 15 Open Source Software 104 16 Declaration of Conformity 111 16 1 Hybridreceiver HD smart CX10 111 16 2 Hybridreceiver HD smart VX10 111 ...

Page 10: ...et to third party do not forget to attach this manual In the support area of our website www smart electronic de you can download the up to date version of the manual e g if the original manual is lost After purchasing the receiver mainly the software will still be enhanced Therefore it may be possible that there are differences in e g operat ing instructions or illustrations between the manual an...

Page 11: ...Description The smart CX10 hybrid receiver uses up to date HDTV chip technology It offers satellite reception and a LAN interface for the connection to your home network and internet access The smart VX10 offers the same features and additionally WLAN compati bility 2 1 Scope of Delivery HDTV satellite receiver smartCX10 VX10 remote control rc 2 batteries AAA for the rc HDMI cable WLAN antenna onl...

Page 12: ... menu or exit menu 3 VOL Decrease volume to the left in the menu VOL Increase volume to the right in the menu OK Show channel list confirm menu item CH Channel Down down in the menu CH Channel Up up in the menu 4 EXIT Exit menu or menu item 5 Display and LED Green LED operational mode 6 WLAN Antenna for wireless network only VX10 7 CA Bay for smartcard ...

Page 13: ...thernet connector home network internet 7 SATA Serial ATA data interface to connect an external data stor age device hard disk eSATA 9 USB USB data storage medium 9 HDMI0F 1 Digital audio video out 10 TV Scart connection to a TV set 11 Video Composite analog TV video signal 12 AUDIO L Analog audio left 13 SPDIF Digital audio optical out SPDIF 14 ON OFF Mains switch 1 High Definition Multimedia Int...

Page 14: ...X10 VX10 2 3 Remote Control Unit No Key Description 1 Switches between operating mode and standby 2 V FORMAT Toggles video resolution 3 0 9 Program selection alphanumeric input 4 TV R Switches between TV mode and Radio mode 5 Volume ...

Page 15: ... on the current program 11 FAV Shows favorite program list 12 Fast forward and backward 13 Jump forward and backward 14 USB Opens Personal Planner 15 Mute 16 16 9 Toggle video format 17 AUDIO Change audio mode 18 RECALL Switch back to the last viewed program 19 Program 20 Yellow function key 21 Blue function key 22 EXIT Exit menu or menu item 23 BACK Back to the previous menu item 24 EPG Opens ele...

Page 16: ... 7 9 1 page 74 2 5 Warranty The warranty for the HDTV Satellite Receiver smartCX10 VX10 complies with the legal regulations at the time of purchase 3 Safety Instructions 3 1 Designated Use The HDTV satellite receiver CX10 VX10 is intended for the reception of both free to air and scrambled digital satellite programs DVB S S2 in the private sector It is designed exclusively for this purpose and may...

Page 17: ...d or squeeze the cable Repairs on plug cable or receiver may only be per formed by qualified skilled personnel 3 3 Grounding The satellite antenna must be grounded properly Note the relevant VDE2F 3 regulations3F 4 smart recommends that the outdoor unit of the satellite system should be installed by a professional 3 4 Installation Location Place the receiver on a solid flat surface Protect receive...

Page 18: ...sed of in accordance with current legal regula tions see chapter Disposal page 102 3 6 Product Liability We do not assume liability if the designated protection of the unit is im paired especially in these cases The unit is not used according to the manual The application range is not correct The user makes unauthorized changes regarding the receiver hardware 4 Connecting smart CX10 VX10 CAUTION C...

Page 19: ... can be tapped at the LNB OUT connection to connect if desired additional receivers If your receiver is in standby mode you only can use loop through if you selected the energy mode economic see section 7 9 1 page 74 4 3 Connecting the TV Set As shown in the connection diagram there are various options to connect the smartCX10 VX10 and the TV set It depends on the connectivity of your TV set which...

Page 20: ...ansmission is digital 4 4 Connecting a Home Theater System optional In order to improve the sound quality you can connect to your CX10 VX10 additionally to the TV set a home theater system with surround sound or a stereo system Once more there are various options It depends on the connectivity of your home theater system which option is possible for you a Your home theater system can loop through ...

Page 21: ...choose the connection via HDMI cable Quality is best if both audio transmission and video transmission is digital 4 5 Connecting a Data Storage Device optional Connect the receiver via the USB socket or the eSATA socket to a data storage device USB stick or hard disk with USB or eSATA socket with a suitable cable Then you can store video recordings see chapter 6 page 49 or access various media fil...

Page 22: ... all devices have been properly con nected to the receiver 4 7 Inserting the Batteries of the RCU This is the procedure to insert new RCU batteries or to replace empty batteries Open the battery cover at the bottom of the RCU Insert two batteries 1 5 V Type AAA Take care of the right polarity Replace batteries when the range of the remote con trol is decreasing or when the receiver no longer re ac...

Page 23: ...play Now you can choose the menu language 5 If you don t want to take over the default value Deutsch for the menu language proceed like this Press the key in order to go to the options Choose the desired language with the keys and Press OK in order to confirm the chosen language Press the green function key in order to go to the next installation window 6 In the second installation window you can ...

Page 24: ...le for Germany there are a basic list and additionally the groups 3rd programs info and sports special interest local TV news beginning position 100 and many music channels beginning position 123 After you selected RAPS 1 Press OK in order to confirm the chosen installation type 2 Press the green function key continue in order to go to the next installation window The third installation window Ant...

Page 25: ... the next window where you can select your preferred regional program 3rd program 5 Select the desired program whose position should be 3 in the channel list with the keys and and press the green function key continue in order to confirm and to go to the next window Channel Filter where you can select whether you want to add erotic programs and call TV to your channel list Both offers may cause hi...

Page 26: ...e HD again If you first choose HD channels but do not want them later you have to perform a new RAPS configu ration deselecting the pay TV package 7 Press the green function key continue in order to start the installation of the channel list When the installation is complete the receiver switches automatically to TV mode 5 3 Installation without RAPS 5 3 1 Predefined List Select Predefined List an...

Page 27: ...satel lites from which you want to receive programs 2 Select with the keys and the items Satellite1 Satellite2 Satellite3 or Satellite4 you can select maximum four receivable satellites Change with the key to the right side of the window Select there with the keys and the desired satellite and confirm with OK or Press Auto detect yellow function key in order to search for satellites automatically ...

Page 28: ...rating software of your receiver There are different possibilities to update the software of your CX10 VX10 5 5 1 Update via USB You also can transfer the current software via the USB interface 1 Look for the update file on the website www smart electronic de item Support CX10 or VX10 Download 2 Save the file to your PC 3 Unpack the file which is a zip archive 4 Copy the new software file 30 35 MB...

Page 29: ...eeds about one minute After the update normal operation is started automatically 8 After the update reset the receiver to factory defaults section 7 9 8 page 85 5 5 2 Online Update You can update your device directly over the Internet If a connected USB storage device contains an update file the software is not updated over the Internet but via the USB port see above Please ensure that your device...

Page 30: ...tem Update and follow the instructions on the screen 4 After the update reset the receiver to factory defaults section 7 9 8 page 85 5 5 4 Automatic Update The receiver also checks in subsequent operation continuously whether online or via satellite a newer software file than the already installed is available 5 5 4 1 Update During Operation If a new software is available you ll get a correspondin...

Page 31: ...p to more than one hour you can download the update file CX10 VX10 in standby mode and save it to a connected USB storage device The actual update is carried out from the USB device when you switch on the receiver the next time see section 5 5 4 1 a It takes only one minute or two 5 6 Operation Mode The operation mode after the first switch on or after re storing the factory settings is television...

Page 32: ...descriptions simple we will assume normal TV mode The menu operation is basically independent from the operation mode Radio or TV 5 7 Open Close Menu Your smart receiver is operated via an OSD OnScreenDisplay Press the key MENU of the remote control or at the receiver in order to open the menu If you open the menu during watching TV the first menu window is always the one shown above Press the key...

Page 33: ...em Menu items that are active are highlighted in color If there are more values in a list than what is display able you will get additional symbols at the top and at the bottom which indicate that the list is longer than you can see list goes on at bottom list goes on at top 5 9 Watching TV 5 9 1 Channel Selection Select with the keys P and P the channel which you want to see or Type the channel l...

Page 34: ...s in order to access enhanced functions Press the keys and in order to navigate through the channel list and to select a channel the selected channel is highlighted Press OK in order to switch to the selected channel this channel will be shown in the thumbnail view Press the keys P and P in order to move eight positions in the chan nel list up or down 5 9 2 Select Channel List 1 Press the key FAV ...

Page 35: ...ss the key TXT of the remote control in order to switch on teletext The first teletext page 100 is displayed When you switch on teletext the first time your receiver loads and saves maximum 1800 pages incl all sub pages which then can be accessed very fast The number of already loaded teletext pages is displayed at the bottom left side The page memory will be cleared if you switch to another chann...

Page 36: ...rmal teletext is displayed all over the TV image small reduced size about 1 6 dis played top left half reduced size on half of the screen When Teletext is activated the arrow keys can only be used for navigation The volume control is only possible via the keys and Press the key EXIT or once more the key TXT in order to switch off teletext again Now the volume can be changed again via the arrow key...

Page 37: ...of the current program 7 USB storage device is connected 8 Receiver is connected to a LAN via a wired connection 9 The current channel is included in a RAPS channel list 10 Name of the following program 11 Current day date and time 12 Signal strength 13 The current channel provides HbbTV 14 Press the key in order to go to the previous quick access menu 15 The current channel is broadcasted with le...

Page 38: ... representation of the sequence of the current program 26 Indication of pressing the yellow function key to directly access the smartPORTAL 27 Indication of pressing the blue function key to directly access the sorting function 28 Beginning and end of the following program 29 Press in order to go to the next quick access menu Press the key INFO during TV mode or Radio mode in order to open the inf...

Page 39: ...me in order to go to the window Add to favorite 2 Press OK in order to select the first favorite list 3 Press the keys and in order to select the favorite list to which you want to add the current channel and confirm with OK 4 Press EXIT in order to go back to the TV mode 5 9 7 Subtitles If the current channel contains subtitles in different languages you can select the desired subtitles in the qu...

Page 40: ...layed optimal 16 9 programs the image size is reduced in order to fit the screen width a lack of height is filled up by black bars 16 9 Automatic 16 9 TV set Independently from the current program you do not lose any image information 16 9 Pan Scan 4 3 programs the image size is changed in order to fit the screen width at top and bottom there is image information missing 16 9 programs are displaye...

Page 41: ...esolution 1 Press the keys INFO and several times in order to go to the quick access menu TV Resolution 2 Press OK in order to select the first resolution value11F12 3 Press the keys and in order to the highest value your TV set can show Value Order 1080p12F 13 Highest value 1080i 720p 576p 576i Smallest value 4 Press OK to confirm your selection Now you can change to another quick access menu 5 P...

Page 42: ...INFO and several times in order to go to the quick access menu Soundtrack 2 Press OK in order to enter the menu and to select the language Deutsch 3 Press the keys and in order to select the desired language and press OK in order to confirm your selection You can change now to another quick access menu 4 Press EXIT in order to go back to the TV mode 5 9 11 Audio 1 Press the keys INFO and several t...

Page 43: ... sleep timer that allows that the device automatically goes to the standby mode standby You can set the time manually or select one of the given time intervals You can also switch off a programmed or already active timer 1 Press the keys INFO and several times in order to go to the quick access menu Sleep Timer 2 Press OK or in order to enter the menu Now you have various options a Manual Entry Th...

Page 44: ...ress EXIT in order to go back to the TV mode 5 9 13 Parental Control When enabled in Settings Parental blocking channels you can simply edit the list of blocked channels 1 Press the keys INFO and several times in order to go to the quick access menu Parental Control 2 Press the keys and in order to decide whether you want to block or deblock the current channel 3 Press OK in order to confirm your ...

Page 45: ... channel 11 Logo of the next channel in the channel list 12 Position of the current channel in the channel list 13 Position of the next channel in the channel list 14 Name of the next channel in the channel list 15 Name of the current channel 16 Name of the current program 17 Name of the current program of the next channel 18 Second program of the next channel 19 Third program of the next channel ...

Page 46: ... and two times or press EPG on the remote control in order to go to the window Full Guide The window Full Guide is similar to the window Mini Guide and you can operate it in the same way The main difference is that it shows eight channels at the same time Additionally there are four function keys at the bottom which offer more features You can also open the window Full Guide via the main menu Guid...

Page 47: ... window Full Guide Press the blue function key in order to open the window More options The possible display and edit functions are explained in section 7 11 on page 91 Press the green function key in order to switch between Full Guide and Single Channel The window Single Channel only shows the programs of one channel ...

Page 48: ... VX10 allows you to use the various HbbTV offers of the broad cast stations For that purpose you need to proceed as follows 1 Ensure that beside the connection to the SAT antenna your receiver is connected to the internet How to connect your receiver to a home network and thus to the internet is described in the sections 4 6 on page 22 and 7 9 6 on page 81 2 Press the red function key in order to ...

Page 49: ...to hide the HbbTV content If you want to access the menu you must leave HbbTV completely For that purpose press EXIT 6 PVR 6 1 Record There are three options to use the personal video recorder with an exter nal USB or eSATA disk to record TV and radio programs First connect an USB disk to the USB port at the rear panel of the CX10 VX10 and wait until it is detected by the receiver You must connect...

Page 50: ...te 2 5 GB hour for SD records standard resolution and approx 120 MB per minute 7 0 GB hour for HD records high resolution The records are stored in TRP format There a directory will be created which includes several files streams container Of course these files will be connected dur ing playback The CX10 VX10 uses the FAT32 file system for records It has a NTFS detection for playback 6 2 Programmi...

Page 51: ...ogram only once Select Daily in order to record the selected program every day at the same time Select Mon Fri in order to record the selected program from Monday to Friday at the same time Select Weekly in order to record the selected program every week at the same day of the week 1 Press in order to go to the button Confirm 2 Press OK in order to go back to the EPG window You cannot schedule rec...

Page 52: ...rent speeds are possible Display Meaning or Fast forward fast backward or Higher speed or Highest speed Press the key in order to go back to the currently broadcasted pro gram 6 4 Playback There are different options for play back an USB recording 6 4 1 Direct Playback 1 Press PVR in order to open the window All media see section Man age Your Recordings page 54 2 Press OK two times in order to ope...

Page 53: ...a message However during an on going recording you can switch the screen to an other channel broadcasted via the same transponder as the recorded channel Press the keys and or the keys and Note You can record from HD channels but the record files are subject to the HD restrictions e g only the scrambled program will be stored the fast forward and fast backward functions are limited 6 6 Recording a...

Page 54: ...rder to close it prematurely 7 3 Manage Your Recordings In this submenu you can manage your recordings movies You can just display them including preview delete them or rename them You can also format the data storage device mount and unmount the data storage device and set default folders for record and time shift 1 Ensure that you connected a data storage device to the receiver 2 Select the subm...

Page 55: ...3 Date of the recorded program 4 Record resolution 5 Record file duration 6 Symbol for playback pause to be changed with the key 7 Current date time 8 Numerical indication of the current playback position 9 Graphical indication of the playback progress The info window disappears automatically You can press EXIT in order to close it prematurely 7 3 2 Deleting a Recording File Press the red function...

Page 56: ... seven times the key 9 in order to insert a small x 7 3 4 Define default directories Press the blue function key in the submenu TV Radio Recorded TV in order to define an open directory as default directory for Recording or Timeshift or Web Download You also can select New Folder in order to first create a new folder Select the appropriate item with the keys and and confirm with OK Press EXIT in o...

Page 57: ... select Cancel For compatibility reasons smart recommends to use the file system FAT32 With FAT32 the maximum file size is 4GB If a recording exceeds this size the file will auto matically be split in several parts 7 3 6 Mounting Unmounting an USB or eSATA device Press in the information window above the yellow function key Unmount device in order to unmount the storage device before un plugging i...

Page 58: ...l as for mounting and unmounting and for checking it also via the menu Media 7 4 Programming a Timer Personal Planner is the CX10 VX10 timer menu You can program re cordings channel selections or reminders Select the submenu Personal Planner and press OK or press INFO and three times the key or Press the key USB of the remote control Following window opens Press OK in order that this window become...

Page 59: ... Press the key in order to go to the next input field date 7 4 2 Setting Start Date and End Date 1 Press OK in order to set the day 2 Press the keys and in order to change to the right date 3 Press the key in order to set the month 4 Press the keys and in order to change to the right month 5 Press the key in order to go to the next input field 7 4 3 Setting the Channel 1 Press OK in order to chang...

Page 60: ...y will explain the set tings regarding this item for the event type Record Select with the keys and the button Single in order to record the desired program one time Select Daily in order to record the selected program every day at the same time Press OK to confirm Select Mon Fri in order to record the selected program from Monday to Friday at the same time Press OK to confirm Select Weekly in ord...

Page 61: ...ttons at the bottom Press OK once more in order to change to the input mode The first channel list Gesamt TV will be marked 7 5 1 Delete a Channel List Select with the keys and one of the shown lists and press the red function key in order to delete the list completely You cannot delete the channel lists which have been created during channel search e g the HD channel list Deutschland TV 7 5 2 New...

Page 62: ...l characters are available via multiple pressing of the keys 0 and 1 all others Wait one second after each character in order to confirm the input Press OK in order to confirm the new name to leave the edit mode and to go back to the previous window 7 5 4 Editing Channel Lists Select with the keys and one of the shown channel lists and press OK in order to edit them additionally After OK you ll ge...

Page 63: ...first of several channels Enlarge the marking with the keys and and press once more the green function key in order to set the end of the marking Now you can add the marked channels to a favorite list or delete them from a favorite list 7 5 7 Sorting a Channel List Press the yellow function key in the List Editor in order to open the sorting function described in section 7 10 page 90 7 5 8 Moving ...

Page 64: ...ly lock a program if you selected before Lock Settings Channels for the item Set Access Rights Level in the submenu Parental Control Select Show tech info in order to open the window Technical Info see section 7 11 page 91 Example Adding of a radio channel to a favorite list 1 Select the list Gesamt Radio in the List manager 2 Press the blue fuction key More options 3 Press to mark Edit to list 4 ...

Page 65: ...ed storage device USB or eSATA or on a shared network folder in your home net work How to share a folder or a drive in a Windows network is described in section 7 7 3 on page 68 The CX10 and VX10 can play this formats Audio Video Photo MP3 AVI MKV MP4 JPG GIF PCX The list of supported formats may be extended by soft ware updates Ensure that a storage device containing the files you want to play is...

Page 66: ...e and all files on shared network folders will be displayed After selecting the submenu USB Flash Disk and subsequent OK all files on the connected USB storage device will be displayed In TV mode press STOP to show all files on the con nected USB storage device After selecting the submenu ATA and subsequent OK all files on the connected eSATA disk will be displayed After selecting the submenu Netw...

Page 67: ...er has connected to the network entering under allowed addresses or similar 7 7 2 Receiver Settings for Streaming 1 Connect the receiver to a home network as described in section 4 6 Connecting a Home Network optional 2 Go to Control panel Network and press OK 3 Ensure that Network service is On Change the value if necessary 4 Go to Network files and press OK The window Network files opens 5 Selec...

Page 68: ...reen function key twice to confirm your entries and return to the Settings menu 10 Turn off the receiver using the power switch on the back Turn on the receiver again Now under Media Network you see the computer that hosts the shared file or folder 11 Press OK to see the shared file or folder 7 7 3 How to Share Folders and Drives Here we describe the folder sharing in a windows home network while ...

Page 69: ... click the file or folder you want to share 2 Click Properties 3 Select the Security tab 4 Check whether in the names box the group Everyone is existing If the group Everyone does not exist click on Add type Everyone in the object names box click on Check names and confirm all inputs 5 Set for the group Everyone the desired permissions and confirm all menus If you only want to stream i e playback ...

Page 70: ...itionally you must set the proper permissions directly in the file sys tem 1 Right click the file or folder you want to share 2 Click Properties 3 Select the Security tab 4 Click Edit 5 Click Add 6 Type Everyone in the textbox and confirm the menu 7 Set for the group Everyone the desired permissions and confirm all menus If you only want to stream i e playback via the receiver in most cases only r...

Page 71: ...eady in a subdirectory you go to the parent directory by selecting the icon Press OK in order to start playback or press the key Use the keys and to control the playback In order to go quickly to a certain point in an audio or video file use the keys and 13 Keep the key pressed until the desired position is reached Do you re lease the key the device conducts synchronization and playback starts Via...

Page 72: ...he file suffix e g mp3 in order to en sure that the file is recognized as music file and played back properly Press the blue function key in order to define an opened directory as standard directory for recording or time shift see section Setting De fault Directories page 79 7 7 5 Example Photos The basic procedure for image files is similar to those for music files Press OK after you selected an ...

Page 73: ...much more Press the yellow function key in order to directly ac cess the smart portal from TV mode The smart web offerings are continuously enhanced For details visit www smart electronic de 7 9 Control Panel In the menu Control Panel you can adjust many parameters in several sub menus for the operation of the CX10 VX10 and view the current set tings 1 Navigate to the menu Control Panel 2 Press OK...

Page 74: ...rol Panel discarding the changes 7 9 1 User Preferences 7 9 1 1 Default State of the Receiver After Power Up Select Start up mode to define whether your CX10 VX10 starts up with the live TV screen or whether there is already the menu opened Lobby 7 9 1 2 Number of Channels in the Channel Memory Select Last history depth in order to set how many channels are stored in the channel memory Whenever yo...

Page 75: ...see section 5 9 5 page 37 and other info text is dis played You can select the values 3s 6s und 9s Default value is 3s 7 9 1 4 4 EPG Font Size Select EPG font size in order to set the font size in the Full Guide window Default value is small 7 9 1 4 5 Menu Font Size Select GUI font size in order to set the font size in the menu windows Default value is small 7 9 1 5 Quick View Window Behavior Sele...

Page 76: ... keys except the red function key are reserved for the receiver operation 7 9 1 7 Automatic Standby Mode Select Auto Standby to set whether the receiver should automatically switch to standby mode when there isn t any key pressed for a certain time 7 9 1 8 Functions for the Keys FAV EPG and HELP There are default functions for the keys FAV EPG and HELP Neverthe less you can assign other functions ...

Page 77: ...timedia File Select Auto playback to set whether the playback of a multimedia file audio video photo starts only by selecting the file On or whether you must press or OK to start the playback Off or whether playback starts with 3 seconds delay after selecting the file 3 sec When playing a TV recording you already see captured EPG data during these 3 seconds 7 9 1 10 Leaving the Menu User preferenc...

Page 78: ...s and to the right values 2 Press OK in order to complete the date entry Select Local time in order to insert the current time The menu item Local time is only active when you selected Automatic time update Off 1 Select with the key hours and minutes and change with the keys and to the right values 2 Press OK in order to complete the time entry Select Time zone in order to set the time zone where ...

Page 79: ...urrent program with multi channel sound contains this language The same applies analogously to Primary subtitle language 7 9 4 Recording 7 9 4 1 Setting Lead Time and Overrun Time Select Start guard buffer in order to set with the keys and the minutes a recording should start earlier than set in the Personal Plan ner Select End guard buffer in order to set with the keys and the minutes a recording...

Page 80: ...so available during playback 7 9 4 6 Recording Teletext Select Record with Teletext to set whether you want to record broadcasted teletext data which are then also available during play back 7 9 4 7 Power at the USB Port You can set whether a connected USB hard drive without own power supply should be in operation during standby Select USB Power in Standby to switch on or off the 5V voltage at the...

Page 81: ...dcasting currently programs with a higher FSK approval 16 18 The function Restrict content rating can only be used when this service is provided by the provider i e programs must contain a flag for the FSK ap proval Select Set Access Rights Level in order to restrict the access to channels or menus with the PIN 7 9 6 Network Select the submenu Network in the menu Control panel and press OK 7 9 6 1...

Page 82: ... to the previous window Press EXIT in order to leave the menu 7 9 6 1 2 Manual LAN Configuration 1 Select No for Auto IP config 2 Enter the network parameters IP address Subnet mask Default gateway and Preferred DNS server by selecting the relevant parameters entering the appropriate value with the numeric keypad and clicking OK 3 Press the green function key Connect in order to connect to the net...

Page 83: ...LAN Configuration Select Manually connect to a wireless network After OK the receiv er looks for the wireless network looks for the available wireless net works 1 Select your network and press OK Beside the network connection you should insert your key password 2 Insert your WLAN key with the numeric keys of the remote control and press OK in order to confirm your entry 3 Press the green function ...

Page 84: ...activate a network quality control 7 9 7 Channel Search 7 9 7 1 Satellite Search In the submenu Satellite Search you can create overall channel lists TV and Radio for one or for several satellites Select Scan mode in order to set the way of creating a new overall channel list Quick Scan searches all channels which are available from a satellite HD the HD channel list will be used Select Channels i...

Page 85: ... look for a HD channel DVB S2 or a SD channel DVB S Select FEC in order to set the FEC mode If you set the FEC mode i e do not leave it Automatic the search will be simpler and the search time will be shorter Select PIDs in order to set the PID values If you do not know them set the value to Automatic Then the PIDs provided by the broadcaster will be used Only if you select manual you can insert v...

Page 86: ...eceiver is connected to the in ternet if you want to update the receiver software online 7 9 10 System information Here you can get various information regarding your CX10 VX10 Especially if you want to contact the smart service hot line you should know the receiver s software version 7 9 11 Audio Video 7 9 11 1 Digital Audio Out Select Digital Audio Out in order to switch the digital audio out be...

Page 87: ...ether the HDMI signal should be transferred with a HDMI security code If you turn off HDCP for example because your TV set cannot handle HDCP signals certain playback func tions may be blocked 7 9 11 5 Disable Analog Video Output Select Analogue video output to select whether you want to deactivate the analog video outputs completely Off or whether only the pure video signal without OSD informatio...

Page 88: ... unicable system need to manual adjustments in the submenu Antenna 16 59 32 Stephan S gibt es deinerseits noch Änderungswünsche zum jetzigen PM Entwurf Leave the settings in this menu to a professional For normal use you do not have to make any settings here With the help of the indication of signal quality and signal strength you can verify your entries immediately Select LNB Type in order to sel...

Page 89: ...equency of the reference transponder 7 9 13 Smartcard Since the CX10 VX10 is a HD receiver a smartcard bay is available You can remove the smartcard at any time or insert it without turning off the receiver Insert the smartcard with the chip down carefully until the contacts inside snap into place After the smartcard is inserted the corresponding channel can be select ed It may take a few seconds ...

Page 90: ... Press die yellow function key in order to open the window Sorting on top of the EPG window Full Guide Dependent on your installation with RAPS or without RAPS you ll get different windows Sorting e g with RAPS In TV mode you can press the blue function key in order to access directly the sorting function 3 Press the keys and in order to select the desired sorting function and confirm with OK Unso...

Page 91: ... be displayed Genre filter the window Genre filter opens Select with the keys and a Genre and confirm with OK Now only channels which belong to this Genre will be displayed 4 Press EXIT in order to leave the EPG window and to go back to nor mal TV operation 7 11 EPG More options 1 Press the remote control key EPG 2 Press die blue function key in order to open the window More Op tions on top of the...

Page 92: ...uage for programs with multi channel sound 9 Frequency 12460 MHz Frequency in MHz 10 Service ID 659 For each channel there is a unique number 11 PCR PID 3071 PCR Program Clock Reference built on the PIDs necessary that the decoder works properly Edit scheduled event opens the programming window of the EPG where you can program recordings channel selection or reminders see section 6 2 page 50 4 Pre...

Page 93: ...s are available with these functions Taste Bedeutung Numbers 0 9 Letters Navigation in the menu or change of a value RETURN key OK In the Internet application you can use these keys Taste Bedeutung Numbers 0 9 Letters Shift key Upper lower case Space bar Deletion key Del RETURN key TAB Go to next field Alt TAB Go to previous field F3 Go to previous page F4 Go to next page F5 Refresh F6 Display vid...

Page 94: ...iver USB inter face at the rear You can use the device now 7 12 2 Several USB Devices If you want to use the recording and or time shift functions in conjunction with a USB storage device or mouse and keyboard should be available simultaneously you need to connect several USB devices 1 Connect a USB hub to the USB socket on the back of the receiver 2 Connect a USB keyboard to the USB hub You can u...

Page 95: ...ls and frequencies depends on the used LNBs or multiswitches The data sheet and the technical documentation for your LNB and or multiswitch contain a mapping table similar to the following 8 2 Allocation ZF Channels and Frequencies Receiver ZF channel Example frequency MHz Frequency MHz Receiver 1 1 1210 Receiver 2 2 1284 Receiver 3 3 1400 Receiver 4 4 1420 Receiver 5 5 1516 Receiver 6 6 1632 Rece...

Page 96: ...it the menu by pressing EXIT the settings are stored 8 Select the menu Control Panel the submenu Config RAPS and enter the PIN code 9 Make sure that the value for RAPS Mode is Config You may need to change this value 10 Press the yellow function key to start the RAPS installation 11 Go on as described in section 5 2 page 24 9 Management of USB Storage Devices For recording time shift and media pla...

Page 97: ... or they are defective 9 3 USB Hard Drive 3 5 Inch 3 5 USB hard drives have their own power supply Therefore we recommend hard drives of this size for the operation along with smart receivers 9 4 Check the Read and Write Speed You can test the read and write speed of your USB storage device with various programs In the support section of the website www smart electronic de you can find such a prog...

Page 98: ...ents for Recording SD recordings need about 40 MB minute 2 5 GB hour HD recordings need about 120 MB minute 7 0 GB hour 9 8 Troubleshooting USB Storage Devices Symptom Possible reason Corrective Recording jerky still image Inadequate read and write speed of the disk the internal memory buffer of the USB stick is overload ed Storage device fie system damaged Check read and write speed Windows error...

Page 99: ...not sup port standby function Check technical data of the hard disk 9 9 Error Checking in Windows In the following we describe the procedure for the operat ing system Windows XP If you have a different operating system find out a possibly different procedure in the manual of your PC or operating system 1 Connect the disk to the PC 2 Open My Computer and click on the disk with the right mouse butto...

Page 100: ...r thinner Clean the housing of the receiver with a dry cloth 11 Transport and Shutdown This is the procedure if you want to transport the receiver or do not want to use it anymore 1 Disconnect the receiver and the connected units from the power sup ply 2 Pull all connected cables 3 Remove the batteries from the remote control 4 Place the receiver cables and remote control in the original packaging...

Page 101: ...ctions to the receiver and from the receiver to the connected units and fasten them if necessary The TV set has no picture The system is not con nected properly The TV set is not in the AV mode Check the connection of the scart or composite cable and fasten it If necessary switch the TV set to the appropriate AV input Picture only black and white and or not properly syn chronized The video format ...

Page 102: ...gs Service Hotline 49 0 7724 94 78 555 Fax 49 0 7724 94 78 333 E mail service smart electronic de Internet www smart electronic de 13 Disposal CAUTION Never throw receiver and batteries in the normal do mestic waste Inquire at your city or local government about proper and environmentally suitable disposal methods for the unit Take used up batteries to a collection point The WEEE symbol on the pro...

Page 103: ... Input frequency 950 MHz 2150 MHz Input level 65 dBm to 25 dBm LNB current 13 18 V max 400 mA LNB control signal 0 22 kHz DiSEqC control full DiSEqC support 14 2 Remote Control Range Up to 7 m Batteries 2 size AAA 14 3 LAN WLAN LAN 10 100Mbit s TCP IP IPv4 IPv6 is not supported WLAN VX10 only 802 11b g Speed 54Mbit s Encryption WEP WPA and WPA2 14 4 Power Supply Power consumption in deep standby m...

Page 104: ...rk WWW 1 Ethernet RJ45 socket 1 connection for WLAN antenna only VX10 14 6 Temperature Operating temperature 0 C to 40 C Storage temperature 40 C to 65 C 14 7 Dimensions and Weight Width 260 mm Height 50 mm Depth 215 mm Weight Approx 1 5 kg 15 Open Source Software The smartCX10 VX10 software contains different modules of an open source operating system which are available according to the GNU GENE...

Page 105: ...ic License The Program below refers to any such program or work and a work based on the Program means either the Program or any derivative work under copyright law that is to say a work containing the Program or a portion of it either verbatim or with modifications and or translated into another language Herein after translation is included without limitation in the term modification Each licensee...

Page 106: ...so as to satisfy simultaneously your obligations under this License and any other pertinent obligations then as a consequence you may not distribute the Program at all For example if a patent license would not permit royalty free redistribution of the Program by all those who receive copies directly or indirectly through you then the only way you could satisfy both it and this License would be to ...

Page 107: ...e version number 2 1 Preamble The licenses for most software are designed to take away your freedom to share and change it By contrast the GNU General Public Licenses are intended to guarantee your freedom to share and change free software to make sure the software is free for all its users This license the Lesser General Public License applies to some specially designated software packages typica...

Page 108: ...provided that you conspicuously and appropriately publish on each copy an appropriate copyright notice and disclaimer of warranty keep intact all the notices that refer to this License and to the absence of any warranty and distribute a copy of this License along with the Library You may charge a fee for the physical act of transferring a copy and you may at your option offer warranty protection i...

Page 109: ...terials specified in Subsection 6a above for a charge no more than the cost of performing this distribution d If distribution of the work is made by offering access to copy from a designated place offer equivalent access to copy the above specified materials from the same place e Verify that the user has already received a copy of these materials or that you have already sent this user a copy For ...

Page 110: ... AND OR OTHER PARTIES PROVIDE THE LIBRARY AS IS WITHOUT WARRANTY OF ANY KIND EITHER EXPRESSED OR IMPLIED INCLUDING BUT NOT LIMITED TO THE IMPLIED WARRANTIES OF MERCHANTABILITY AND FITNESS FOR A PARTICULAR PURPOSE THE ENTIRE RISK AS TO THE QUALITY AND PERFORMANCE OF THE LIBRARY IS WITH YOU SHOULD THE LIBRARY PROVE DEFECTIVE YOU ASSUME THE COST OF ALL NECESSARY SERVICING REPAIR OR CORRECTION 16 IN N...

Page 111: ...2006 A1 2007 EN 55024 1998 A1 2001 A2 2003 EN 61000 3 2 2006 EN 61000 3 3 2008 Low Voltage Directive LVD 2006 95 EC EN 60065 2002 A1 2006 A11 2008 16 2 Hybridreceiver HD smart VX10 EMC Directive 2004 108 EC EN 55013 2001 A1 2003 A2 2006 EN 55020 2007 EN 55022 2006 A1 2007 EN 55024 1998 A1 2001 A2 2003 EN 61000 3 2 2006 EN 61000 3 3 2008 Low Voltage Directive LVD 2006 95 EC EN 60065 2002 A1 2006 A1...

Page 112: ...Art Nr 90 60 01 0139 ...

Reviews: