Slinex SL-10IP User Manual Download Page 8

{ Design. Uniqueness. Innovation }

DESIGN 

DIRECT

SERIES

13

14

Left mouse

button click

Left mouse

button double click

Left mouse

button hold & slide

1.  Click left mouse button on           icon from instrumental panel to enter 

configuration settings menu.

2.  In configuration settings menu click left mouse button on any icon to enter 

current sub menu settings.

3.  Click left mouse on any icon to enter current parmeters screen.
4.  Click left mouse button on any parameter to change its value.
5.  Click left mouse button on             icon to exit from current parameters screen.
6.  Click left mouse on any icon to enter its settings.
Double click left mouse on any part of the image in quad screen mode to enter 
full screen mode.
Use left mouse button hold & slide in motion detection settings to set motion 
detected part of the screen.

6.2 Tool bar

Click right mouse button in standby or monitoring mode to enable or disable the tool bar.

Setup

Playback

Manual Record

Remove SD

E-zoom

Ring

+

Reboot

6.2.1 Configuration settings

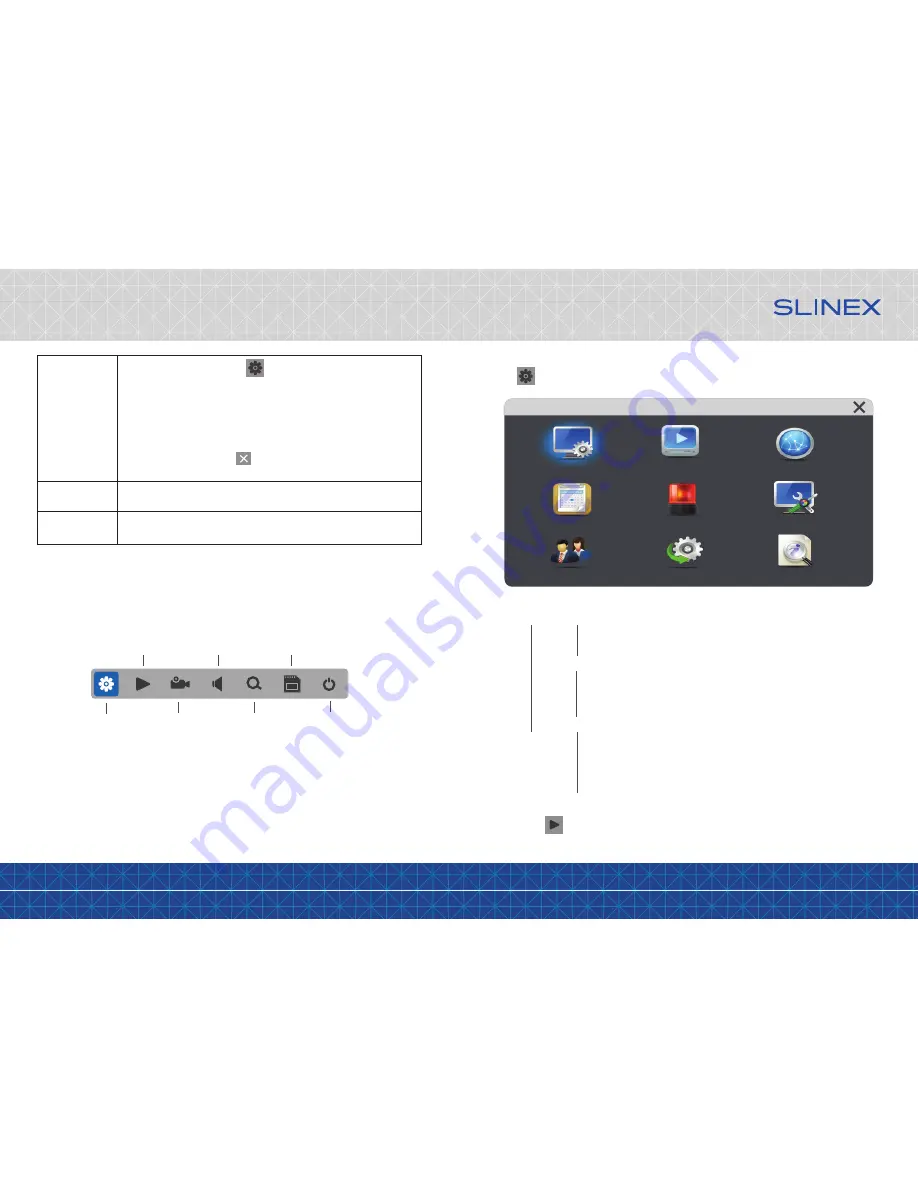
Press             icon on the tool bar to enter configuration settings menu:

Configuration settings menu has the following structure:

System 


→    

Basic   


→ 

Language

 – system menu and settings language

→ 

Standard

 –video signal standard  (PAL или NTSC)

→ 

Resolution

 – video camera resolution (HD or CVBS)

→   

Time    


→ 

Date format

 – date display format (MM/DD/YY, YY/MM/DD or DD/MM/YY)

→ 

Date

 – date setting

→ 

Time format

 – time display format (12 Hour / 24 Hour)

→ 

Time

 – time setting

→   

Video


→ 

Channel

 – choose channel number to change settings

→ 

Channel name

 – current channel name

→ 

Color setup 

– Chroma, Brightness, Contrast and Saturation settings

→ 

Video margin

  – Left, Right, Up and Down image margins

→ 

Record

  – record Resolution and Frame rate settings for all channels

Playback

 – video records stored on the  SD card archive playback,  (this menu also available on the tool bar 

by selecting               icon, look at the page 18, paragraph 6.2.2).

Configuration

System

Playback

Alarm

Default

Information

Maintenance

Network

Scheduling

User

Summary of Contents for SL-10IP

Page 1: ...Design Uniqueness Innovation DESIGN DIRECT SERIES SL 10IP 10 video door phone Thank you for the choice of our equipment User manual...

Page 2: ...ture protection Don t throw away the device with other industrial or nutritive trash if you see that symbol Some regions have separation and recycling systems for the electronic equipment Connect with...

Page 3: ...top conversation with the visitor current system settings menu exit Unlock button door unlocking Mouse USB connector Answer button incoming call answer and start talking with the visitor Monitor butto...

Page 4: ...RG 6 coaxial cable for the video signal c Shielded or non shielded twisted pair not recommended distance up to 25 meters non shielded twisted pair can be used distance 25 to 50 meters shielded twiste...

Page 5: ...p main power cord 100 240 V disconnected from the outlet otherwise it can damage monitor circuits Door panels cameras power supplys locks and other additional equipment described on the schemes are op...

Page 6: ...or screen Visitor presses call button on the first door panel Visitor presses call button on the second door panel Press Answer button to start conversation with the visitor Melody stops ringing and c...

Page 7: ...nsferred from the Master monitor door panels to the Slave monitors 2 If someone press call button on the door panel while monitoring is active then the image from this door panel appears on the monito...

Page 8: ...mode to enable or disable the tool bar Setup Playback Manual Record Remove SD E zoom Ring Reboot 6 2 1 Configuration settings Press icon on the tool bar to enter configuration settings menu Configurat...

Page 9: ...phone to the local network in two ways wired or wireless Wi Fi connection We strongly recommend to use wired connection because it is more reliable than wireless one Enable Wi Fi module if wireless c...

Page 10: ...of the list Press button to go to the next page of the list or button to go to the last page of the list Scheduling Record schedule can be seted up on this screen There are three types of schedule se...

Page 11: ...ows 7 Windows 8 or Windows 10 with Internet Explorer browser version 7 0 and higher Mouse can be connected to the door phone any time without power disconnection of the door phone 7 2 Security setting...

Page 12: ...nd default gateway Note There is also another way to access network parameters display Press right mouse button on the Network icon on the task manager bar or on the desktop and choose Open Network an...

Page 13: ...bled for the current channel M Enable disable monitoring mode Snapshot Start instant recording on every channel Start stop conversation Open lock Quad mode One camera monitoring mode Full screen mode...

Page 14: ...of the screen to enter remote door phone settings Here you can find encode record alarm network alarm mobile and user settings ENCODE SETTING video quality settings On the left side of the screen pres...

Page 15: ...e you can enable or disable recording channels set the schedule and recording type for every channel such as motion detection normal schedule recording or no recording NETWORK SETTING network paramete...

Page 16: ...such information as device name software version release date and device id number REMOTE UPGRADE remote software upgrading On the left side of the screen press REMOTE UPGRADE to enter software upgrad...

Page 17: ...then press ADD USER button to add a new user acount Press DELETE USER to delete selected user account 7 5 4 Local storage settings LOCAL SETTING bookmark Press LOCAL SETTING bookmark on the upper side...

Page 18: ...obile device into the local network which is video door station connected 3 Run Slinex application on your mobile device and press icon to add a new device 4 Press Click here for connected wired wirel...

Page 19: ...nded function This limited warranty covers only repair replacement refund or credit for defective products as provided above Manufacturer is not liable for and does not cover under warranty any damage...

Reviews: