Slinex SL-10IP User Manual Download Page 19

{ Design. Uniqueness. Innovation }

DESIGN 

DIRECT

SERIES

35

36

9. Limited warranty

Manufacturer guarantees product normal functioning during the warranty period if the user keeps all safety 

instructions described in that manual.

Warranty period is 12 months from the moment of the product purchasing (warranty period could be 

extended up to 24 months or more, depending on the local regulations).

Warranty period allows user to make guarantee repair in cases when normal functioning of the product  was 

violated by the fault of manufacturer and the user haven’t offend transporting, installation and working 

conditions.

This limited warranty does not cover any damage to the product that results from improper installation, 

accident, abuse, misuse, natural disaster, insufficient or excessive electrical supply, abnormal mechanical or 

environmental conditions, or any unauthorized disassembly, repair or modification. 

Warranty void in such cases:

•  the product was damaged by the fault of the customer;

•  the product wasn’t properly installed according reccomendations from the manual;

•  the sticker on the backside of the product was broken;

•  the product was not used for its intended function.

This limited warranty covers only repair, replacement, refund or credit for defective products, as provided 

above. Manufacturer is not liable for, and does not cover under warranty, any damages or losses of any kind 

whatsoever resulting from loss of, damage to, or corruption of, content or data or any costs associated with 

determining the source of system problems or removing, servicing or installing products. This warranty 

excludes third party software, connected equipment or stored data. Manufacturer is therefore not liable for 

any losses or damage attributable to third party software, connected equipment or stored data.

In the event a product has been discontinued, manufacturer shall either repair the product, offer to replace 

it with a comparable product or provide a refund at the lesser of the purchase price or the product’s current 

value.

Repaired or replacement products will continue to be covered by this limited warranty for the remainder of 

the original warranty term. 
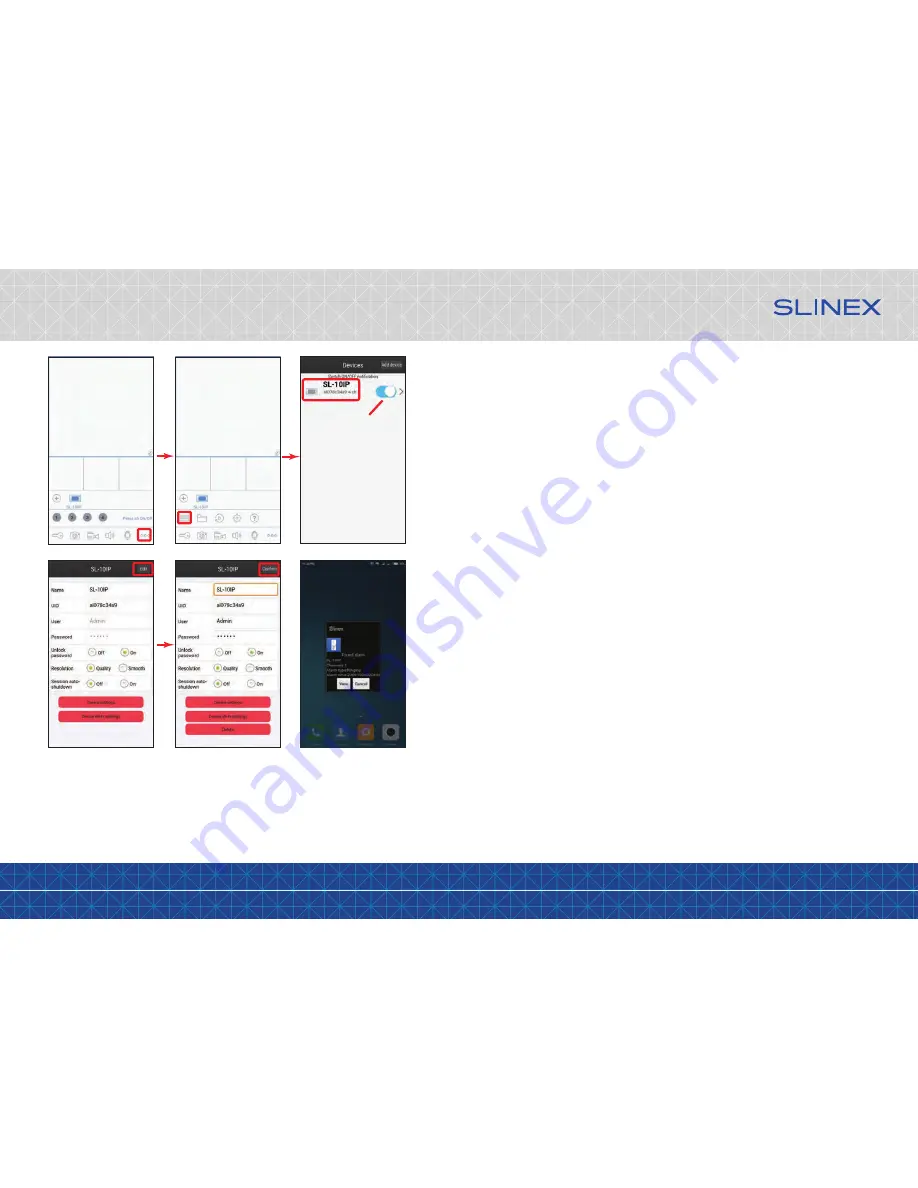
enable or disable

notification

Press «Edit» to change any 

setting on this screen

Press «Confirm» to save

all the settings

Incoming call notification

Notes:

Disable door pannels or cameras monitoring for the current device before trying to change any settings or 
parameters; 
Disable current device notification to access such parameters as «Delete» or «Device settings».

Summary of Contents for SL-10IP

Page 1: ...Design Uniqueness Innovation DESIGN DIRECT SERIES SL 10IP 10 video door phone Thank you for the choice of our equipment User manual...

Page 2: ...ture protection Don t throw away the device with other industrial or nutritive trash if you see that symbol Some regions have separation and recycling systems for the electronic equipment Connect with...

Page 3: ...top conversation with the visitor current system settings menu exit Unlock button door unlocking Mouse USB connector Answer button incoming call answer and start talking with the visitor Monitor butto...

Page 4: ...RG 6 coaxial cable for the video signal c Shielded or non shielded twisted pair not recommended distance up to 25 meters non shielded twisted pair can be used distance 25 to 50 meters shielded twiste...

Page 5: ...p main power cord 100 240 V disconnected from the outlet otherwise it can damage monitor circuits Door panels cameras power supplys locks and other additional equipment described on the schemes are op...

Page 6: ...or screen Visitor presses call button on the first door panel Visitor presses call button on the second door panel Press Answer button to start conversation with the visitor Melody stops ringing and c...

Page 7: ...nsferred from the Master monitor door panels to the Slave monitors 2 If someone press call button on the door panel while monitoring is active then the image from this door panel appears on the monito...

Page 8: ...mode to enable or disable the tool bar Setup Playback Manual Record Remove SD E zoom Ring Reboot 6 2 1 Configuration settings Press icon on the tool bar to enter configuration settings menu Configurat...

Page 9: ...phone to the local network in two ways wired or wireless Wi Fi connection We strongly recommend to use wired connection because it is more reliable than wireless one Enable Wi Fi module if wireless c...

Page 10: ...of the list Press button to go to the next page of the list or button to go to the last page of the list Scheduling Record schedule can be seted up on this screen There are three types of schedule se...

Page 11: ...ows 7 Windows 8 or Windows 10 with Internet Explorer browser version 7 0 and higher Mouse can be connected to the door phone any time without power disconnection of the door phone 7 2 Security setting...

Page 12: ...nd default gateway Note There is also another way to access network parameters display Press right mouse button on the Network icon on the task manager bar or on the desktop and choose Open Network an...

Page 13: ...bled for the current channel M Enable disable monitoring mode Snapshot Start instant recording on every channel Start stop conversation Open lock Quad mode One camera monitoring mode Full screen mode...

Page 14: ...of the screen to enter remote door phone settings Here you can find encode record alarm network alarm mobile and user settings ENCODE SETTING video quality settings On the left side of the screen pres...

Page 15: ...e you can enable or disable recording channels set the schedule and recording type for every channel such as motion detection normal schedule recording or no recording NETWORK SETTING network paramete...

Page 16: ...such information as device name software version release date and device id number REMOTE UPGRADE remote software upgrading On the left side of the screen press REMOTE UPGRADE to enter software upgrad...

Page 17: ...then press ADD USER button to add a new user acount Press DELETE USER to delete selected user account 7 5 4 Local storage settings LOCAL SETTING bookmark Press LOCAL SETTING bookmark on the upper side...

Page 18: ...obile device into the local network which is video door station connected 3 Run Slinex application on your mobile device and press icon to add a new device 4 Press Click here for connected wired wirel...

Page 19: ...nded function This limited warranty covers only repair replacement refund or credit for defective products as provided above Manufacturer is not liable for and does not cover under warranty any damage...

Reviews: