Slinex SL-10IP User Manual Download Page 12

{ Design. Uniqueness. Innovation }

DESIGN 

DIRECT

SERIES

21

22

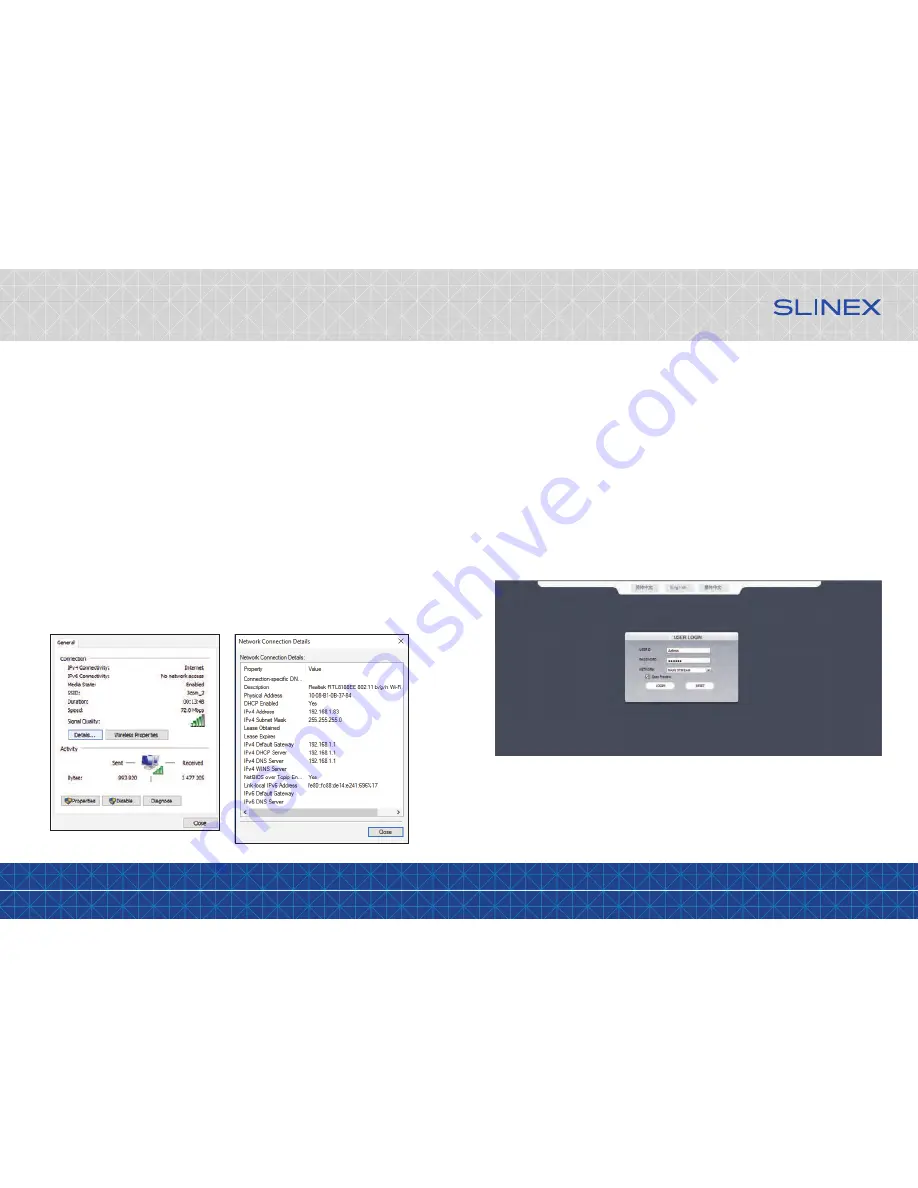
Select the English language on the upper middle side of the screen. Enter user name and password.

USER ID

 – user name. Default user name is 

Admin

.

PASSWORD

 – password. Default password is 

888888

.

NETWORK

 – choose MAIN STREAM or SUB STREAM. Main stream has better image quality than sub stream.

Open preview

 – select this option if you want to turn on panels and cameras image monitoring after 

authorization.

7.3 Network settings

Door phone remote access can be carried out through the Internet or local network connection. Clent 
computer IP address should use the same network segment as the door phone. In global network the only 
demand is that computer and door phone should be available to use public network and Internet 
connection using IP address or dynamic domain name. Local network connection settings are described 
below:
1) Check computer IP address, subnet mask and default gateway. Press right mouse button on the Windows 
«Start» button and choose «Network connections» menu. Press left mouse button twice on the currently 
used network connection and then press «Details...» button.
Here you can see network parameters of the computer, such as IP address, subnet mask and default 
gateway.

Note:

There is also another way to access network parameters display. Press right mouse button on the 
«Network» icon (on the task manager bar or on the desktop) and choose «Open Network and Sharing 
Center» 

→ 

«Change adapter settings».  Press left mouse button twice on the currently used network 

connection and then press «Details...» button.

2) Set appropriate  IP address from the current network segment, subnet mask and gateway in the door 
phone settings (Configuration 

→ 

Network 

→ 

Basic). In the current example IP address can be set as 

192.168.1.Х, where Х – any number between 0-255, except 255 and 1 (and also except IP addresses that 
already exist in that segment). Subnet mask  – 255.255.255.0 and gateway – 192.168.1.1

Note:

If the door phone connected to the global network then  public IP address should be used.

7.4 Plugin installation

After all settings have been made, open browser and enter door phone IP-address (Configuration 

→ 

Network 

→ 

Basic 

→ 

IP address) into address line. After IP address, enter colon (:) sign and web port number 

that is used on the door phone (Configuration 

→ 

Network 

→ 

Port 

→ 

Web Port). For example if the current 

web port is 8090 (default web port), then the final text in the adress line should be like 

http://192.168.1.50:8090

After entering you will be asked to install monitoring software. Confirm this installation and then you can 
enter door phone web interface to monitor your cameras, panels or change settings:

Summary of Contents for SL-10IP

Page 1: ...Design Uniqueness Innovation DESIGN DIRECT SERIES SL 10IP 10 video door phone Thank you for the choice of our equipment User manual...

Page 2: ...ture protection Don t throw away the device with other industrial or nutritive trash if you see that symbol Some regions have separation and recycling systems for the electronic equipment Connect with...

Page 3: ...top conversation with the visitor current system settings menu exit Unlock button door unlocking Mouse USB connector Answer button incoming call answer and start talking with the visitor Monitor butto...

Page 4: ...RG 6 coaxial cable for the video signal c Shielded or non shielded twisted pair not recommended distance up to 25 meters non shielded twisted pair can be used distance 25 to 50 meters shielded twiste...

Page 5: ...p main power cord 100 240 V disconnected from the outlet otherwise it can damage monitor circuits Door panels cameras power supplys locks and other additional equipment described on the schemes are op...

Page 6: ...or screen Visitor presses call button on the first door panel Visitor presses call button on the second door panel Press Answer button to start conversation with the visitor Melody stops ringing and c...

Page 7: ...nsferred from the Master monitor door panels to the Slave monitors 2 If someone press call button on the door panel while monitoring is active then the image from this door panel appears on the monito...

Page 8: ...mode to enable or disable the tool bar Setup Playback Manual Record Remove SD E zoom Ring Reboot 6 2 1 Configuration settings Press icon on the tool bar to enter configuration settings menu Configurat...

Page 9: ...phone to the local network in two ways wired or wireless Wi Fi connection We strongly recommend to use wired connection because it is more reliable than wireless one Enable Wi Fi module if wireless c...

Page 10: ...of the list Press button to go to the next page of the list or button to go to the last page of the list Scheduling Record schedule can be seted up on this screen There are three types of schedule se...

Page 11: ...ows 7 Windows 8 or Windows 10 with Internet Explorer browser version 7 0 and higher Mouse can be connected to the door phone any time without power disconnection of the door phone 7 2 Security setting...

Page 12: ...nd default gateway Note There is also another way to access network parameters display Press right mouse button on the Network icon on the task manager bar or on the desktop and choose Open Network an...

Page 13: ...bled for the current channel M Enable disable monitoring mode Snapshot Start instant recording on every channel Start stop conversation Open lock Quad mode One camera monitoring mode Full screen mode...

Page 14: ...of the screen to enter remote door phone settings Here you can find encode record alarm network alarm mobile and user settings ENCODE SETTING video quality settings On the left side of the screen pres...

Page 15: ...e you can enable or disable recording channels set the schedule and recording type for every channel such as motion detection normal schedule recording or no recording NETWORK SETTING network paramete...

Page 16: ...such information as device name software version release date and device id number REMOTE UPGRADE remote software upgrading On the left side of the screen press REMOTE UPGRADE to enter software upgrad...

Page 17: ...then press ADD USER button to add a new user acount Press DELETE USER to delete selected user account 7 5 4 Local storage settings LOCAL SETTING bookmark Press LOCAL SETTING bookmark on the upper side...

Page 18: ...obile device into the local network which is video door station connected 3 Run Slinex application on your mobile device and press icon to add a new device 4 Press Click here for connected wired wirel...

Page 19: ...nded function This limited warranty covers only repair replacement refund or credit for defective products as provided above Manufacturer is not liable for and does not cover under warranty any damage...

Reviews: