


{ Design. Uniqueness. Innovation }
DESIGN
DIRECT
SERIES
9
10
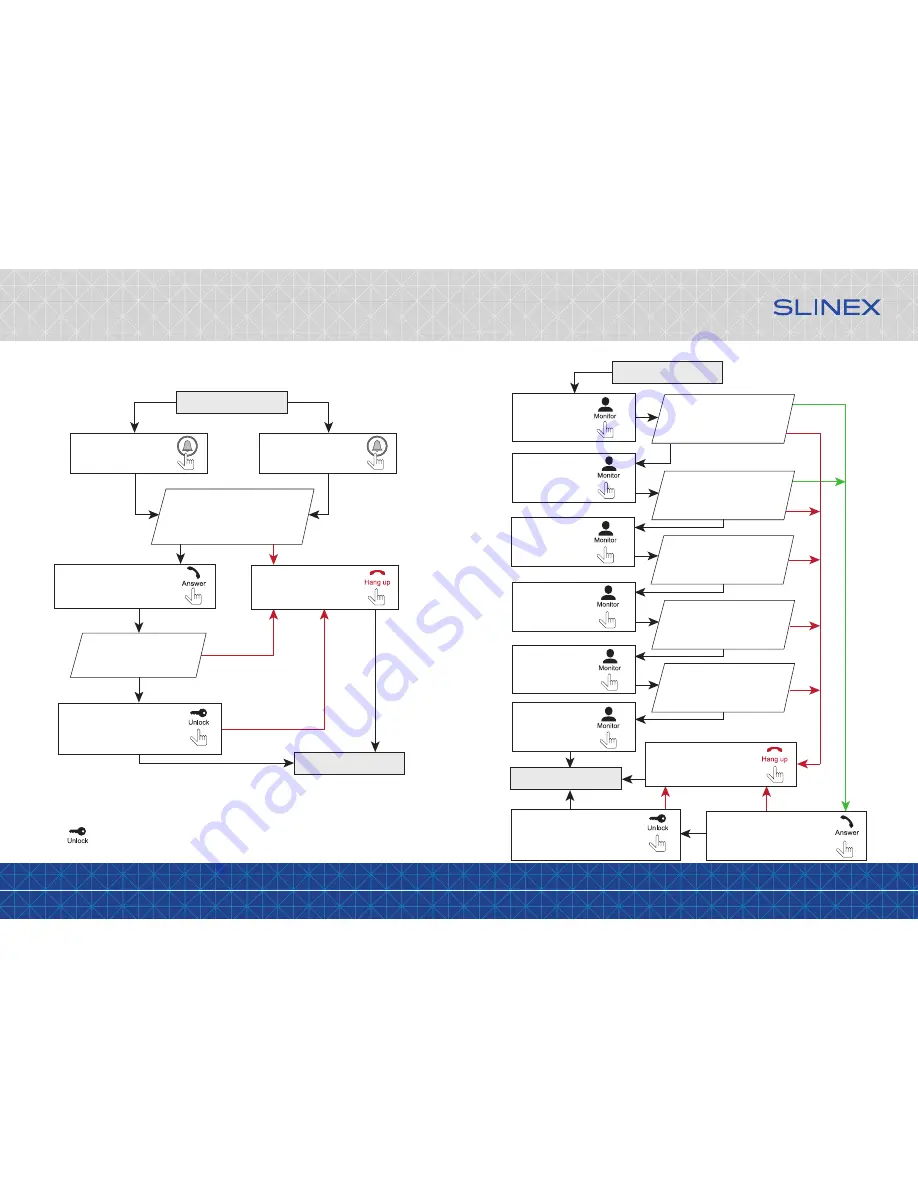
Monitor will show
the image from the
first CCTV camera
Press «Unlock» button to open
lock connected to the current
door panel, relay built into the
panel will open the lock
Press «Monitor»
button on the
monitor
Press «Monitor»
button on the
monitor again
Monitor will show
the image from the
second CCTV camera
Monitor will show
the quad image screen
Press «Monitor»
button on the
monitor again
Monitor will show
the image from the
second door panel
Press «Monitor»
button on the
monitor again
Press «Monitor»
button on the
monitor again
Press «Monitor»
button on the
monitor again
5. Operation
5.1 Incoming call
Standby mode
Standby mode
Melody is ringing on the
monitor and door panel,
image from the door panel
appears on the monitor screen
Visitor presses call button
on the first door panel
Visitor presses call button
on the second door panel
Press «Answer» button to start
conversation with the visitor
Melody stops ringing and
conversation starts,
talking time is 120 seconds
Press «Hang up» button to
stop conversation or
incoming call
Press «Unlock» button to open
lock connected to the current
door panel, relay built into the
panel will open the lock
Notes:
1) Monitor will be automatically switched into standby mode if the user doesn’t answer incoming call
during 60 seconds;
2) Image and sound from the door panel will be active during 20 seconds after the moment user presses
button. It let the user know if the visitor passed through the door.
20 seconds
Monitor will show
the image from the
first door panel
20 seconds
Standby mode
Standby mode
Press «Answer» button to start
conversation with the visitor
Press «Hang up» button to
stop monitoring or
conversation
5.2 Door panel and camera image monitoring


