


Form 40017 Rev 1906
Page 3 of 26
Getting Started
Charging the Battery Pack
AC Charging Options
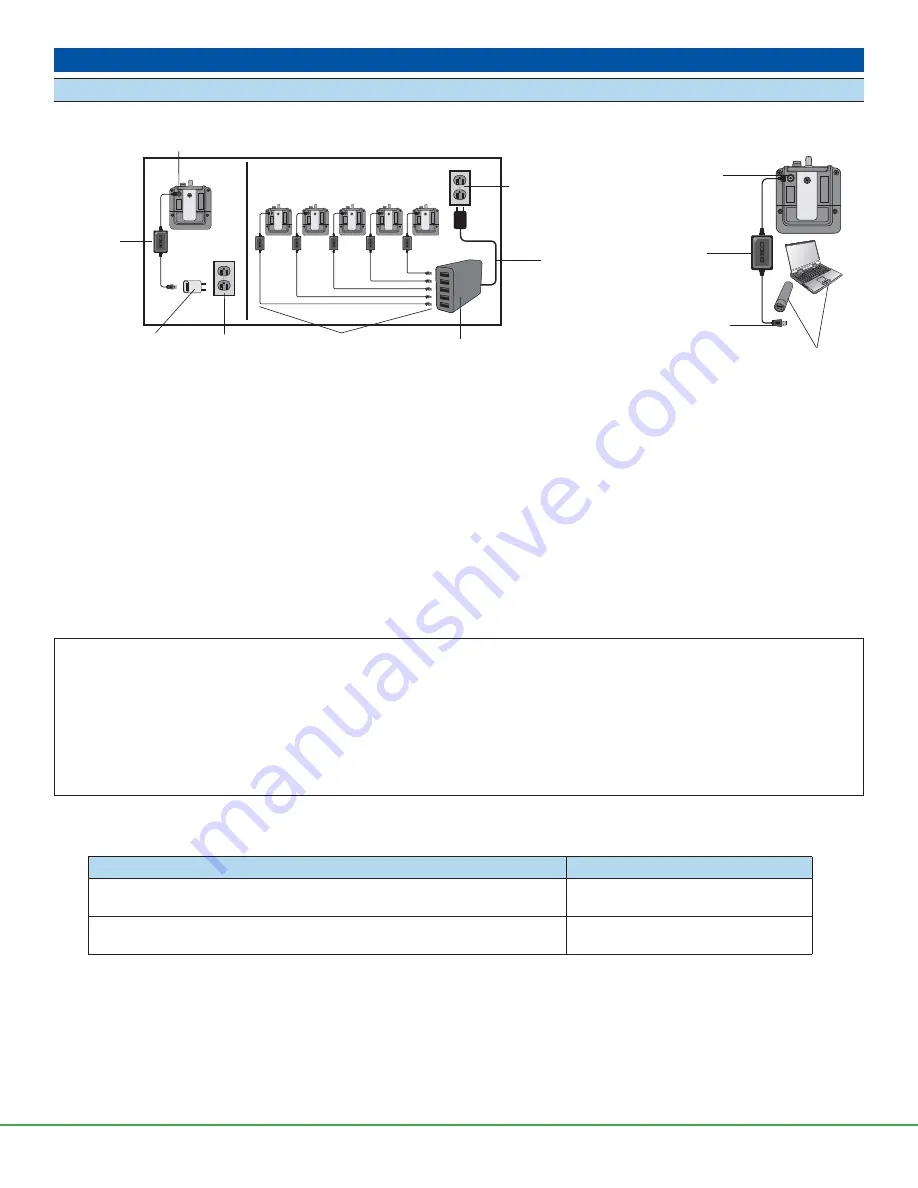
Portable Charging Options
1. Insert USB connector on charging cable into a USB port on a(n):
a.
Adapter
(wall cube, supplied with SKC Single USB Charger, Cat. No. 220-300). Plug adapter (wall cube) into a standard 100 to
240-volt wall outlet.
b.
PC/laptop
(not supplied by SKC) with a full charge or plugged into a wall outlet.
Note:
USB ports and PC/laptop se
tt
ings vary.
If using this charging option, verify that your pump is charging by checking that more bars have appeared on the pump ba
tt
ery
status icon midway through charging.
c.
Portable power pack
(not supplied by SKC) with a full charge and that is compatible with Pocket Pump TOUCH
The blue LED on the charger will light.
2. Hover the magnetic charging connector on the charging cable closely over the charging contact on the back of the pump
(Figure 1)
until the LED behind the magnetic contact on the pump lights blue and pump status LEDs blink red in a repeating pa
tt
ern of right-
inlet-left.
Troubleshooting Charging
If the magnetic charging connector is seated on the pump charging contact, but the charger and charging contact LEDs
are not lit blue:
Check that the charging cable is connected to an AC adapter and active outlet, PC/laptop connected to an active
power source, or a portable power pack with a full charge that is compatible with charging Pocket Pump TOUCH.
If only the charger LED lights blue:
It means that there is no connection with the pump charging contact. Check and reconnect
the charging connector on the cable to the pump’s charging contact. Both the charger and charging contact LEDs should light blue
when connected properly.
3. Charge
ba
tt
ery completely (approximately 10 hours to 100% or 4.5 hours to 80%).
See ba
tt
ery charge status indicator descriptions below.
LED Activity Description
Charging Status
Charging contact LED blue/
inlet and corner LEDs red,
fl
ashing in repeated pattern
of right-inlet-left
Battery charging
Charging contact LED blue/
inlet LED green, solid/corner LEDs green, blinking,
battery status icon outline
fl
ashing
Battery charging complete
Charging
cable/charger
Power cable
Magnetic charging contact
AC adapter
(wall cube)
with U.S. plug
Standard
100-240-V
wall outlet
Use up to 5 charging
cables/chargers
5-port USB hub
Standard
100-240-V
wall outlet
Magnetic
charging contact
Figure 2.
Charging Trains
Charging
cable/charger
USB
connector
Portable power
pack or PC/Laptop


