8
GB
7. Preparation
7.1 Setting up the device
Place the device on a dry, level and heat-re-
sistant surface.
7.2 Requirements on the
film/bags
-
You can use tubular film or complete
bags.
-
The film bag must not be wider than
30
|
cm.
-
The film bag must have dots/knobs or
grooves on one side. Smooth film bags
are not suited for sealing.
-
The thickness should be between 0.17
and 0.29 mm (170 - 290
m).
-
When buying the film bag, check the
temperature range it is suited for. The
ideal range is between -20 °C and
+110 °C. Such film bags can be deep-
frozen or boiled. The film supplied is
suitable for this application.
-
You will find those data on the package
of the film or bag.
7.3 Producing a bag
If you use finished bags, these steps do not
apply.
1. Unwind the length of vacuum bagging
tube from the roll that you require for
your bag. Regarding the length of the
bag, remember that a space of approx.
6 cm towards the top should be left af-
ter filling.
2. Use scissors to cut the piece of vacuum
bagging tube as straight as possible.
3. Seal one end of the bag (see “Sealing
bags (without valves)” on page 10).
8. Use
8.1 Overview of the
functions
All functions stop automatically when the
process is complete.
Pressing the function button again can cancel the
process sooner.
WARNING! Risk of material dam-
age!
~
After the sealing and/or vacuuming
process, the device needs to cool down
for at least 80 seconds.
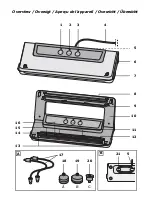
Button
Function
|
1
Start/cancel vacuum-pack-
ing using the connection
|
6
with a vacuum tube
|
17
and
an adapter
|
18
/
19
/
20
|
2
Start/cancel sealing (with-
out vacuum)
|
3
Start/cancel vacuum-pack-
ing and sealing the film bag


