


.
80.
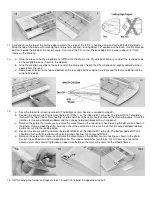
a. Cut away a 3/16" wide strip of material from the center of the stabilizer
where the fin is to be glued. Epoxy the fin to the top of the stabilizer, using
a triangle to check its alignment as it dries. Make certain that the back
edge of the fin is lined-up with the back edge of the fuselage sides.
b. Hinge the rudder to the fin and fuselage using three EASY HINGES.
81.
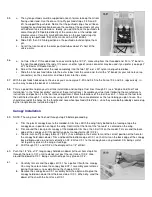
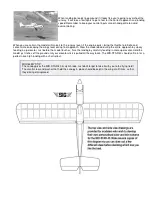
(OPTIONAL) Although the fin attachment method in the previous step has
proven to be more than adequate on our test models, some modelers may want
some extra strength in that area, particularly if they fly on a rough field where
models have a tendency to flip over on their back. Then again, there are some of
us who tend to flip our models over even on smooth fields! The optional fin
braces shown in the photo aren't exactly pretty, but they do add a tremendous
amount of strength to the area and are recommended for any MId-Star 40 pilot
who is more concerned with day-to-day hardknocks flying than with looks.
The fin braces can be cut from the 1/2" triangle stock provided in the kit and
shaped as shown in the picture. Cover the outside face of the braces, and cut
away the covering material on the fin and stabilizer before gluing the braces in
place on each side of the fin.
82.
Now is a good time to apply the decals. Use the plans and photos of the finished
model for proper positioning. Cut out the decals with scissors, leaving about
1/32" to 1/16" of clear at all edges and rounding the corners. as you cut. Wet the
surface on which the decal will be placed with soapy water (use a couple of
drops of dishwashing detergent in a small bowl of water). Place the decal on the
model and squeegee the water from underneath with a balsa paddle. This
procedure allows time for repositioning and prevents air from being trapped
under the decal. Allow several hours to dry.
83.
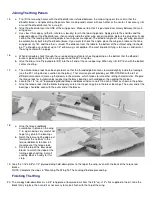
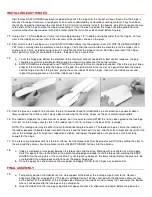
Install 2-3/4" main wheels on the aluminum landing gear using the hardware as
shown on the plans. A drop of CA on the inner nut will help keep the assembly
from vibrating loose. Once the wheels have been attached, the landing gear
assembly can be bolted to the fuselage using four 4-40 x 1/2" mounting bolts.
NOTE: If you are building the optional taildragger version of the MID-STAR 40,
skip step 84 and proceed to step 85. If you are building the standard tricycle gear
version, perform step 84, skip step 85, and proceed with step 86.
84.
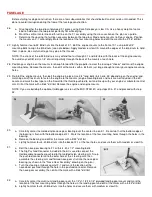
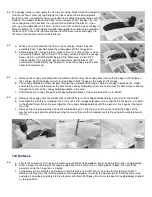
a. Bolt the nose gear bearing to the front of F-1. Install a 2-1/2" dia. wheel on
the nose gear strut using two 5/32" wheel collars (not included,
SIGSH587), then assemble the strut and steering arm to the nose wheel
bearing. When putting the nose gear together, you can adjust the length
of the wire strut a little if necessary to get the model to sit at the proper
ground attitude (see page 21 of "The Basics Of Radio Control"). The MID-
STAR 40 should sit on its tricycle gear so that the top edge of the Lite-Ply
fuselage side (behind the wing) is perfectly level in relation to the ground.
The adjustment is made by loosening the set screw in the steering arm
and sliding the wire strut further in or out of the nose gear bearing. To
prevent the steering arm from twisting on the strut, grind or file a small flat
spot on the wire strut where the set screw makes contact.
b. Install the nose gear pushrod using the guidelines in "The Basics Of Radio
Control" (page 9). To prevent unwanted flexing, the outer nylon tubing
should be glued firmly to F-1, F-2, and a scrap balsa standoff at the end
closest to the servo. The flexible cable is attached to the servo with a
solder clevis, and to the steering arm with the pushrod connector which
was installed earlier.
85.
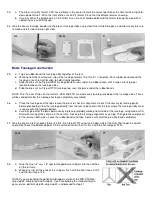
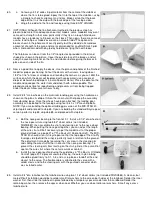
Install a 3/4" dia. tailwheel on the tailwheel wire using two 1/16" wheel collars (not included SIGSH584). A cleaner, but
more difficult installation would be to solder small flat washers to the wire on both sides of the tailwheel. Solder the inner
washer first, then slide the tailwheel in place followed by a temporary spacer made from thin cardboard. Solder the
remaining waher, then remove the spacer when cool. Whether you use wheel collars or washers, trim off any excess
tailwheel wire.