-24
Connecting to a
Computer Using the
RGB Cable
1
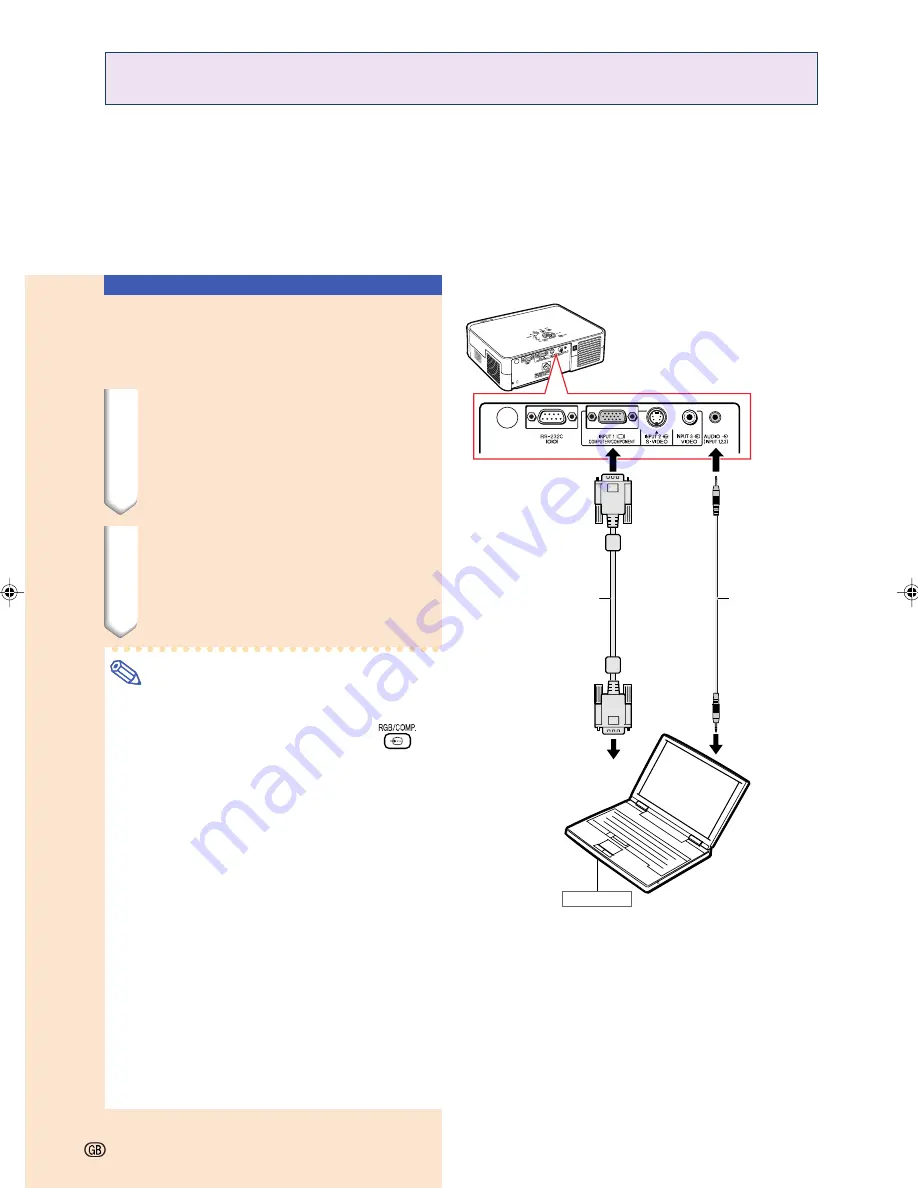
Connect the projector to the com-
puter using the RGB cable (com-
mercially available or sold sepa-
rately).
•
Secure the connectors by tightening the
thumbscrews.
2
To input an audio signal, connect
the projector to the computer us-
ing a ø3.5 mm stereo or mono
audio cable (commercially avail-
able).
Note
•
When connecting the projector to the com-
puter, set “Signal Type” on the “Picture”
menu to “RGB” (page 44), or press
on the remote control to select the RGB
input.
•
See page
59
“Computer Compatibility Chart”
for a list of computer signals compatible with
the projector. Use with computer signals other
than those listed may cause some of the func-
tions to not work.
•
A Macintosh adapter may be required for us-
ing the computer cable to connect to some
Macintosh computers. Contact your nearest
Sharp Authorised Projector Dealer or Service
Centre.
•
Depending on the computer you are using,
an image may not be projected unless the sig-
nal output setting of the computer is switched
to the external output. Refer to the computer
operation manual for switching the computer
signal output settings.
•
When using the ø3.5 mm mono audio cable,
the volume level will be half of when using
the ø3.5 mm stereo audio cable.
Computer
To audio output
terminal
To AUDIO INPUT
terminal
ø3.5 mm stereo
or mono audio
cable
(commercially
available)
RGB cable
To RGB output
terminal
To INPUT 1 terminal
•••••
Before connecting, be sure to unplug the power cord of the projector from the wall outlet and
turn off the devices to be connected. After making all connections, turn on the projector and
then the other devices. When connecting a computer, be sure that it is the last device to be
turned on after all the connections are made.
•••••
Be sure to read the operation manuals of the devices to be connected before making connec-
tions.
Connecting the Projector to a Computer
XV_Z10E_E_p19_25.p65
03.11.7, 4:15 PM
24
Summary of Contents for XV-Z10E
Page 71: ...Memo ...
Page 72: ......


