background image


Repeat play

Repeat  play  can  play  one  track,  all  tracks  or  a  programmed 

sequence continuously.

To repeat one track:

Press the 

 button repeatedly until “REP ONE” appears. Press 

the USB  /

 button.

To repeat all tracks:

Press the 

 button repeatedly until “REP ALL” appears. Press 

the USB  /

 button.

To repeat one folder (during folder mode on):

Press the 

 button repeatedly until “FOLD REP” appears. Press 

the USB  /

 button.

To repeat desired tracks:

Perform steps 1 - 5 in “Programmed play (MP3/WMA)” section and 

then press the 

 button repeatedly until “REP ALL” appears.

To cancel repeat play:

Press the 

 button repeatedly until “NORMAL” appears and “

” 

disappears.

Caution:

After performing repeat play, be sure to press the 

DEMO/[ECO]/ ( ) 

button. Otherwise, the device will play continuously.


Random play

The  tracks  on  the  device  can  be  played  in  random  order 

automatically.

To random play all tracks:

Press  RDM  button  on  the  remote  control  until  “RANDOM” 

appears. Press the USB  /

 button.

To cancel random play:

Press the RDM button again. “RDM” indicator will  disappear.

Notes:


If you press the 

 button during random play, you can 

move to the track selected next by the random operation. 

On the other hand, the 

 button does not allow you to 

move to the previous track. The beginning of the track being 

played will be located.


In  random  play,  the  unit  will  select  and  play  tracks 

automatically. (You cannot select the order of the tracks.)


In  folder  mode  on,  only  tracks  in  selected  folder  will  be 

played randomly.


Programmed play (MP3/WMA)

1

  While in the stop mode, press the MEMORY button to enter the 

programming save mode.

2

  Press the TUNING (  or 

)  button  on  the  remote  control  to 

select the desired folder.

   Then press the 

 or 

 button on the remote control to 

select the desired tracks.

3

  Press  the  MEMORY  button  to  save  the  folder  and  track 

number.

4

  Repeat steps 2 – 3 for other folder/tracks. Up to 32 tracks can 

be programmed.

5

  Press the USB  /

 button to start playback.

To cancel the programmed play mode:

During  programmed  stop  mode,  press  the 

DEMO/[ECO]/

(

)  button.  The  display  will  show  “MEMCLEAR”  and  all  the 

programmed contents will be cleared.

Adding tracks to the program:

If a program has been previously stored, the “MEM” indicator will 

be displayed. Press the MEMORY button.  Then follow steps 2 

- 3 to add tracks.

Notes:


During the program operation, random play is not possible.


If you press the ON/STANDBY button to enter the 

Bluetooth


standby  mode  or  change  the  function  from  the  USB  to 

another, the programmed selections will be cleared.
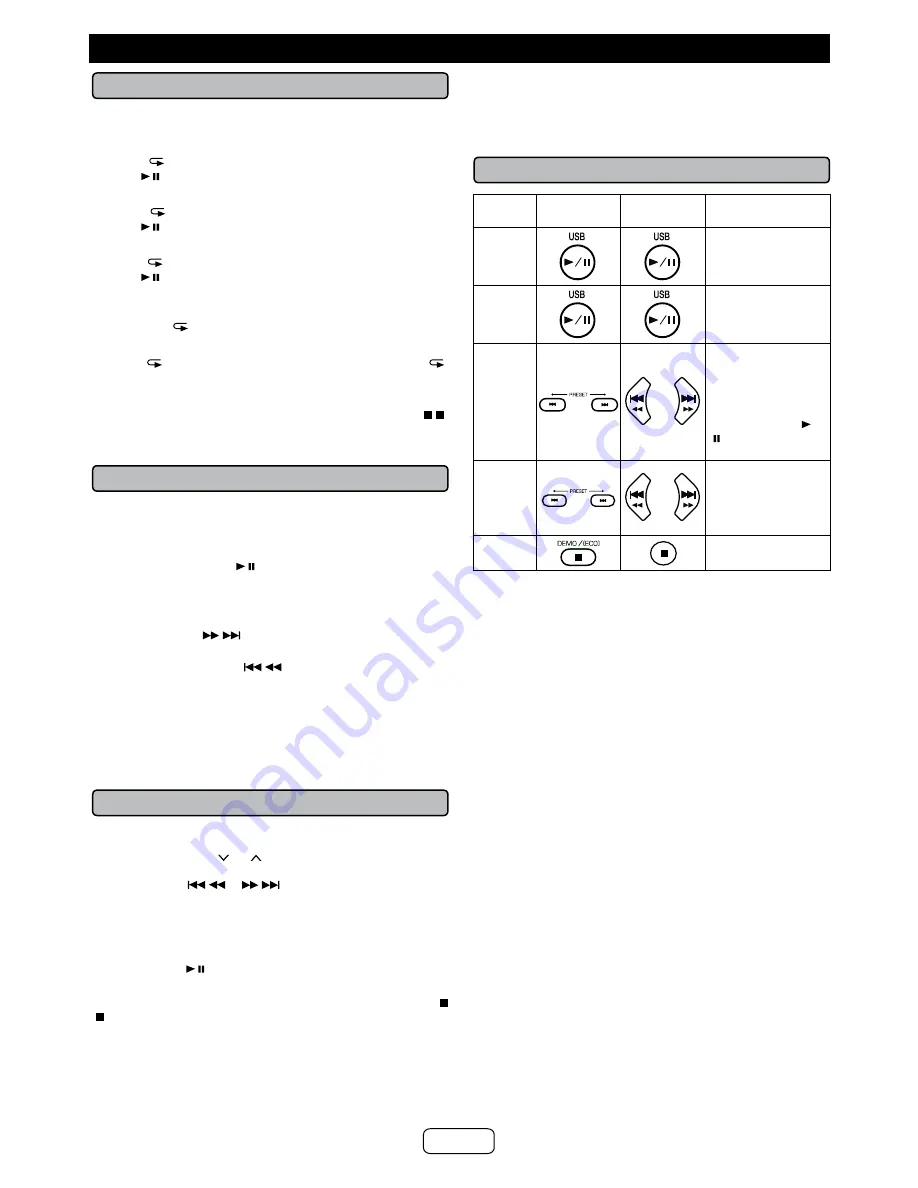
 

Various USB functions

Function

Main unit

Remote 

control

Operation

Play

Press in the pause 

mode.

Pause

Press in the 

playback mode.

Track 

up/ 

down

Press in the 

playback or pause 

mode. 

If you press the 

button in the pause 

mode, press the 

/

 button to start the 

desired track.

Fast 

forward/ 

reverse

Press and hold 

down in the playback 

mode.

Release the button 

to resume playback.

Stop

Press to stop 

playback.

Notes:


If USB memory device is not connected, “NO MEDIA” will be 

shown on the display.


Fast forward/reverse is invalid when playing back a 

variable bitrate file.

Notes:

  This  unit  only  supports  “MPEG-1  Audio  Layer-3”  format. 

(Sampling Frequency is 32, 44.1, 48kHz)

  Playback order for MP3 files may differ depending on the writing 

software used during file download.

  Bitrate  which  is  supported  by  MP3  is  32~320  kbps,  WMA  is 

64~160 kbps.

  For MP3/WMA files, please put “.MP3” “.WMA” extension. Files 

cannot be played back if there is no MP3/WMA extension.

  Playlists are not supported on this unit.

  This unit can display Folder Name or File Name up to 32 

characters.

  Maximum total number of MP3/WMA files is 65025. 

  Total number of folders read is 999 including folder with non-

playable file. However, the display shows only folder with MP3 

files. 

  The display playback time may not be displayed correctly when 

playing back a variable bitrate file.

  The  ID3TAG  information  supported  are  TITLE,  ARTIST  and 

ALBUM only. Title name, artist name and album name can be 

displayed by pressing the DISPLAY button during file playback 

or pause mode.

  WMA meta tag also supports title, artist and album name which 

are  recorded  in  WMA  files.  Copyright  protected  WMA  files 

cannot be played back.

Advanced USB playback

E-17

Summary of Contents for GX-BT9

Page 1: ...RP product Accessories Printed in Malaysia The following accessories are included AC power cord x 1 QACCD0025AWZZ Remote control x 1 RRMCGA370AWSA Carrying Strap x 1 JHNDZA001AWZZ Notes for Android device This audio system supports NFC enabled device with Android 4 1 Jelly Bean and higher For device with a lower Android version refer the operation manual of the device for recommended app applicati...

Page 2: ...he equipment and re ceiver Connect the equipment into an outlet on a circuit different from that to which the receiver is connected Consult the dealer or an experienced radio TV technician for help Warning Changes or modifications to this unit not expressly approved by the party responsible for compliance could void the user s authority to operate the equipment FCC Radiation Exposure Statement Thi...

Page 3: ...rough openings as they may touch dan gerous voltage points or short out parts that could result in a fire or electric shock To prevent fire or shock hazard do not expose this appli ance to dripping or splashing No objects filled with liquids such as vases shall be placed on the apparatus 18 Damage Requiring Service Unplug this product from the wall outlet and refer servicing to qualified service p...

Page 4: ...ot allow the exclusion of incidental or consequential damages so the above exclusion may not apply to you THIS LIMITED WARRANTY IS VALID ONLY IN THE FIFTY 50 UNITED STATES THE DISTRICT OF COLUMBIA AND PUERTO RICO Model Specific Section Your Product Model Number Description Warranty Period for this Product Additional Item s Excluded from Warranty Coverage if any Where to Obtain Service What to do t...

Page 5: ...e AC power plug by the head when removing it from the AC outlet as pulling the cord can damage internal wires The AC power plug is used as a disconnect device and shall always remain readily operable Do not remove the outer cover as this may result in electric shock Refer internal service to your local SHARP service facility This unit should only be used within the range of 41 F 95 F 5 C 35 C Do n...

Page 6: ...n Button 10 X Bass Button 11 Volume Up Button 12 Bluetooth pairing indicator 13 Remote sensor 14 NFC detection area 15 USB Terminal Rear panel 1 FM Antenna 2 DC 12 V input jack 3 Headphone jack 4 Microphone volume knob 5 Microphone input jack 6 Guitar input jack 7 Guitar volume knob 8 Audio input jack 9 AC input jack 10 Cable holder X BASS EQ DEMO DIMMER VOLUME iPod CD USB TUNER AUDIO IN ON STAND ...

Page 7: ...uetooth Play Pause Button 4 Stop Button 5 Pairing Button 6 Tuner Preset Up Button 7 Equalizer Button 8 Tuner Preset Down Button 9 Folder button 10 Tuning Up Folder Up Button 11 Track Down Fast Reverse Button 12 Tuning Down Folder Down Button 13 Audio Button 14 Echo Up Button 15 Echo Down Button 16 Demo Eco Button 17 USB Play Pause Button 18 Audio In Button 19 Tuner Button 20 Repeat Button 21 X Bas...

Page 8: ...cording to the direction indicated on the rear panel Remove the batteries if they are weak or if the unit will not be used for long periods of time This will prevent potential damage due to battery leakage Replace all old batteries with new ones at the same time Do not mix old and new batteries Battery replacement When batteries are low battery indicator will blink to show that the batteries need ...

Page 9: ...y at the remote sensor on the unit The remote control can be used within the range shown below REMOTE SENSOR Remote sensor 8 20 0 2 m 6 m Note Exposing the infrared remote control to direct sunlight may cause the remote control to be inoperable Carrying the unit Caution Before transporting the unit remove all connection from the unit Then set the unit to the standby mode Transporting the unit with...

Page 10: ... the unit turns on with the selected function activated Auto power off function The main unit will enter the standby mode after 15 minutes of inactivity during Audio In No detection of input signal USB In the stop mode or no media Bluetooth In the pause or stop mode and no incoming signal from a source device Note Auto power off function is invalid if guitar or microphone is con nected Auto resume...

Page 11: ...ce to the NFC detection area on the main unit PORTABLE MUSIC BOOMBOX GX BT9 REMOTE SENSOR NFC detection area on the main unit 2 A pop up window asking whether to proceed with the Bluetooth connection appears on the device Select YES The connected message appears when the connection is complete 3 Press play on remote control or source device Sound will be heard from the speakers of this unit via au...

Page 12: ...ay lists of detected devices To pair this unit with the source device refer to the source device operating manual for details 4 Select GX BT9 SHARP from the source list If Pass code is required enter 0000 Passcode may be called PIN Code Passkey PIN number or Password 5 Pairing indicator blue will stop blinking once the unit is successfully paired with the source device Pairing information is now m...

Page 13: ...these functions are on sound may be distorted Notes Make the Bluetooth connection again if the source device is not turned on or its Bluetooth functionality is off or is in sleep mode The volume of this unit may not be controlled as in tended depending on the device To disconnect the Bluetooth device Perform any of the followings Disconnect the Bluetooth connection on the audio source device Refer...

Page 14: ...let to the unit 4 Press play on remote control or source device Notes If the source device has an extra bass or equalizer function set them to off If these functions are on sound may be distorted Incoming calls will pause the playback application Once the calls are answered the conversation can only be heard through the built in speaker of the cellular device Turn on the device speaker or disconne...

Page 15: ... playback 1 Press the ON STANDBY button to turn the power on 2 Press the USB button on the remote control or the main unit to select USB function 3 Connect iPod or iPhone to the unit USB will appear Track number 4 Press the USB button to start playback Note Stop button is invalid during iPod or iPhone playback iPhone playback Sound will only switch from iPhone to the main unit after authentication...

Page 16: ...Artist and Album name are displayed if they are recorded in the USB memory device Display content can be changed by pressing the DISPLAY button To remove USB memory device 1 Press the DEMO ECO button to stop playback 2 Disconnect USB memory device from the USB terminal Notes SHARP will not be held liable for the loss of data while the USB memory device is connected to the audio system Files compre...

Page 17: ... DEMO ECO button The display will show MEMCLEAR and all the programmed contents will be cleared Adding tracks to the program If a program has been previously stored the MEM indicator will be displayed Press the MEMORY button Then follow steps 2 3 to add tracks Notes During the program operation random play is not possible If you press the ON STANDBY button to enter the Bluetooth standby mode or ch...

Page 18: ...ton 3 Within 30 seconds press the PRESET or button to select the preset channel number Store the stations in memory in order starting with preset channel 1 4 Within 30 seconds press the MEMORY button to store that station in memory If the MEM indicator and preset number disappear before the station is memorized repeat the operation from step 2 5 Repeat steps 1 4 to set other stations or to change ...

Page 19: ...r ECHO button ECHO OFF ECHO 08 Notes The sound is produced in 2 channel stereo automatically while playing karaoke When you sing too loud through the microphone your voice may be distorted depending on the devices connected If this happens lower the microphone volume If an extremely sensitive microphone is used howling may be generated Unidirectional microphone is more appropriate for vocal use Wh...

Page 20: ...ontrol Connecting other equipment continued Many potential problems can be resolved by the owner without calling a service technician If something is wrong with this product check the following before calling your authorised SHARP dealer or service center General Symptom Possible cause When a button is pressed the unit does not respond Set the unit to the power standby mode and then turn it back o...

Page 21: ...ith iPhone or This accessory is not supported by iPhone appears on iPhone screen The iPhone battery is low Please charge the iPhone Condensation Sudden temperature changes storage or operation in an extremely humid environment may cause condensation inside the cabinet or on the transmitter on the remote control Condensation can cause the unit to malfunction If this happens leave the power on until...

Page 22: ...r RMS Total 66 watt into 3 ohms at 100 Hz 10 T H D FTC 50 watt minimum RMS into 3 ohms from 70 Hz to 200 Hz 10 T H D Output terminals Headphones 16 Ω 50 Ω recommended 32 Ω Input terminals Audio In audio signal 500 mV 47 k ohms Mic Input 200 Ω 2 kΩ Ø 1 4 6 3 mm Guitar 100 kΩ 1 MΩ Ø 1 4 6 3 mm Bluetooth interface Bluetooth Frequency Band 2 400GHz 2 480GHz Compatible Bluetooth Profile A2DP Advanced A...

Reviews: