1 – 3
FO-CC500A
FO-K01A
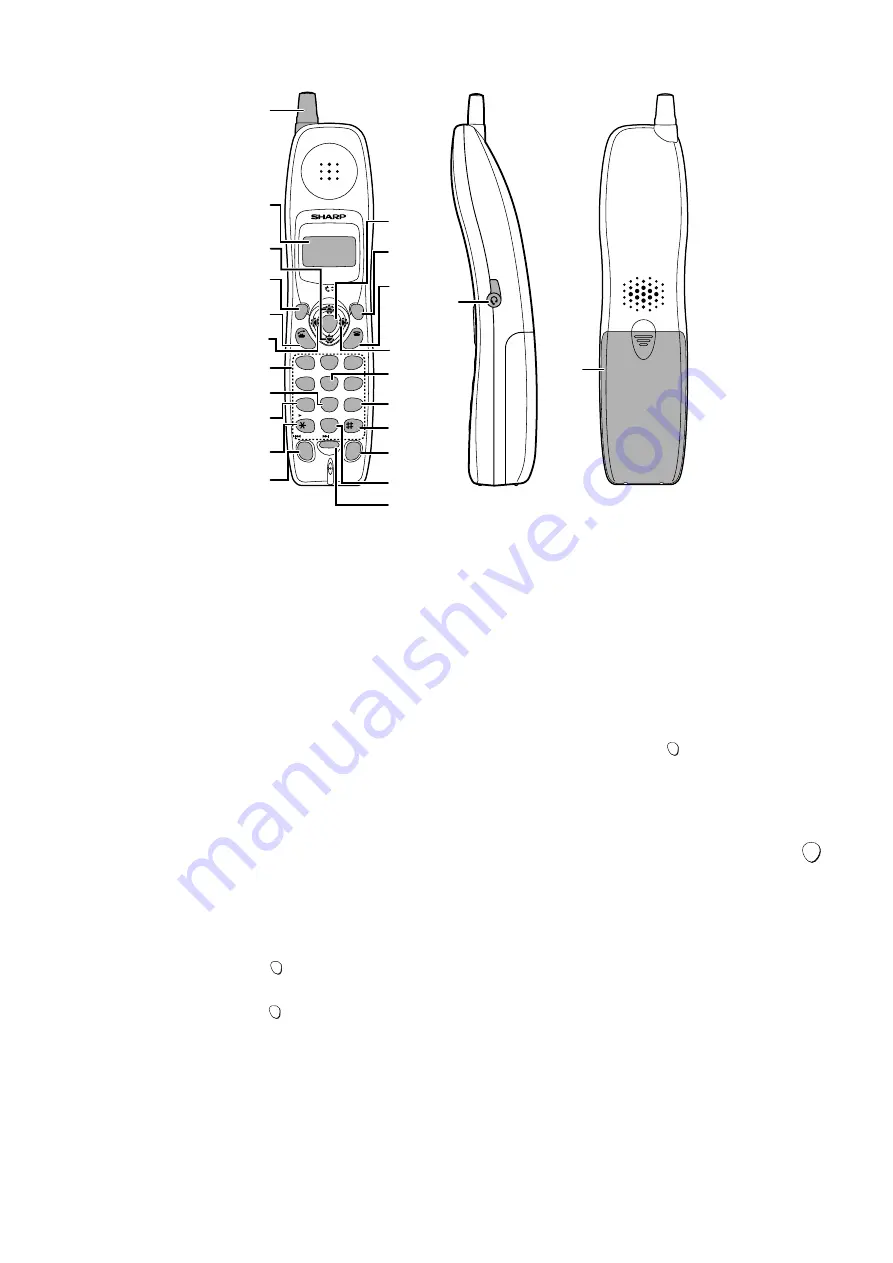
Cordless Handset
1. Antenna
2. Display
This displays messages and prompts to help you use the cordless
handset.
3. UP and DOWN arrow keys
Receiver volume: When talking on the cordless handset, press
these keys to adjust the receiver volume. This also adjusts the
volume when using a headset (purchased separately) connected
to the cordless handset.
Ringer volume: When not talking on the cordless handset, press
these keys to adjust the cordless handset ringer volume.
Scroll through numbers: Press these keys to scroll when
searching for an auto-dial number or reviewing received calls (only
available when you have Caller ID).
4. FUNCTION/PAUSE key
Use this key to store a new auto dial number (press the SEARCH
(right) arrow key, select the book with the UP or DOWN arrow key,
and then press the FUNCTION/PAUSE key). When entering an
auto-dial number, press this key to insert a pause between digits.
5. TALK key
Press this key to make or answer a call.
6. REVIEW (left) arrow key
Press the REVIEW arrow key and then the UP or DOWN arrow
key to scroll through your 30 most recent calls (only available if
you have Caller ID). This key can also be used to move the cursor
left when entering or editing an auto-dial number or name.
7. Number keys
Use these keys to dial numbers, and enter numbers and letters
when storing auto-dial numbers.
8. PLAY NEW key
Press this key after pressing to listen to new messages recorded
in the personal box of the cordless handset.
9. PLAY key
Press this key after pressing to listen to all messages recorded in
the personal box of the cordless handset.
10. REPEAT key
Press this key while listening to a message to play it again.
11. INTERCOM key
Press this key to page the fax machine or another cordless
handset.
12. START key
Press this key to start fax reception from the cordless handset, or
to complete entries when storing, editing, or deleting auto-dial
numbers.
13. REMOTE/RECALL key
Press this key to perform remote operations on the fax machine.
The key is also used to access special services from your
phone company that require subscription (contact your phone
company for details).
14. OFF key
Press this key to end a call.
15. SEARCH (right) arrow key
Use this key to search for an auto dial number (press the
SEARCH key, press the UP or DOWN arrow key to select the
book, and then press the UP or DOWN arrow key to scroll
through your auto-dial numbers). This key can also be used to
move the cursor right when entering or editing an auto-dial
number or name.
16. RECEPTION key
Press this key after pressing to change the reception mode
on the fax machine.
17. STOP key
Press this key to stop playback of messages.
18. DELETE
Press this key while listening to a message to delete it. To
delete all your messages, press this key after playback ends
(while the display shows REMOTE MODE), followed by .
19. HOLD/ERASE key
Hold: Press this key during a call to put the other party on hold.
Erase: Press this key to delete a phone number when
searching through your recently received calls (only when you
have Call ID), or when searching through your auto-dial
numbers. Press the key to delete a digit or character when
storing or editing an auto-dial number.
20. SKIP key
Press this key while listening to your messages to skip to the
next message.
21. REDIAL key
Press this key to redial the last number dialed using the
cordless handset.
22. Headset socket
This socket lets you connect a headset (purchased separately)
to the cordless handset.
23. Battery cover
Remote this cover to install or replace the handset battery.
1
2
3
4
5
6
7
8
9
10
11
12
13
14
15
16
17
18
19
20
21
22
23
START
FUNCTION
/PAUSE
TALK
OFF
REMOTE
/RECALL
START
UP
DOWN
PLAY NEW
PLAY
REPEAT
SKIP
DELETE
ERASE
STOP
RECEPTION
REVIEW
INTER
COM
HOLD
REDIAL
SEARCH
1
ABC
DEF
JKL
GHI
MNO
TUV
PQRS
WXYZ
2
3
4
5
6
7
8
9
0
REMOTE
/RECALL
REMOTE
/RECALL
REMOTE
/RECALL
Summary of Contents for FO-CC500
Page 82: ...FO CC500A FO K01A Control PWB parts layout Top side 6 7 ...
Page 83: ...FO CC500A FO K01A Control PWB parts layout Bottom side 6 8 ...
Page 87: ...FO CC500A FO K01A LIU PWB parts layout Top side 6 12 ...
Page 88: ...FO CC500A FO K01A LIU PWB parts layout Bottom side 6 13 ...
Page 92: ...FO CC500A FO K01A 6 17 Cordless PWB parts layout Top side ...
Page 93: ...FO CC500A FO K01A 6 18 Cordless PWB parts layout Bottom side ...


