background image

1-BIT  MD /  CD  SYSTEM  SD-FX10

39

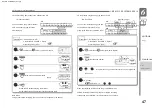
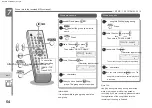
A  song,  B  song,  C  song,  D  song,  E  song,

It  will  be  in  the  recording  standby  state.

beginning

listen

Various  ways  

of  listening

Recording  starts

MD

You  can  select  a  song  in  the  middle  of  

a  CD  and  record  the  song  and  beyond  

on  an  MD.

CD

MD

Recording  sound

2.  Insert  the  CD  and  MD.

recording

1  3  45

Press  

4 .

2

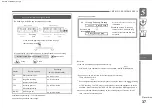
How  to  assign  a  song  number  by  yourself  

during  recording

C  song,  D  song,  E  song

By  pressing  [REC],  you  can  add  song  

numbers  wherever  you  like.  (After  

assigning  a  song  number,  the  next  

song  number  cannot  be  assigned  for  

about  4  seconds.)

2  

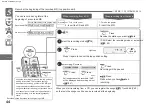
Select  the  recording  mode.  (P.36)

Preparation

Press  

1 .

CD

Preparation  1.  Turn  on  the  power.

3  

Press  or  press  to  select  the  song  number  

you  want  to  record.  The  song  number  

you  want  to  record

Press  

5 .

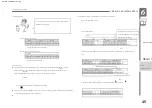
•  When  the  CD  has  finished  playing,  the  MD  will  be  in  the  recording  

standby  state.  •  Press  [MD]  to  stop  recording.

Note  During  

synchronized  recording,  you  

cannot  record  at  4x  speed  (or  

2x  speed).

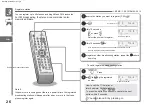
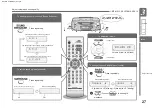
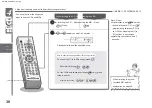
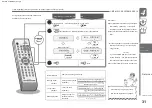
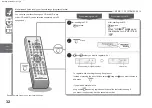
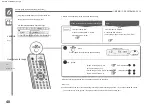
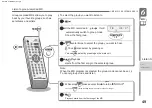
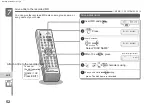
Record  from  the  song  in  the  middle  of  the  CD  (synchronized  recording)

one  two  three

record

Record  sound  from  a  song  in  the  middle  of  CD

Machine Translated by Google

Summary of Contents for Auvi SD-FX10

Page 1: ...Machine Translated by Google ...

Page 2: ... 47 Listen to group recorded MD 49 page page page For safe and correct use 4 Main features 8 About accessories 8 Name of each part 9 page Listen to the CD 20 Listen to the MD 22 Listening to radio broadcasts 24 Broadcasting stations 26 Adjust the volume and sound quality 27 Switching the display contents of CD and MD 28 Listen from the song you want to listen to 30 Listen repeatedly Listen in no p...

Page 3: ...oup to the beginning 62 Move non group songs to the end of MD 62 Group ungrouped songs 63 Create group 64 Erase group information 64 Group recording playback beginning edit page page Restrictions on 4x recording 71 About CDs 72 About MD 73 I thought Is it a malfunction Tara 74 When such a display appears 76 MD system restrictions 77 About music copyright 78 About care 78 Specifications 79 Warranty...

Page 4: ...aged resulting in fire or electric shock Power cord Do not use any power cord other than the one provided Do not use in foreign countries This product can be used only in Japan and the power supply voltage differs in foreign countries so do not use it beginning Do not wire octopus legs It means that you need to be careful Do not look directly at the light source of the CD pickup CD pickup Continue...

Page 5: ... antenna remove the AM antenna and stop using it The antenna may get scratched or hit your eyes resulting in injury or accident About thunder If thunder starts For safety do not touch the product It may cause electric shock It may cause fire or electric shock Do not place vases flower pots cups cosmetics containers containing chemicals or water or small metal objects nearby If something goes wrong...

Page 6: ...n a place exposed to oily smoke or steam Do not place in a closed car or other place exposed to direct sunlight for a long time near a heater or near a fire Placement Do not place in an unstable place It may fall and cause injury or malfunction It may cause a fire or an accident It may cause fire or electric shock The cord may be damaged and cause a fire or electric shock Do not place in places wh...

Page 7: ...er heat or throw into fire Do not disassemble Do not solder Do not short circuit terminals Do not mix different types of dry batteries Rechargeable batteries Nickel cadmium batteries Etc is not used YUJI TAKEBAYASHI YUJI TAKEBAYASHI Dry batteries that have been used once with new batteries Do not mix batteries when not in use for a long period of time Be sure to turn off the power for safety and p...

Page 8: ...with a 1 bit digital amplifier that realizes high resolution sound of 2 8MHz High speed sampling of about 2 8 million times about 2 8MHz per second dramatically improves the sound decomposition capability Sound transmission amplification is performed with a 1 bit digital signal to reproduce high quality sound rise and smoothness and clear sound quality with less deterioration in sound quality comp...

Page 9: ...7 68 04 CD pig 20 Demo display button TRACK 15 40 09 MD insertion slot twenty two 7 Record mode 01 Power button POWER 17 AC power socket AC INPUT 14 11 Erase button ERASE 60 13 02 MD record button REC 39 23 4 56 play 13 14 16 03 CD play pause button record power CD PLAY PAUSE 20 21 truck 08 8 Erase TUNER BAND 24 12 06 10 MD eject button 23 Name of each part stop 05 Track Edit 12 Recording mode but...

Page 10: ...rd cue tuning button CD MD EDIT NORMAL 36 08 CD MD Fast Rewind Cue Tuning Button 89 7 Surround normal CD MD EDIT HIGH 36 03 MD Stop Button MD 22 Volume button VOLUME 27 04 volume 05 MD play pause button MD 22 23 06 Remote control sensor 16 07 CD MD One Touch Edit Normal Speed Button 6 Front surface operation unit beginning tuning Yes TUNING 21 23 24 Name of each part Machine Translated by Google ...

Page 11: ... timer playback recording display DAILY REC 68 Reference page 14 15 FM stereo mode display STEREO 25 Face display monaural analog 4 78 9 11 program Once timer playback recording display ONCE REC 68 Once record 3 06 07 Repeat playback display 1 31 03 Time Level meter Character Frequency display 28 beginning 11 Tok display TOC 34 13 Tok Sleep display SLEEP 69 09 CD MD playback display 20 22 14 Track...

Page 12: ... TUNER BAND 24 8 Track edit button TRACK 40 Yes power FM stereo mode button ST MODE 25 Group button GROUP 46 Record mode Remote control top Top position 01 Power button POWER 17 Five 05 CD MD One touch edit button 14 Tuner band selector button It is an operation button of 3 11 03 Top position edit button 7 truck normal 07 Record button REC 39 Stereo mode 13 ÿ 09 CD MD cue tuning button 04 CD MD ED...

Page 13: ...ton CLEAR 32 26 Enhancer Surround SOUND ENHANCER 27 26 CD MD fast forward tuner pre setup timer 20 28 Character input CD MD tuner 29 29 Symbol time display selector button symbol TIME 28 52 23 16 Tuner preset 27 28 TUNER PRESET 21 26 53 Name Tok Edit 18 Surround button SURROUND 27 16 Enter button ENTER 18 Cursor button Direct button 26 52 22 Timer Erase button TIMER DELETE 18 53 21 Program button ...

Page 14: ...ed Input Screws are not included Use headphones with an impedance of 16 to 50 ÿ recommended 32 ÿ and a diameter of 3 5 mm with a stereo mini plug Sound from speakers when headphones are connected To household outlets Haji 100V AC 50 60Hz Preparation ÿ To listen with headphones 2 Connect the power cord How to assemble a loop antenna for AM To the headphone jack Connect the antenna and the power cod...

Page 15: ...d mobile phones those devices and this product may malfunction or cause noise In that case turn off the power of those devices or keep them as far away from this product as possible Preparation Recording sound Consideration Group recording playback If you press POWER to turn on the power while the demo is displayed the demo display disappears Press POWER again to return to the demo display Press T...

Page 16: ... malfunction Do not put stickers on the remote control sensor or transmitter Haji About 15 Preparation Pay attention to the direction of the dry cell close Range where the remote control can be used reference About 20cm 6m Open About 15 Insert two 2 AA batteries The life of the remote control dry cell is about one year under normal use If it does not work unless you approach the remote control sen...

Page 17: ...2 to 3 seconds after the power is turned off beginning Various ways of listening Bright Turn on the power edit once again Consideration Press To turn on the power Each time you press it it switches as follows Press for 3 seconds or more Preparation ÿ To turn off the power Dark Dark Bright Group recording playback Press for 3 seconds or longer Recording sound Convenient The brightness cannot be cha...

Page 18: ...ss to set the month Press 1 to turn on the power Select TIME ADJUST Match the year Press 2 4 Within 10 seconds press Hear Record For 2003 match it with 03 Hen 18 If you set the date and time you will be able to play timers and record timers as well as clocks Also when recording to MD the recording date and time is automatically recorded to MD Recording date and time P 29 nine sound 1 BIT MD CD SYS...

Page 19: ... or press several times to display the time ÿ To check the time When the power is off press beginning In step 2 ONCE TIMER is displayed instead of SLEEP In step 3 the current time is displayed instead of TIME ADJUST If you adjust the time after setting the clock the display will change Press 9 or to set the minutes Set the day sleep The time is displayed and disappears after about 5 seconds 8 Pres...

Page 20: ...t the CD Press Preparation For CDs with the CD TEXT mark if there is a disc name it will be displayed Recording sound Convenient Playback starts from the first song For CDs with the CD TEXT mark the song title is displayed 3 Close the CD pig Consideration beginning Group recording playback Four Total playing time 1 Turn on the power and press Various ways of listening edit CD Listen to CD Machine ...

Page 21: ... Press during playback or stop After selecting the song number you want to listen to while stopped when you start playing the song will be played from that song CD R CD RW may not be played back correctly depending on the recording device and the condition of the disc In that case try changing the recording speed of the device that records the CD R CD RW or the disc to be used For details refer to...

Page 22: ...gs Total playing time Volume adjustment P 27 Recording sound When the last song finishes playing it will stop beginning Insert the label side up in the direction of the arrow mark Consideration 1 Turn on the power and press Various ways of listening Playback starts from the first song If the song title is included the song title is displayed MD Listen to MD Machine Translated by Google ...
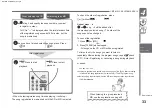
Page 23: ...rious ways of listening Precautions Be sure to turn on the power when inserting the MD 1 Cue the song Stop MD Press Preparation Operation Consideration Various operations of MD How to take out MD Press while stopped pause Press during playback Recording sound The MD becomes warm during use but this is not a malfunction MD makes it difficult for the sound to skip due to vibration but the sound may ...

Page 24: ...istening beginning Choose a station Preparation Recording sound Auto tune Press and hold the button for 0 5 seconds or longer and release it to automatically receive a station with strong radio waves Consideration 1 Turn on the power and press Note Keep the AM loop antenna away from the main unit and power cord If used close to each other noise may occur During automatic tuning if there is a jammi...

Page 25: ...TEREO FM broadcast About TV sound TV sound can be received at the following frequencies 1 channel FM 95 75MHz 2 channels FM 101 75MHz 3 channels FM 107 75MHz The TV audio reception circuit of this product is also used as the FM broadcast reception circuit As a result FM broadcasts may interfere in some regions You cannot receive TV sound multiplex broadcasting TV sound is received in monaural If y...

Page 26: ...sting station repeat the procedure from step 1 2 Press to call up the registered number Preparation You can register up to 40 stations including AM and FM broadcasts 3 Within 10 seconds or press Press 2 edit Group recording playback How to call the 11th station or later Example 28th station ÿ To press the button continuously operate the next button within 5 seconds Select the number to register 1 ...

Page 27: ... is emphasized To add sharpness to the sound Sound Enhancer beginning The sharpness of the sound is further emphasized To change the sound quality bass treble To set the sound spread surround edit listen Recording sound Press repeatedly Various ways of listening When adjusting treble Consideration 3 weak to 3 strong 3 weak to 3 strong When emphasizing the spread of sound 1 Press or to change the s...

Page 28: ... or by pressing or Group recording playback To switch the time display Song title 1 If you insert a CD or MD listen If you press repeatedly during playback Recording sound Playback time of the selected song 1 The title is not displayed when the disc name or song name is not recorded 2 When the song title is recorded the song title is displayed for a few seconds Note Some of the playback times show...

Page 29: ...cording date 3 listen Recording sound If you press repeatedly the elapsed playback time Recording time 3 No name 2 Monaural recorded songs are displayed as M 3 Play only MD is not displayed Note The song title is not displayed for CDs that are entered in hiragana katakana or kanji On a disk in which characters are entered on a personal computer the disc name may not be displayed correctly or it ma...

Page 30: ...song ÿ MD For the 100th and subsequent songs MD only press twice to specify How to specify the song number 10th song or later Note Direct song selection is not possible when random playback P 31 or program song selection P 32 is set When pressing the 1 to 10 buttons in succession operate the next button within 5 seconds CD To specify the 11th to 99th songs press You can play from the songs you wan...

Page 31: ...MD recording operation is performed Listen repeatedly listen in no particular order repeat playback random playback 2 J song All songs will be played repeatedly Preparation 1 After inserting the CD After inserting the MD Press Press Play in no particular order H song A song Press 3 1 song repeat playback C song Five Various ways of listening 7 1 2 3 4 5 6 7 8 9 10 11 H song beginning When listenin...

Page 32: ...king the song title press or instead of pressing the direct button select the song number you want to listen to and press CD 2 You can play your favorite songs on CD and MD in any order CD and MD can be selected separately up to 20 songs each group If you make a mistake in the song number press during registration to cancel the last selected song If you press it continuously it will be canceled in...

Page 33: ...to start playback When listening to a group recorded MD see the explanation on page 49 4 Repeat step 3 and specify the song numbers you want to register in order 2 Press CLEAR while stopped Press to start playback Repeat steps 1 to 5 to add a song It will be added after the previously selected song The order of the songs cannot be changed All songs on the CD or MD will be unregistered To check the...

Page 34: ... is not recorded Music copyright What you record cannot be used without the permission of the copyright holder except for personal enjoyment When TOC goes out Recorded or edited information is recorded on the MD Accidental erasure prevention status Tok About MD TOC Table of Contents After recording it is recommended that you open the erasure prevention knob to prevent accidental erasure of importa...

Page 35: ...y a special compression method so miscellaneous sounds are recorded very rarely May occur When recording with an emphasis on sound quality we recommend stereo SP or twice as long recording LP2 Songs recorded for 2x or 4x longer time cannot be played on devices that do not support 2x or 4x longer playback Precautions Do not record near devices such as TVs PCs and mobile phones The recording may be ...

Page 36: ...fter the CD and MD are stopped write the song number to the MD 2 Press CD and MD will stop Press Press Record at 4x speed high speed 1 2 Press How to listen Analog recording P 38 CD Recording sound Preparation 1 Turn on the power 2 Insert the CD you want to record 3 Insert the recording MD Select a recording mode When the CD finishes playing or the MD has no more recording time left 3 Start record...

Page 37: ... that cannot be recorded When recording only songs that can be recorded Press When not recording Record at constant speed Record at 4x speed beginning Number of songs that can be recorded CD B song C song Various ways of listening display Stereo recording 2x long time recording stereo 4x long time recording stereo Monaural recording Switching is not possible during recording The recording mode doe...

Page 38: ... in 2x longer recording mode Level meter At that time Can t COPY may be displayed This limits digital recording for copyright protection purposes In that case please record as follows Press REC Record from CD R or CD RW to MD Elapsed CD playback time 2 Analog recording ÿ If you switch the level meter or MD during the remaining recording time the display remains during recording When you stop recor...

Page 39: ...dd song numbers wherever you like After assigning a song number the next song number cannot be assigned for about 4 seconds 2 Select the recording mode P 36 Preparation Press 1 CD Preparation 1 Turn on the power 3 Press or press to select the song number you want to record The song number you want to record Press 5 When the CD has finished playing the MD will be in the recording standby state Pres...

Page 40: ...the CD and record them in the order in which they were registered CD D song E song song selection Choose MD after recording Lights up 2 Select the recording mode P 36 It will be recorded in the order of the registered songs ÿ Preparation one two three Recording sound If you select 21 or more songs EDIT OVER will be displayed Press Record at 4x speed 5 Repeat steps 3 to 4 to register Up to 20 songs...

Page 41: ... MD Press CD 3 Various ways of listening ÿ To register while listening to the CD 1 While playing the song you want to record listen Note When selecting a song in My Track Edit you cannot switch from CD to another input If you want to use another input cancel the song selection My Track Edit cannot be used when program song selection or random playback is set Please cancel the setting If you use My...

Page 42: ...und 1 Press Press 4 Preparation 1 Turn on the power 2 Insert the recording MD 3 Receive the broadcast you want to record P 24 It will be in the recording standby state Press MD to pause recording Press it again to resume recording The song number will increase by one Press MD to stop recording How to listen After the MD is stopped write the song number to the MD Record radio transmission Machine T...

Page 43: ... song ÿ C song ÿ MD recording time remaining beginning Song B Before you start recording Rimo Note When recording an AM broadcast keep the AM antenna away from the main unit while it is in the recording standby state and adjust it so that the AM broadcast can be heard most clearly T MARK 10m C song ÿ ÿ To switch the display during recording T MARK 5m Recording starts and a song number is added eve...

Page 44: ...ng is finished it will be moved to the beginning ÿ 2 Select the recording mode P 36 2 Insert the CD and MD Press 1 Press 4 Start recording Record at constant speed Press When the recording is finished the top position setting is canceled The recorded content becomes the first song number of the MD and the previously recorded content moves to the song number after the song just recorded Note You ca...

Page 45: ...If you set the group mode and record L song A song ÿ Group playback By using a group recorded MD you can play back by your favorite group such as by set album or artist Five 3 group 11 K song Four Group 1 3 Group 2 C song D song N songs Four group 2 I song M song G song 2 Non group 2 1 2 Four ÿ About group recording J song Ten Four 2 M song Non group B song 3 New form 3 Group 2 H song F song Group...

Page 46: ... pressing 1 Set the input to TUNER MD Record at 4x speed Preparation Press to turn on GROUP The group recording settings will not change until the next change Group recording playback Press 1 Press 2 Insert the CD and MD 3 Select a recording mode P 36 Record at constant speed Last group Press If you cannot record all songs from the CD OVR will be displayed and recording will not start P 37 4 Start...

Page 47: ...ant to record You can register up to 20 songs 8 Four K song 3 Press 1 or to enter the song number you want to register When the recording is finished the song registration will be deleted Information When 99 groups are created recording to the group is not possible It will be recorded to a non group 2 4 5 6 10 11 6 4 1 Lights up You can select a song in the middle of a CD and perform group recordi...

Page 48: ...D song Four H song Press O song P song R song S song T song Note Top position edit cannot be set or canceled during recording or while recording is paused If you have created 99 groups you cannot record to the groups Non group cannot be selected in the top position edit J song Press it again to cancel the top position setting ÿ Record at the beginning of the group top position edit 1 CD and radio ...

Page 49: ...ow the first group group 1 Press 4 Playback starts from the first song in the selected group Group recorded MDs allow you to play back by your favorite groups such as set albums and artists Group recording playback MD Note When the MD program is selected the group mode cannot be set ÿ To cancel group mode and listen You can also select by pressing or Press 2 ÿ To select the group you want to liste...

Page 50: ...eps 1 to 3 of To select the group you want to listen to All songs are played repeatedly in group order conduct P 49 Specify the song number you want to hear in 2 Playback starts from the specified song in the selected group Group recording playback Normal playback NORMAL It regenerates in random order within the group and after playing all songs in the group the next group is played in random orde...

Page 51: ...ram you can listen to only the group you want to listen to repeatedly Random playback is not possible when a group program is registered Press 7 When registration is complete press 3 To cancel registration Press 8 When all the songs in the registered group are played they will stop automatically Blinking ÿ Remember and listen only to your favorite group group Five I remember registering the group ...

Page 52: ...ing Press EDIT 2 5 4 Within 10 seconds press NAME TOC MD 1 Insert MD and press Character input screen edit Canner You can give the recorded MD a disc name group name or song name of your choice Disk name Name tok edit Select DISC NAME 6 When you have finished inputting press The disk name is recorded Attach a title to the recorded MD Machine Translated by Google ...

Page 53: ...Enter two characters Kakikukeko ABC 2 Katakana uppercase alphabetic timer 6 Lowercase jkl 5 edit wxyz 9 Lowercase display Space Switching between uppercase and lowercase letters the size of the numbers does not change Space 2 Press or to remove Tachitsuteto GHI 4 Set to input mode Alphanum input mode When moving the cursor enter When entering additional characters push Press 1 10 Symbol abc 2 Ente...

Page 54: ...ed repeatedly Press 5 Within 10 seconds press Character input screen group Name tok 5 When you have finished inputting press The song title is recorded and normal playback is resumed Information It is not possible to give a group name to a non group edit Canner Note You can give a song title when a song is selected while it is stopped or while it is paused or recording If you are recording please ...

Page 55: ...GROUP NAME Tok full 4 Within 10 seconds press or name ÿ Erase the song title Name Tok Edit Press and select TRACK NAME 1 Insert MD and press MD enter If you enter LP at the beginning of the title it may not be displayed P 77 2 Press NAME TOC EDIT Press and select DISC NAME ÿ Erase the disk name NAME FULL is displayed Up to about 1 700 characters on a single MD Group name 5 Within 10 seconds TIMER ...

Page 56: ...f the CD title Make a note of the MD title MD name M1 BEST 3 M3 ALBUM To cancel press Make a note of the title name memo M5 LIVE You can memorize the title and copy it to another MD Display the disc name or song name Memo 2 If you remember the title 1 Within 10 seconds or press select NAME MEMO M2 SINGLES 4 Within 10 seconds press M20 Unregistered I will memorize it here Memo number edit M4 MY FAV...

Page 57: ...25 characters Or press repeatedly Name copy Note If the power cord is unplugged or the power is stopped for one day or more the stored title will be erased When the group mode is set the disk name is not displayed To use Name Memo or Name Copy for the disk name cancel the group mode before operating At this time if you select the edit menu To cancel press Press 7 At this time you can change the di...

Page 58: ...cted songs Press D song edit Connect two songs into one combine After connecting To cancel press one two three 1 While stopped press or to select the song number behind the connection one two three Then select COMBINE MD Information You can also pause the song behind For two songs that are not consecutive use Move to make the two songs continuous and then connect them You cannot connect digitally ...

Page 59: ...ted have a song title and recording date and time the same song title and recording date and time will be attached to both songs To cancel press Divide one song into two divide Move a song move C song D song However if there is no space to register the text information in the TOC the song title and recording date and time will not be attached to the song behind While playing the song you want to m...

Page 60: ...can erase it before operating You can also do this while playback is paused Group Track Erase Erase the group group erase 2 4 Within 10 seconds press Only these operations can be performed on the main unit Press 2 3 Press again for at least 3 seconds 1 While stopped press repeatedly to select the group you want to erase 3 Within 10 seconds or press To cancel press Name Tok Edit Track erase The sel...

Page 61: ...een group recorded on another device with this product it may not work properly 1 2 Edit the group Then select Gr CHANGE E song F song G song Group 1 D song Press 2 to select the group that contains the song you want to move Group 1 MD A song C song 7 or press L song J song Before moving H song E song F song G song Non group To cancel press Non group ÿ Group 2 Four B song Select the destination gr...

Page 62: ...oup 3 H song Four 1 E song F song G song P song D song D song Press Non group 3 N songs C song I song 2 M song J song C song Four Group 3 M song 3 Group 2 2 B song 2 B song Group 1 Group 2 Group 3 2 3 4 1 2 3 4 1 2 3 4 5 Press again The non group song moves to the end of the MD Group top move K song 1 Four D song Group 3 2 K song 3 1 N songs Then select Gr TOP MOVE 2 C song Edit the group continue...

Page 63: ...e moved later so you may not know the order of the songs and you may not be able to restore them Make sure that you can move it before operating it F song A song Before making a group Non group 3 B song H song 1 C song Press 5 or to glue 1 234 5 D song Note If the group name is recorded the group name does not change even if you perform a group top move Group Top Mu for the first group When I try ...

Page 64: ...s within 10 seconds MD Group 2 2 D song K song Four B song The song will be recorded later Group 2 3 Press again Delete group information group cancellation 5 When you have finished inputting press The group is created 1 While stopped press for 3 seconds or longer To cancel press 1 1 Group 1 1 C song D song 3 A song Group 1 3 A song I song After canceling 1A song 2B song 3C song 4D song 5H song 6I...

Page 65: ...venient in such cases Recording a radio broadcast only for that day etc After the end the timer setting will be canceled 1 Set the daily timer If the daily timer and the once timer overlap the once timer will be given priority so please wait at least 1 minute Note Other devices cannot be operated with the timer settings of this product Timer recording is not possible at the following times When a ...

Page 66: ...sing the timer P 18 The timer cannot be used unless the clock is set 2 Prepare for playback or recording 7 Set the end time in the same procedure as operations 5 to 6 Wake up with music or record while you are away timer continued Once timer 1 Turn on the power and press 9 30 Once Select SET and press Or press T IM ER Select ONCE TIMER or DAILY TIMER and press daily 2 Within 10 seconds or press 3 ...

Page 67: ...registering the broadcasting station start over from step 1 Note If the power is turned on at the timer start time timer playback or timer recording will not start Select a recording mode P 42 Select the desired station and press Preset number Select the desired station and press Preset number If the broadcasting station is not registered Or press 9 or press 12 Press or to set the volume and press...

Page 68: ...ting is canceled and the status becomes ONCE OFF If you do not want to change the contents follow step 3 for ONCE ON or DAILY Daily call 2 Once Select ONCE CALL or DAILY CALL with or and select timer Daily off timer daily 1 Press TIMER DELETE Daily timer Once timer recording Daily timer playback Daily timer recording If you select ON the settings will be reset with the same contents Once Press ENT...

Page 69: ...to wake up only sleep without turning off the power you can also wake up by the following operation 1 During sleep operation Lit The sleep operation starts Select SLEEP and press It can be set from 1 minute to 2 hours You can set from 5 minutes to 2 hours in 5 minute increments and from 1 minute to 5 minutes in 1 minute increments timer Press 3 or to sleep time delete Sleep off enter Sleep is rele...

Page 70: ...mer playback ÿ Timer playback ÿ Operation end ÿ Operation end ÿ Operation start ÿ P 69 Operations 1 to 4 With sleep and timer recording Sleep ÿ Timer recording ÿ Timer recording ÿ Operation end ÿ Operation start ÿ Operation end ÿ P 69 Operations 1 to 4 When the sleep time expires the power turns off and when the timer playback starts the power turns on automatically and timer playback starts For e...

Page 71: ...g 4x or 2x from 20 CDs 64 minutes This product can record from CD to MD in a quarter of the normal time When recording from a CD RW it is halved For 4x or 2x recording there are restrictions for copyright protection Start recording at 4x speed or 2x speed If the recording ends in 10 minutes you will not be able to record at 4x or 2x for another 64 minutes ÿ 74 minutes after the start AA AA To reco...

Page 72: ...he edge with a soft cloth Do not write on the printed surface with a hard pencil or ballpoint pen It also affects the playback surface and causes malfunction Do not attach labels or stickers Do not use cellophane tape labels or other items that have glue that sticks out or has been peeled off Playing it back as it is may cause a malfunction ÿ When to hold an optical disc Those with the mark on the...

Page 73: ...tter will break if you force it open Consideration Precautions for storage Be sure to store in a special case to avoid dust scratches deformation etc Do not place it in the following places A place exposed to direct sunlight for a long time Especially in a closed car Places with high temperature or high humidity A place where sand and dust can easily get inside the special case Seaside sand etc At...

Page 74: ...m the speaker ÿ Is the volume set to 0 P 27 ÿ Are you connected to headphones P 14 ÿ I can t record ÿ Is the MD erasure prevention knob open It stopped working normally while I was pressing the button ÿ Turn off the power and try the operation again If it still does not work perform a reset operation P 75 The TV image is distorted or noisy Common ÿ If a TV using an indoor antenna is placed nearby ...

Page 75: ...on as follows Reset operation Note If you perform the reset operation all the registered contents will be deleted Continuous sounds such as sea and za are included in the broadcast ÿ Noise is generated when receiving a radio broadcast near a TV computer word processor etc In such cases try moving away from areas where noise is likely to occur ÿ Is the direction of the antenna wrong P 25 I can t re...

Page 76: ...r audio is recorded PLAYBACK MD MD cannot be edited Try editing another song I can t read the disc information Non standard CDs and MDs NO TRACK MD is protected from accidental erasure The temperature has become too high Turn off the power and leave it for a while Can t WRITE TOC FULL There is not enough MD recording time DISC FULL Er MD Turn off the power and then turn it on again Is the sales sy...

Page 77: ...have been recorded and edited repeatedly the sound may be interrupted during fast forward rewind Consideration Even if the maximum recording time of MD is not reached Tok full If you fast forward rewind a recorded song the sound may be interrupted Even if you do not have it TOC FULL may be displayed No matter how many short songs you erase the remaining recording time may not increase The combine ...

Page 78: ...25 7111 ÿ Kyoto branch 075 250 1134 ÿ Omiya branch 048 643 5461 ÿ Osaka branch 06 6244 0351 ÿ Ueno branch 03 3832 1033 ÿ Kobe branch 078 322 0561 ÿ Tokyo branch 03 3562 4455 ÿ China branch 082 249 6362 ÿ West Tokyo branch 03 5321 ÿ9530 1500 Naha Branch 098 863 1228 Blower Thinner Pickup lens Precautions Be careful not to touch the pickup lens with your hands Keep the CD pig closed when not in use ...

Page 79: ...player Mini disc part JEITA Output terminal Headphone output 16 to 50 ÿ recommended 32 ÿ Reading method Non contact optical reading method using semiconductor laser AM Dedicated loop antenna included Reed Solomon Code ACIRC Reception frequency FM 76 0 to 108 0 MHz TV audio 1 to 3CH Recording method Magnetic field modulation overwrite method Sampling frequency 44 1 kHz Timer clock section power sup...

Page 80: ...s convenient to enter the date of purchase and the name of the store Discontinue use Warranty period One year from the date of purchase Please read the warranty carefully as you may be charged even during the warranty period Warranty back cover Please read well When the warranty period has expired Date of purchase Performance parts for repair are parts necessary to maintain the function of the pro...

Page 81: ...an area Western Japan area Kanto area 1 9 2 Nakase Mihama ku Chiba shi Chiba 261 8520 You can also contact us at the following district counters ÿ ÿ Reception hours Monday Saturday 9 00 am 5 30 pm excluding holidays and other holidays ÿ However Okinawa Amami area Monday Friday 9 00 am 5 30 pm excluding holidays and other holidays TEL 043 297 4649 043 299 8280 Repair consultation center Saitama Ser...

Page 82: ...aaaaaaaaaaaaaaaaaaaaaaaaaaaaaaaaaaaaaaaaaaaaaaaaaaaaaaaaaaaaa MEMO 1 BIT MD CD SYSTEM SD FX10 82 Machine Translated by Google ...
Page 83: ...an general household use for example for business use G When consumable parts dry batteries are worn out and need to be replaced H Failure or damage due to battery leakage ÿ For details on the retention period of repair or repair performance parts after the warranty period has expired refer to the instruction manual Consideration Free training regulations I Customers are responsible for the shippi...

Page 84: ...duct for repair and present this manual If there is any omission in the date of purchase the name of the store etc it will be invalid If there is no entry please contact the store where you purchased the product If you cannot request repairs from the store where you purchased the product due to a move or gift please refer to the Customer Service Desk Information described in the instruction manual...

Reviews: