


45
INSTALLATION AND OPERATION INSTRUCTIONS — PERSONAL ALARM SYSTEM
5.6
Alarm Sensitivity Adjustment
5.6.1
The ultrasonic alarm sensitivity is adjusted at the factory for alarm reporting up
to 50 feet and normally needs no field adjustment. Occasionally, sensitivity requires
adjustment in special installations. Remember that increasing sensitivity also increases
the possibility of activating more than one zone. Sensitivity should never be increased
to compensate for improper receiver spacing. Sensitivity may be reduced if one
transmitter sets off alarms in adjacent areas (e.g., under closed doors, etc.)
5.6.2
This adjustment procedure should not be used unless absolutely necessary.
Contact your factory representatives if you have any questions about coverage.
5.6.3
The ultrasonic alarm sensitivity adjustment involves jumper JP7, to select high
or low range, and the “sensitivity adjust” pot to adjust sensitivity within each range.
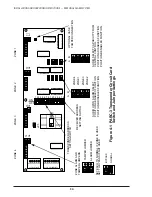
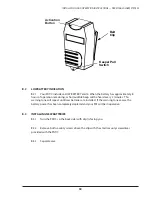
Both controls are located on the 03RM receiver board. Refer to Figure 5-1 for the
location of the adjustments. 03RM receivers are shipped in the “high sensitivity”
configuration (jumper JP7 installed). Removing jumper JP7 will reduce signal levels by
a factor of 10. DO NOT remove jumper JP7 unless absolutely necessary to eliminate
alarms in adjacent zones when zones are small. Make fine sensitivity adjustments using
the sensitivity adjustment potentiometer.
5.6.4
Using a known good transmitter with fresh battery, periodically set off alarms
at the receiver location requiring adjustment. Slowly change sensitivity by turning the
control in the proper direction. Do not turn the adjustment potentiometer more than
10 degrees between tests. DO NOT OVER ADJUST.
5.6.5
Turning the adjustment clockwise increases sensitivity. Counterclockwise
reduces sensitivity. Continue tests until the desired coverage is obtained. When
adjustment is complete, place a piece of masking tape or other marking material over
the adjustment to indicate the sensitivity has been changed from the factory setting.
Mark the tape with the type of adjustment made. Record the adjustment on a copy of
Figure 5-1 for as-built information.
5.7
Audio Level Adjustment
5.7.1
The audio level is adjusted at the factory and does not normally require any
field adjustment. Occasionally, there is a need to increase audio level in a large room or
decrease level in a very noisy area such as a mechanical room.
NOTE: If a receiver is monitoring a very hard room (i.e., concrete or metal walls,
floors, etc.) a lot of reverberation (echo) will be present. Increasing the audio level
under these conditions WILL NOT increase your ability to hear what is going on.
5.7.2
The audio level adjustment is located on the 03RM receiver board. Refer to
Figure 5-1 for adjustment location.


