


Collecting Data
147
dry soil, very dry soil and air. There is an associated approximate velocity (and
hyperbola shape) for each media type.
•
Velocity
– Allows you to use hyperbola-fitting to determine a more accurate velocity.
The options are slightly different, depending whether or not you are in backup mode.
If the backup indicator is on the screen when you press velocity, then you can only
adjust the vertical position of the horizontal scroll bar, since it is presumed you have
backed-up so that the system is right over the hyperbola in question. The scroll bar can
be moved up and down by touching the screen and dragging it, or using the up and
down keypad arrows such that it lines up with the top of the hyperbola (Figure 7-16).
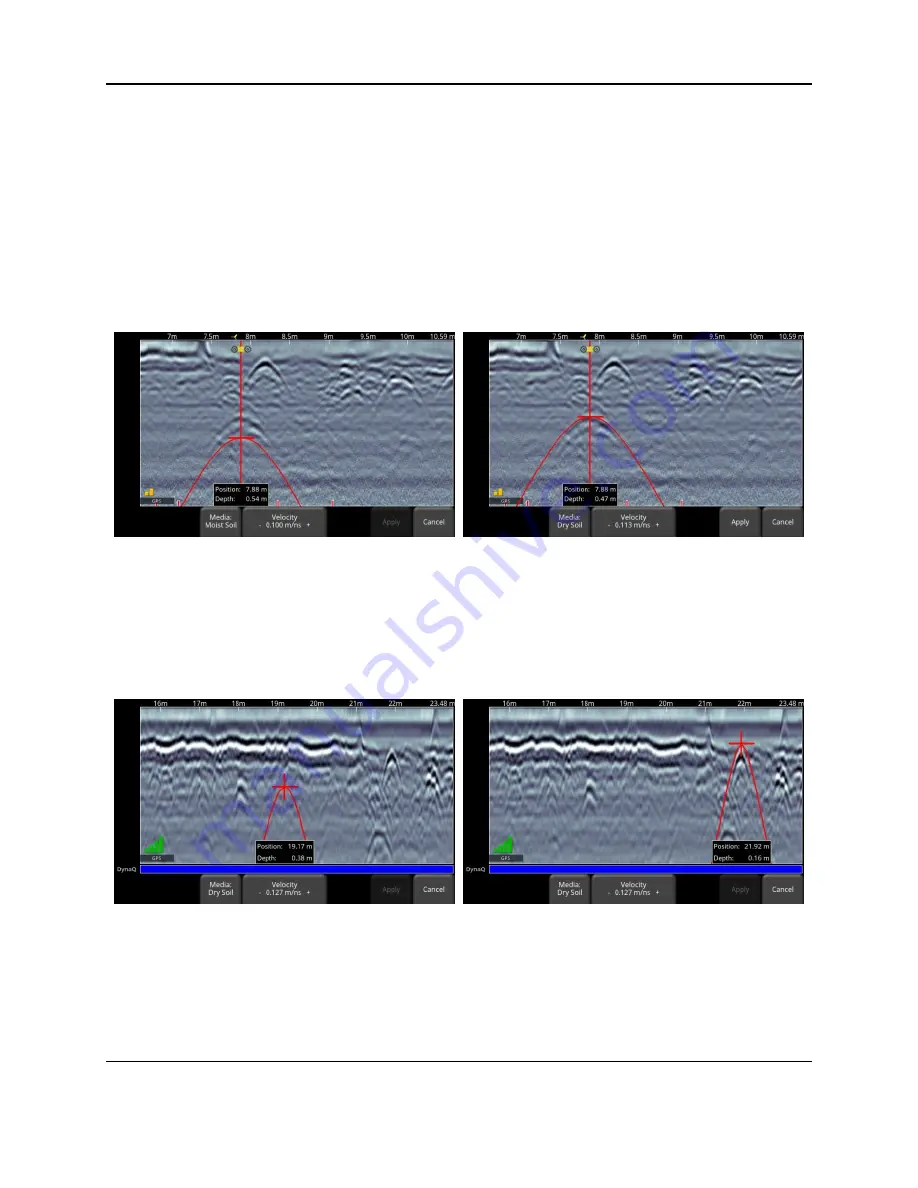
Figure 7-16: Adjusting Velocity while in backup mode. Image on left shows initial hyperbola that appears, while the
one on the right has the correct hyperbola fit.
On the other hand, if you press
Velocity
while you are collecting data or have pressed
Stop, you will see a red hyperbola in the middle of the screen. Touch and drag the
hyperbola so it lies over a hyperbola in the data image (Figure 7-17). You can use the 4-
way keypad arrows to fine tune the position of the red hyperbola.
Figure 7-17: Adjusting Velocity, without backing up. Image on left shows initial hyperbola that appears, while the one
on the right has the correct hyperbola fit
For either scenario above, once the red hyperbola is properly positioned, you can now
use the
+
and
–
buttons on the
Velocity
button to widen or tighten the shape. Once the
shape is matched (right sides of Figure 7-16 and Figure 7-17), you now have the correct
velocity and the measured depths will be most accurate. Press
Apply
to use this value.
Summary of Contents for pulseEKKO
Page 1: ...2005 00040 09 ...
Page 2: ...ii ...
Page 4: ...Warranty Confirmation iv ...
Page 10: ...x ...
Page 14: ...Introduction 2 ...
Page 72: ...Assembling Full Configurations 60 ...
Page 80: ...Getting Started 68 ...
Page 116: ...Tools and Preferences 104 ...
Page 180: ...Collecting Data 168 ...
Page 190: ...Map View 178 ...
Page 198: ...Managing Data 186 ...
Page 221: ...Care Maintenance 209 ...
Page 222: ...Care Maintenance 210 ...
Page 226: ...Technical Specifications 214 ...
Page 228: ...Appendix A 216 ...
Page 234: ...Appendix B 222 ...
Page 236: ...Appendix C 224 ...
Page 238: ...Appendix D 226 ...
Page 246: ...Appendix E 234 ...
Page 248: ...Appendix F 236 ...
Page 250: ...Appendix G 238 ...


