background image

Configuring the interpretation system

91

Configuring the interpretation system

This chapter provides information on how to quickly and easily configure
the consoles of your interpretation system (but not the consoles of the
conference system) using the software.

For configuring the interpretation system, you require the S-IM
(Interpreter Management) software module which is started as follows:

Click “Start” and select “Programs”, “SDC 8200” and “S_IM” one after
the other. The click “Intsys”.
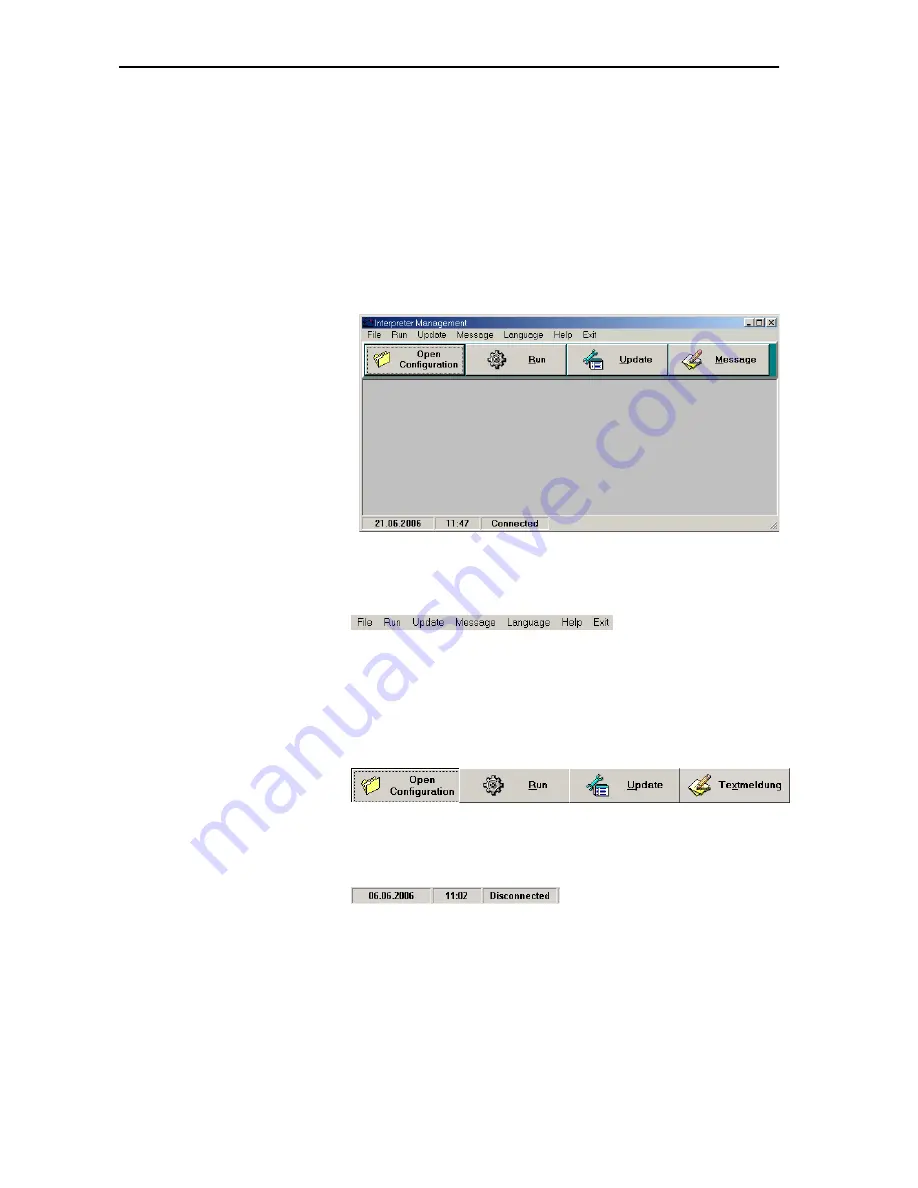
The “Interpreter Management” window opens.

The “Interpreter Management” window consists of:

y

the menu bar

y

the buttons

y

the status bar
(displays the date, the time and the status of the COM connection)

To open an 
interpretation 
configuration:

To monitor the 
status of the 
interpreter 
consoles during 
the conference:

To change the 
language for the 
B-channel:

To send text 
messages to 
displays of the 
interpreter consoles:

Summary of Contents for SDC 8200 SYS

Page 1: ...Software SDC 8200 SYS SDC 8200 SYS M Software Manual...

Page 2: ...er half a century of accumulated expertise in the design and manufacture of high quality electro acoustic equipment have made Sennheiser a world leading company in this field Please take a few moments...

Page 3: ...Preparing the conference system for use 15 Connecting the PC to the central unit 15 Installing the software 16 Removing the software 17 Starting the Confsys program for the first time 18 Connecting th...

Page 4: ...ng the conference mode 48 Configuring the speaker limit 49 Configuring communication with the central unit 49 Configuring the COM port 49 Saving the conference options 50 Managing delegate data 51 Ent...

Page 5: ...ng a conference 73 Changing the speaker limit during a conference 73 Changing the volume of the consoles built in loudspeakers 74 Turning the central unit s audio inputs and outputs on and off during...

Page 6: ...menu language 99 Changing the password 100 Locking the Interpreter Manangement software 100 Initializing the interpreter consoles 101 Changing the options later on 103 Displaying the serial numbers of...

Page 7: ...he dongle while installing or de installing software of any kind on the Master PC Keep liquids away from the dongle Warning against data loss PC files can be destroyed by defective hardware e g hard d...

Page 8: ...managing your delegate data You can access delegate data at any time y gives your conference a personal touch You and all delegates if you so wish can see the name of the current speaker y allows you...

Page 9: ...that the SDC 8200 SYS software cannot be used with the SDC 8200 CU M central unit and that the SCD 8200 SYS M software cannot be used with the SDC 8200 CU central unit For information on the two cent...

Page 10: ...e monitor and control the conference system from your PC With the S MM software module you can y create a synoptic view of the conference room y assign a real microphone to each conference console ico...

Page 11: ...are modules are activated automatically when you install the software You can upgrade your license s at any time to include additional software modules see Upgrading the software license on page 108 N...

Page 12: ...n Password 2 is required for initializating the conference consoles Password 1 On delivery of the software password 1 is 123 Password 2 Password 2 is 456 Note In order to ensure that only authorized p...

Page 13: ...interpreter consoles you have not licensed the S IM software module y you use two different PCs to control the conference and interpretation system each PC has an RS 232 interface of its own y you use...

Page 14: ...ster see Configuring the PC in a network on page 44 The master PC gives you access to all functions of the conference and interpretation system The dongle must be inserted into a free USB port of the...

Page 15: ...unit Make sure that the required serial interfaces are available and free The required interfaces must appear in the Windows Device Manager under Ports COM LPT These interfaces must not be used by any...

Page 16: ...tallation of the dongle driver you can select either Complete all components including the help file or Custom optionally without help file We recommend selecting Complete After the installation is su...

Page 17: ...s dialog box opens On the left hand side of the dialog box click Change or Remove Programs Select SDC8200 in the list and click the Change Remove button A warning appears Confirm the warning with Yes...

Page 18: ...ou the following options 1 You can close the Waiting for master dialog box insert the dongle and restart the program see Connecting the dongle on page 18 2 You can click the Options button password re...

Page 19: ...e and interpretation system If you only use one PC to control the conference and interpretation system configure this one as the master PC In this case you do not require any IP addresses On the CU ta...

Page 20: ...soles but only the first five conference consoles are stored y You can open conference configurations with more than five conference consoles but only the first five conference consoles are displayed...

Page 21: ...asswords on page 12 and press the Enter key The New Password box appears In the New Password box enter the new password eight characters max and press the Enter key The Confirm Password box appears In...

Page 22: ...s of y the menu bar If you have not licensed all of the software modules some of the menus will not be available in your software y the Start button for starting an already existing conference configu...

Page 23: ...click the Room Configuration button in the SDC 8200 window The Room window opens The Room window consists of y the menu bar y the Config Init and Vip tabs on the right hand side of the window y the c...

Page 24: ...ture for a synoptic view From the File menu choose New Picure An empty background picture opens and you can add the drawing objects to the picture To open an existing background picture for a synoptic...

Page 25: ...drawing palette click the Pencil icon Use the mouse pointer to draw as if you were drawing with a pencil on paper To erase objects or areas In the drawing palette click the Eraser icon Click and hold...

Page 26: ...r to the desired size of the rounded rectangle and release the mouse button To draw an ellipse or a circle In the drawing palette click the Ellipse icon Select the desired fill style y Border foregrou...

Page 27: ...e airbrush In the drawing palette click the Airbrush icon Position the mouse pointer on the canvas then click and hold down the left mouse button Drag the mouse pointer to paint with the airbrush and...

Page 28: ...eration is redone To cut a selected area From the Edit menu choose Cut or press the key combination Ctrl X The selected area is cut and saved on the clipboard To copy the selected area to the clipboar...

Page 29: ...ects by clicking the desired color on the color palette or define your own color To set a fill color for drawing objects From the Format menu choose Fill Color The color palette opens Set the fill col...

Page 30: ...onsole icon You can change this color at any time by clicking the conference console icon and then clicking another color in the Party Color box Click one of the two Micro buttons Clicking the left Mi...

Page 31: ...line intersection When releasing the mouse button the icon will automatically snap to the grid line intersection The icons are also aligned with the grid when the grid itself is hidden but the Snap op...

Page 32: ...y In the X ax Hor field enter the position of the horizontal axis along which the icons are to be flipped At a value of 8200 the axis runs horizontally through the center of the image Click the Apply...

Page 33: ...ing conference console icons automatically on page 46 For this you must have a delegate list see Entering delegate data on page 51 To move and align an icon label Proceed as described for the console...

Page 34: ...pation in votes to certain participant groups Notes You can define a maximum of 20 groups One group can comprise a minimum of one and a maximum of all conference consoles Delegate units VIP units and...

Page 35: ...nsole which is to be added to a group The dialog box for editing groups opens From the Audio Group drop down list choose the number of the audio group to which the conference console is to be added an...

Page 36: ...l rights and privileges y With a VIP unit you can take the floor at any time by pressing the microphone key regardless of the conference mode and without first having to be assigned the speaking right...

Page 37: ...ab appears in front of the Room window To automatically initialize the conference consoles On the Init tab click the Automatic Init button In the Start Initialisation dialog box that opens click Yes A...

Page 38: ...phone number On the Init tab click the Open Init button In the Start Initialisation dialog box that opens click Yes In the Delete Reserve box click the Delete option button Click the 0000 field and en...

Page 39: ...microphone number of the conference console is saved Checking an initialization On the Init tab click the Get Init Info The status of each conference console icon is displayed y Green conference cons...

Page 40: ...en exiting the program see Configuring the saving options on page 42 Vote Mode 1 of Presence Vote Correction Logo1 Logo2 y Voting options as well as file paths and names of the logos in the voting win...

Page 41: ...n page 43 Path voting Path copy Path data y File paths of the log and safety files see Configuring the log files on page 47 Sound y File paths of the sound files see Configuring acoustic signals on pa...

Page 42: ...ogram You can either save or not save the changes y If you click the On option button your changes are saved automatically when you exit the program Configuring the voting settings To preset the votin...

Page 43: ...ab click the desired option button We recommend entering the title of your conference Via this title it will later be possible to clearly assign all printouts to a certain conference To add up to two...

Page 44: ...al PCs it is necessary to specify the tasks of the PCs in the network y Master Control of the conference system and or control of the interpretation system access control dongle y Slave Control of the...

Page 45: ...now configured as a video PC To prevent the video PC at which no one is working because it is used for display purposes only from starting the screensaver Make sure that the screensaver of the video P...

Page 46: ...e option button an icon label with the name read from the chip card is automatically added to the conference console icon only if the SDC 8200 SYS software is being used If no chip card is inserted no...

Page 47: ...d into or removed from the chip card slot of a console this is saved in a log file y Vote Logging All voting items are saved in individual log files y Chronological Logging All system events are saved...

Page 48: ...gently recommend selecting a folder on the master PC for saving the log databases Deleting log databases You can manually delete the log databases or set a deadline after which the log databases are a...

Page 49: ...tion even though no consoles are connected the Off option allows you to avoid the constant display of the No communication dialog box Configuring the COM port To configure the COM port of the PC for c...

Page 50: ...dows Device Manager However in contrast to standard desktop PCs on a number of laptops the infrared interface IrDa and not the serial RS 232 interface is preconfigured as COM1 In such a PC the serial...

Page 51: ...ates window If you use chip cards the microphone numbers are not fixedly assigned to the delegate names In this case you do not have to enter any delegate data Instead the delegate names stored on the...

Page 52: ...e data To add new delegate data to the dalegate database In the Delegates window click the Add button The insertion point appears in the Micro field Enter the data into the different fields one after...

Page 53: ...are displayed in the input mask To scroll through the delegate database In the Delegates window click one of the arrow buttons The previous or the next entry of the corresponding box is displayed in...

Page 54: ...mber 4 y Last name Name 40 y First name First name 20 y Street Street 30 y ZIP code ZIP code 4 y City City 20 y Organization Party 15 y District District 30 Example Delegates txt 0001 Luthi Maria R mi...

Page 55: ...e selection box opens Select the delegate list to be printed and confirm your selection by clicking the OK button The Start Printing dialog box opens Click the OK button The selected delegate list is...

Page 56: ...thus give your conference a personal individual touch For this you require the S MM S DM and S VM software modules as well as consoles with a chip card slot SDC 8200 CV or SDC 8200 DV Writing data to...

Page 57: ...personal data of the delegates on the chip cards you require the SDC 8200 SYS software Insert a chip card into the chip card slot of each conference console The chip must point downwards and to the le...

Page 58: ...click the Agenda button in the SDC 8200 window The Agenda Items window opens The upper part of the window contains the input mask the lower part displays the agenda and the buttons on the right hand...

Page 59: ...isplayed in the agenda Changing voting items in the agenda file To change a voting item in the agenda file In the agenda of the Agenda Items window click the voting item you want to change The data ar...

Page 60: ...o 100 Click the Apply button The selected quorum is assigned to all voting items listed in the Selected Vote Items field All voting items are moved back to the Available Vote Items field Click the OK...

Page 61: ...Available Vote Items field Click the OK button Deleting voting items from the agenda file To delete a voting item from the agenda file In the agenda of the Agenda Items window click the name of the vo...

Page 62: ...g item is moved to the new item number in the agenda file The entry in the agenda is moved correspondingly Importing voting items Instead of manually entering voting items you can import them from a t...

Page 63: ...name are displayed in the field below Destination file name Click the Start import button The voting items are displayed in the lower part of the window An agenda file containing the data of the text...

Page 64: ...tesseconds mdb Example LOG_2006_10_03_123031 mdb To export or print the log files of a database To open the database of the current conference From the Logging menu choose Open Current Database To ope...

Page 65: ...the white field enter the name to be assigned to the files to be exported In the Format box click the check boxes of the file formats to be created You can export several formats at the same time Cli...

Page 66: ...consoles must be initialized see Initializing the conference consoles on page 37 From the Start menu choose Synoptic or click the Start button The file selection box opens First select the tec file co...

Page 67: ...rresponding boxes of the control palette provided you have licensed the S DM software module The displays on the control palette To display the name of any desired delegate In the synoptic view positi...

Page 68: ...oths box even if you do not have a license for the S IM software module or it is currently not in operation Each interpreter booth is represented by a booth icon displaying the booth number The booth...

Page 69: ...wn Click the STOP button The countdown stops and the speaking right is withdrawn from the speaker Using the Global option button in the Speech Timer box To change the preset maximum speaking time Clic...

Page 70: ...as made a request to speak by pressing the microphone key y Red conference console icon 6 The delegate has been granted the request to speak y Gray conference console icon 7 The conference console is...

Page 71: ...the conference mode you can activate several consoles in succession until the speaker limit set in the options is reached To activate a console in the synoptic view Click the gray console icon of the...

Page 72: ...k LED on the console starts flashing To grant a request to speak in the synoptic view Click the green console icon in the synoptic view The activated console turns red To grant a request to speak in t...

Page 73: ...n to be configured as the chairman unit The console icon turns pink The corresponding console is now configured as the chairman unit If you click the console icon of a chairman unit its color changes...

Page 74: ...d margin of the screen The tool palette opens In the AUX box click the check boxes of the audio inputs and output you want to turn on To turn an audio input or output on a tick must appear in the corr...

Page 75: ...e corresponding audio input y Click the Off option button in the Status box to turn the corresponding audio input or output off Click the On option button to turn the corresponding audio input or outp...

Page 76: ...a conference Press the Ctrl key and keep it pressed Right click the conference console whose group assignments you want to display The dialog box for displaying groups opens The numbers of the audio...

Page 77: ...displayed in the field below the group color field To change the audio setting of all conference console icons choose All from the Group drop down list In this case the group color field and the field...

Page 78: ...sure that no one is currently speaking When changing the conference mode all microphones are turned off automatically From the Mode menu choose the desired conference mode The setting becomes effecti...

Page 79: ...ton The Test Generator ON button disappears and the test tone stops To test the microphones of the connected conference consoles From the Test menu choose Test all Microphones The Test all Microphones...

Page 80: ...or select the name of the delegate from the drop down list box Click the Send message button The message is sent to the display of the selected conference console Select the next delegate to receive...

Page 81: ...art a vote or a series of votes Move the mouse pointer to the left hand margin of the screen The tools palette opens Click the VOTE button The file selection box opens Select an agenda file and confir...

Page 82: ...ht y if specified two logos which appear one above the another on the top right see Configuring the voting settings on page 42 y the Next Item and the Agenda buttons and y the loaded agenda file Agend...

Page 83: ...on the chip card icon lights up Taking secret or public votes To take a secret vote In the Secret box click the ON option button y If you click the Synoptic detail option button the selected voting op...

Page 84: ...egates have the choice of five options Automatically printing the voting results To automatically print all voting results Make sure that the printer is connected and configured correctly and turned o...

Page 85: ...topped The delegates can also cast their votes while the countdown is on hold To continue the countdown Click the CONTINUE button The countdown continues Votes cast after completion of the voting time...

Page 86: ...h console icon is marked with a color symbolizing the vote cast A palette on the right hand margin shows what the colors mean y If you select Bar chart the voting result is shown as a bar or circle ch...

Page 87: ...ary area turns green If a video PC is connected the signal light turns green here too as a signal to the delegates that they are now expected to vote see Configuring the display of the voting results...

Page 88: ...ed see Automatically printing the voting results on page 84 y the safety folder see Configuring the log files on page 47 saves two protocol files which contain all voting details including the voting...

Page 89: ...epeating a vote To repeat a vote In the agenda click the vote which has already been taken and which you want to repeat Press the Del key The x in front of the vote which has already been taken disapp...

Page 90: ...Confsys program To end the Confsys program Click End on the menu bar The program is ended If consoles are active when you exit the program they remain active The conference is not interrupted but is...

Page 91: ...t software module which is started as follows Click Start and select Programs SDC 8200 and S_IM one after the other The click Intsys The Interpreter Management window opens The Interpreter Management...

Page 92: ...older The Configuration Options window opens From the Number of booths drop down list box select the total number of interpreter booths in your configuration y If you are using the SDC 8200 SYS softwa...

Page 93: ...page 98 and Configuring the operating mode within a booth on page 99 of the SDC 8200 system manual Click the OK button The Desk Language Assignment window opens see Assigning languages to the interpr...

Page 94: ...the OK button The subfolder with the name of the interpretation configuration is deleted from the folder C Programs SDC8200 S_IM and all parameters of the configuration are deleted Assigning languages...

Page 95: ...w you want to delete The abbreviation and the name of the selected language appear in the Abbr and Language fields Click the Delete button The language is deleted from the language table of this confi...

Page 96: ...reters can change the configuration of the B channel at any time during the conference see Configuring the B channel of an interpreter console on page 38 of the SDC 8200 system manual You can also cha...

Page 97: ...are not in the B channel list cannot be selected for the B channel If you only add a single language to the B channel list the interpreter can only select this language for the B channel To remove la...

Page 98: ...f the selected interpreter console The language is displayed in the box above the list box and is assigned to the B channel of the selected interpreter console To prevent that the interpreter selects...

Page 99: ...ch is not available on your PC a dialog box with the message COMx not available appears x corresponds to the COM port number If you do not know the correct COM port try the different options one after...

Page 100: ...button to keep the current password Locking the Interpreter Manangement software If you need to leave your PC during a conference you can secure your interpretation configuration and prevent unauthori...

Page 101: ...ars The configuration data are transmitted to the central unit To initialize the interpreter consoles Click the Reset button The Are you sure dialog box opens Click the Yes button Your interpretation...

Page 102: ...lizing the interpreter consoles by pressing the MIC key of interpreter console 1 in booth 1 continue by pressing the MIC key of interpreter console 2 in booth 1 and so on The signal light ring of the...

Page 103: ...button The Configuration Options window opens Change the options and click the OK button The Desk Language Assignment window opens Displaying the serial numbers of all connected interpreter consoles T...

Page 104: ...clicking the arrow of drop down list box In the Send to box click the Booth drop down list box and select the number of the booth to which you want to send the message In the Send to box click the De...

Page 105: ...you want to edit The text is displayed in the box above the list Edit the text Click the Add button The edited line is added to the message list To delete a line from the message list Click the Remove...

Page 106: ...column the current target language y in the Autofloor column whether the Auto floor function is enabled y in the Mix column whether the Mixed mode is active y in the Quality column the quality of the...

Page 107: ...lected booth appear Interpreter console boxes in which Desk is displayed in blue represent consoles which are initialized correctly interpreter console boxes in which Desk is displayed in gray represe...

Page 108: ...ck the Copy to Clipboard icon Send this code by email or by fax to your Sennheiser distributor Within five days you will receive the new license in the form of a license code Enter this license code i...

Page 109: ...ile types Synoptic view file tec Delegate database del Agenda dia lnd Text file with delegate database can be imported txt Text file with voting items can be imported txt Voting results year_month_day...

Page 110: ...program is started for the first time See Setting the correct starting options on page 19 If the Waiting for master dialog box appears when the program is started for the second time or later See Conf...

Page 111: ...S DM Delegate Management software module 500978 SDC 8200 S VM S VM Voting Management software module 500979 SDC 8200 S VD S VD Voting Display software module 500980 SDC 8200 S IM S IM Interpreter Man...

Page 112: ...he conference 48 Conference modet changing during a conference 78 Confsys 10 16 starting 22 Console icon label adding 33 aligning 33 deleting 33 moving 33 Control palette 67 displays 67 D Delegate dat...

Page 113: ...ON 49 menu language 44 Mode 48 Presences 43 protocol 47 saving options 50 Vote Mode 42 Votetext 43 IntSys 99 COM port 99 menu language 99 P Password changing 21 Confsys Password 1 12 Password 2 12 Int...

Page 114: ...taking a vote 81 Voting items importing 62 moving 62 Voting settings 83 1 of 3 84 1 of 5 84 automatically printing 84 Badge 83 chip cards 83 Printer 84 Real Time Voting 84 Secret 83 secret public 83...

Page 115: ...Index 115...

Page 116: ...Sennheiser electronic GmbH Co KG 30900 Wedemark Germany Phone 49 5130 600 0 Fax 49 5130 600 300 www sennheiser com Printed in Germany Publ 12 06 516640 A01...

Reviews: