


Page 40
/
7. The Optional Statprinter Cont’d.
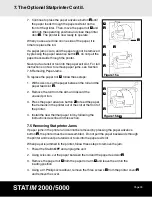
5. Note the orientation of the exposed printed wiring board
■
15
and the paper roll arm
■
4
assembled on the printer door
■
1
.
6. Gently lift the printed wiring board upwards
and away from the printer door. Exercise care
while handling the board. The printer is
integral to the wiring board. Do not place
strain on the connections of the ribbon cable
soldered to the board. Do not remove the
connector of the flexible cable from the
connector header on the board. The paper
drive mechanism on the underside of the
wiring board is now exposed.
7. Using a pair of tweezers or fine needle-nosed
pliers, carefully remove the paper
from the mechanism.
When the paper is removed, reassemble
the printer:
1. Carefully snap the paper roll arm
■
4
, in the
loading position, back into the clips on the
printer door
■
1
.
2. Place the printed wiring board
■
15
back into
position on the printer door. Note the alignment of the mounting holes
■
9
in the wiring
board and the mounting bosses
■
13
on the printer door. The black plastic printer body
rests between the locating ribs
■
10
on the inside of the printer door.
3. Ensure that the flexible cables
■
11
,
■
14
are not pinched between the printer door
and the wiring board.
4. Place the printer cover on the printer door. Ensure that the flexible cables are not
pinched between the cover and the door. The power button and the paper advance
button must protrude through the openings in the cover and operate freely.
5. Using a #1 Phillips screwdriver, secure the printer cover to the printer door with
the three screws retained during the disassembly procedure. Do not over-tighten
these screws.
6. Plug your Statim into the wall receptacle. For the Statim 2000, reconnect the printer
if it was previously disconnected. Turn the power switch to the
ON
position.
7. Press the printer power button to the
ON
position. Load paper into the printer
following the procedures in Installing Paper into the Statprinter.
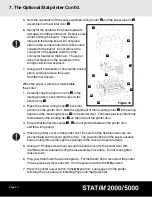
Figure 16
■
1
■
10
■
11
■
12
■
4
■
10
■
14
■
15
■
9
■
8
■
7
■
13


