


Page 28
/
5. Maintenance
5.1 Cleaning the Cassette
Keeping the Statim cassette clean is good clinical practice and assists in the function of
the unit. SciCan recommends that the interior surface be cleaned at least once a week.
Use dishwashing soap or a mild detergent that does not contain chlorine. Scrub the
inside of the cassette with a cleaning pad designed for use with Teflon™ coated
surfaces. After scouring, rinse thoroughly with water to remove all traces of the
detergent. Cleaning the inside of your cassette is very important if you regularly sterilize
lubricated instruments. Coating the entire inside surface with STAT-DRI / STAT-DRI
PLUS drying agent induces water to form an even coat on the inside surface, without
beading. The water in contact with the hot cassette surfaces also evaporates much
more efficiently. Spotting is minimized and instruments dry much better. STAT-DRI /
STAT-DRI PLUS should be applied every 10 cycles, and after every cassette cleaning.
5.2 Cleaning the Reservoir
Check the reservoir for dirt or particles. The reservoir may be cleaned by draining
followed by cleaning and rinsing with steam process distilled water ONLY. Use of
chemicals or cleaning agents is not reccommended and could cause the unit damage.
5.3 Cleaning the Exterior Surfaces
Use a soft cloth moistened with soap and water to clean all exterior surfaces.
Do not use harsh cleaning chemicals or disinfectants.
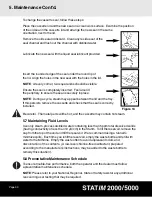
5.4 Changing the Statim 2000 Air Filter
The filter should be replaced every six months in order to maintain an adequate supply
of clean air during the air drying cycle.
To change the filter, follow these steps:
1. Turn the power switch at the back of the unit
OFF
.
2. Remove and discard the old foam air filter
■
4
.
3. Install the new filter
■
4
(SciCan part no. 01-100207S).
4. Secure the filter plate
■
2
to the back of the
compressor using the screw
■
1
retained during
the disassembly procedure.
■
4
■
1
■
2
Figure 10
2000


