


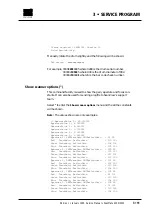


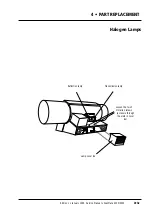


How to remove
1
•
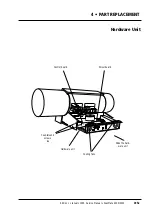
Lamp cover A
is a secured by two dome head 3 mm allen screws to
the back cover
B
. Remove by loosening the two allen screws,
(access is through the ventilation slots, as shown on the diagram
on the cover) and slide the cover off towards the rear.
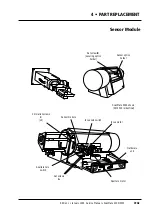
2
•
Back cover B
is secured by nine 2.5 mm allen screws along the
back edge. First remove the lamp cover
A
, and disconnect the con-
nector to the cooling fan. Remove the nine allen screws, slide the
cover towards the rear and carefully lift it away.
3
•
Right hand end plate C
is secured by one 4 mm countersunk allen
screw underneath the drum cover
D
. Remove the allen screw and
lift the plate away from the drum cover.
4
•
Right hand drum cover D
is secured by four 3 mm allen screws on
the inside of the cover securing it to the the frame. First remove
the end plate
C
, remove the four allen screws and washers and lift
the cover away.
5
•
Left hand end plate E
is secured by one 4 mm countersunk allen
screw underneath the drum cover
F
. Remove the allen screw and
lift the plate away from the drum cover.
6
•
Left hand drum cover F
is secured by four 3 mm allen screws on
the inside of the cover securing it to the frame. First remove the
end plate
E
, remove the four allen screws and washers and lift the
cover away.
How to replace
7
• Refitment of the covers and plates are carried out in the reverse
order to that of removal.
Service Manual • ScanMate 4000/5000 Edition 1
•
January 1996
Access Panels
4•2b
Summary of Contents for ScanMate 4000
Page 1: ...ScanMate 5000 ScanMate 4000 ...
Page 6: ......
Page 16: ......
Page 18: ......
Page 20: ......
Page 22: ......
Page 24: ......
Page 28: ......
Page 40: ......
Page 44: ......
Page 48: ......
Page 52: ......
Page 56: ......
Page 60: ......
Page 64: ......
Page 68: ......
Page 72: ......
Page 76: ......
Page 80: ......
Page 84: ......
Page 88: ......
Page 92: ......
Page 96: ......
Page 100: ......
Page 102: ......
Page 106: ......
Page 110: ......
Page 114: ......
Page 118: ......
Page 122: ......
Page 126: ......
Page 130: ......
Page 134: ......
Page 138: ......
Page 142: ......
Page 146: ......
Page 150: ......
Page 154: ......
Page 156: ......
Page 162: ......
Page 164: ......
Page 170: ......
Page 171: ...ScanMate 4000 Type 250 Circuit Connection Diagram ...
Page 172: ...ScanMate 5000 Type 210 Circuit Connection Diagram ...
Page 174: ......


