RTC
®
4 PC Interface Board
Rev. 1.3 e
5 Advanced Programming
48
innovators for industry
Timing
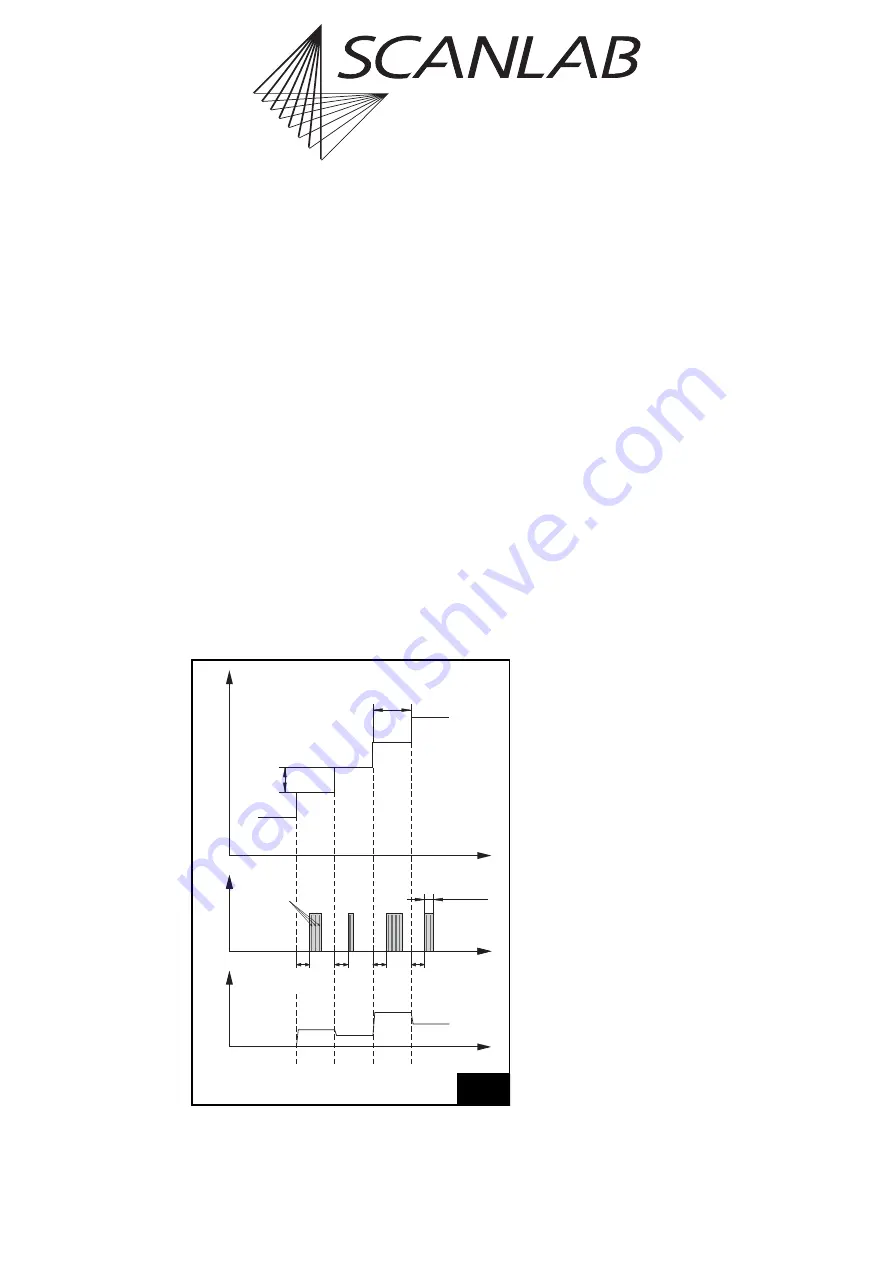
shows the pixel output timing diagram.
Each LASERON pulse is preceded by a LaserOn delay.
The ANALOG OUT2 signal is synchronous to the
position update of the scanners. (Please refer to the
section
for details.)
Note:
The DA converter requires about 1
µ
s … 2
µ
s to
produce a stable analog output signal.
The pixel step period T is set with the command
. To avoid laser control faults, make
sure that the following holds true for all pixels:
T > LaserOn Delay + maximum pulse width
Note
The 9-pin D-SUB laser connector of the RTC
®
4
provides the signals LASER1 and LASERON
or
ANALOG OUT2. If the ANALOG OUT2 signal is to be
used, jumper
X7
must be set to position 2-3. See
chapter 8.2 "Changing The Jumper Settings",
page 59
.
If you need the LASERON signal a
nd
the ANALOG OUT2
signal, then you have the possibility (with an RTC
®
4
including the Processing-on-the-fly option only) of setting
jumper X7 to position 1-2 and taking the signal
ANALOG OUT2 from pin 14 of the MARKING ON THE FLY
connector.
Laser Parameters
The LaserOn delay must be set to a suitable value.
See the section
The standby pulses should be turned off in pixel
mode (command
).
Usually each pixel is marked with one pulse. To
accomplish this, the pulse width and output
period of the LASER1 / LASER2 signal should be
set to values larger than the pixel output period T
(command
Thus the LASER1 / LASER2 signal will stay active
and the laser is controlled by the LASERON signal
only.
Also see the section
.
The FirstPulseKiller signal should be set to zero
(YAG modes only).
20
Scanner Set P
osition
LASERON
/LASER1
ANALOG OUT2
Time
Pixel Step Period T
dx,
dy
Pulse Width
LaserOn
Delay
Time
Time
Individual
pulses of the
LASER1 signal
(Laser Control
Method C)
Timing of the scanner positions and the
laser control signals in the pixel output mode.
Also see section
.


