background image

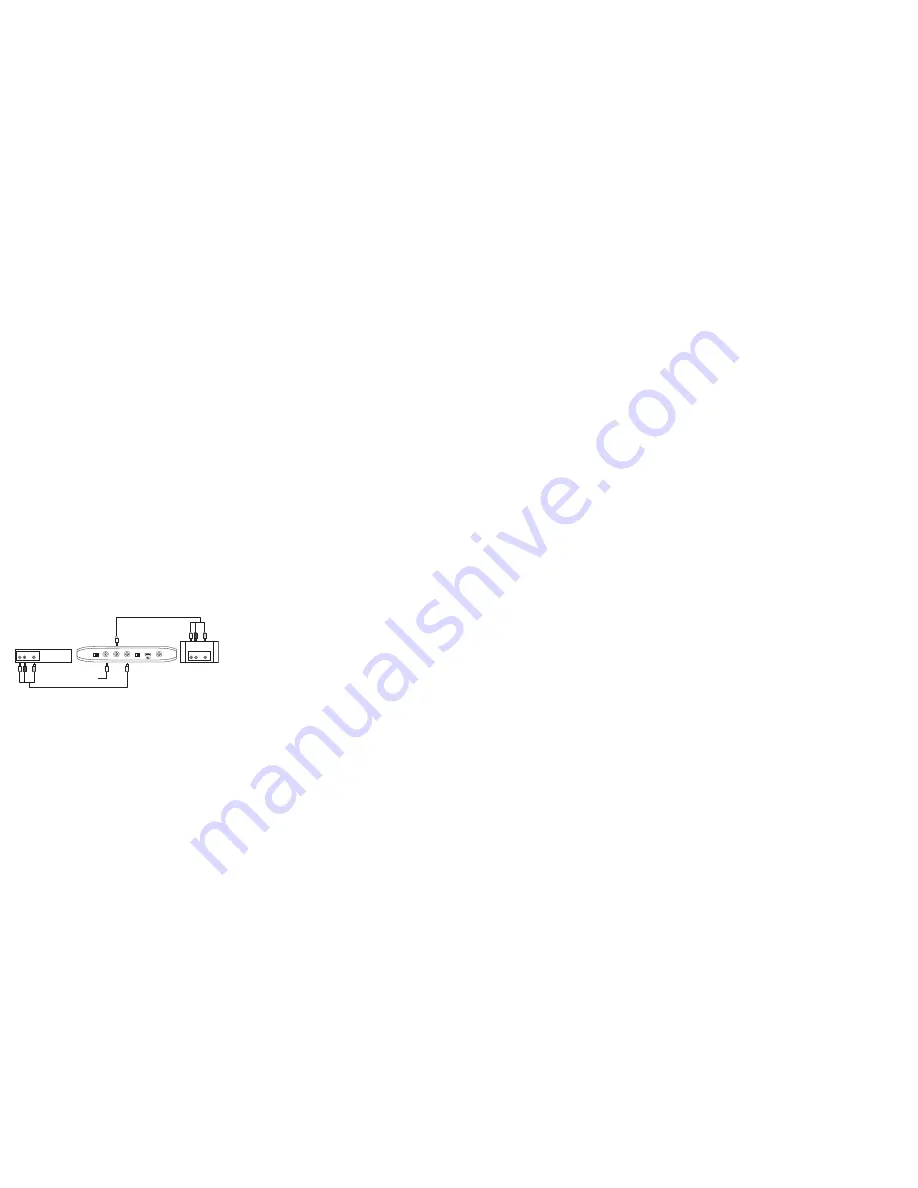
4.  Plug the Power Supply into the back of the V-Mate and plug the power supply into a 

power outlet.

5.  Check the position of the NTSC/PAL switch on the back of the V-Mate. The selected 

position should match with the type of TV. Please consult the manual/specifications of 
the TV for details.

6. Move the power switch on the back of the V-Mate into the ON position.

7. Pull the plastic strip out of the remote control to activate the battery.

8.  Press the power button on the remote and the V-Mate will start up (the blue slot LEDs 

blink and the green power LED stays on).

9.  Turn on the TV and the video source box and change the input source on the TV. 

Depending on the TV, the input source may be called TV/Video, Input, or Source 
(consult the TV manual for more information). When the correct source is selected, you 
will see a message to insert a memory card. When the V-Mate is turned off (standby) 
from the remote control or on the back of the unit, the video signal from the video 
source box will be displayed on the TV screen. The V-Mate is now correctly connected

  •  Resolution (the higher the resolution, the bigger the video width and height)

  • Frame rate (the higher the frame rate, the smoother the video runs)

6.  In order to schedule recordings and to let the V-Mate record programs while you are 

not present, the Infrared Emitter needs to be set up to work with your cable/satellite/
terrestrial receiver box or VCR. 

  A.   Go to SETTINGS 

 IR EMITTER and follow the on-screen instructions. It can 

take more than 10 minutes before V-Mate has finished the setup. Therefore do not 
interrupt the process but wait and follow the on-screen instructions.

7. To adjust the Date and time, go to SETTINGS 

 Date & Time

Recording with the V-Mate*

To record a video file, go to RECORD NOW in the main menu or press the record button 
on the remote control. The recording screen bar will appear with the video stream that 
comes from the source box that is switched on and connected to V-Mate. Press the record 
button and the timer will start counting up, indicating that the video is being recorded. The 
LED indicator next to the slot in which a card is inserted is blinking indicating that data 
is being written to the card. DO NOT REMOVE THE CARD WHEN THE INDICATOR IS 
BLINKING AS IT MAY DAMAGE THE CARD AND CORRUPT THE VIDEO FILE. To stop a 
recording, press the Stop button.

When pressing OK in the recording screen bar, you can set the duration of the recording. 
Use the arrow keys to set the recording length and then press OK to start the recording. 
The timer* starts to count down indicating that the video is being recorded. It shows how 
much time is left till V-Mate will stop the recording.

*  During recording in 640x480 resolution, there will be no recording screen bar visible. 

With V-Mate version 20-90-3112WW, the video being recorded will be displayed full 
screen. The blue LED next to the card slot will be blinking to indicate that the recording 
is ongoing. You can find the 20-90 number on the rubber label on bottom side of your V-
Mate. V-Mate versions 20-90-03081WW and 20-90-03112WW will show a black screen 

Setting the V-Mate

1.  Make sure a compatible memory card is inserted. Only insert one memory card at a time.

2.  In the next screen follow the instructions to set the date and time (accurate time 

and date settings are required for scheduled recordings). When the power supply is 
disconnected, the clock in the V-Mate will reset. When the V-Mate is turned on again, a 
message will come up requesting to set the clock. After the time is set, or you select to 
skip this, the main menu will appear. 

3. To change the language of the user interface, go to SETTINGS 

 Language

4.  This User Guide is based on firmware version “02.07.ww.b4”. To check what version 

is installed on your V-Mate, go to SETTINGS 

 FIRMWARE. To install new firmware, 

go to www.sandisk.com/vmate, click on the firmware update link and follow the 
instructions.

5.  In order to create a video recording file that is compatible with your playback device, 

you need to set the appropriate recording settings. You can do this manually, by 
selecting your playback device from a list or by inputting a code. To select from a 
list, select SETTINGS and then RECORDING FORMAT. Select the appropriate 
category for your playback device, then its brand and finally its model number (if 
applicable). New playback devices are being released on a daily basis and therefore 
not every compatible device is listed in the firmware. If your playback device is not 
listed, go to www.sandisk.com/vmate and click on the link to the recording format 
code list. Look up the code for your device. Then in the V-Mate user interface, go to 
SETTINGS 

 RECORDING FORMAT 

 RECORDING FORMAT CODE and follow 

the on-screen instructions. Settings can be manually adjusted by selecting SETTINGS 

 RECORDING FORMAT 

 MANUAL SETTINGS. The following settings can be 

manually adjusted:

  • Quality (the higher the quality, the sharper the video)

  • Format (different playback devices often work with different video formats)

with “REC” displayed in the top left corner to indicate the V-Mate is recording. Also the 
blue LED next to the card slot will be blinking. You can hear the audio. To see the video 
signal while recording in VGA resolution, you can setup a direct connection between 
the video source box (2nd AV output is required) and the TV (2nd AV input is required). 
This requires an extra AV cable (not included) and on the TV side you need to switch 
between the two AV inputs (consult your TV user guide for details).

To schedule a recording, go to SCHEDULE RECORDING in the main menu and select a 
time slot (you can program a maximum of 30 time slots). With the cursor keys and the OK 
button set the date, channel, start time, stop time, the frequency (ONCE—for one time 
recording, DAILY—for daily recording, WEEKLY—for weekly recording), and whether 
the scheduled recording should be active. When a scheduled recording is active (YES 
is selected), the recording will take place as programmed. When a scheduled recording 
is not active (NO is selected), the recording will NOT take place (this way you can easily 
turn on/off scheduled recordings without deleting them completely and then setting it 
up later again). If you program multiple time slots, make sure there is no overlap in the 
recording time. To delete a time slot, select the time slot and press the Delete button on 
the remote control.

After the recording has stopped and the indicator has stopped blinking, you may remove 
the card from the V-Mate and insert it in your playback device. Consult the manual of 
your playback device on how to insert a card and playback video files from the card.

Unauthorized recording of copyrighted materials may infringe on the rights of the 
copyright owners and violate copyright laws.

OFF/ON

5v DC

IN

OUT

AV

PAL/NTSC

IR Emitter

Video Source

Box (back)

TV

AV Cable (IN)

AV Cable (OUT)

AC Adapter

AUDIO OUT

VIDEO OUT

AUDIO IN

VIDEO IN

Summary of Contents for SDVM1AA30

Page 1: ...S Tech Support 1 866 SANDISK 726 3475 Worldwide Tech Support www sandisk com techsupport 80 36 02733 In remembrance of Simon Wang 1977 09 12 2006 09 03 OEM Project Manager SanDisk V Mate Video Memory...

Page 2: ...ns the responsibility of the user of the product Contents English 2 Nederlands 10 Fran ais 18 Italiano 26 Deutsch 34 Spanish 42 50 Portugu s 58 With respect to a Licensee offering MPEG 4 Video Decoder...

Page 3: ...ement of the obsolete outlet Protect the power cord from being walked on or pinched particularly at plugs convenience receptacles and the point where they exit from the apparatus Only use attachments...

Page 4: ...n the power supply is disconnected the clock in the V Mate will reset When the V Mate is turned on again a message will come up requesting to set the clock After the time is set or you select to skip...

Page 5: ...ted by SanDisk You must obtain a tracking confirmation number which you may be required to provide to SanDisk SanDisk will at its option repair or replace the product with new or refurbished product o...

Page 6: ...talleert en gebruikt Voor gebruik thuis en voor persoonlijk amusement Dit product dient voor opnemen en afspelen bij u thuis voor persoonlijk amusement Het kopi ren en voor commerci le doeleinden gebr...

Page 7: ...everde stekker niet in uw stopcontact past moet u het verouderde stopcontact door een elektricien laten vervangen Pas op dat er niet op het snoer gelopen wordt en dat het niet afgekneld wordt met name...

Page 8: ...schijnt er een bericht dat u vraagt de klok in te stellen Nadat u de tijd hebt ingesteld of u deze functie hebt overgeslagen verschijnt het hoofdmenu 3 Om de taal van de gebruikersinterface te wijzige...

Page 9: ...k reparatie door onbevoegden modificatie of ongelukken Om service volgens de garantievoorwaarden te verkrijgen neemt u contact op met SanDisk op het nummer 1 866 726 3475 of stuurt u een e mail naar s...

Page 10: ...fonctionnement du V Mate Pour usage personnel et domicile Ce produit est con u pour l enregistrement et la lecture aux fins de divertissement personnel et chez soi Il est possible que la reproduction...

Page 11: ...comporte deux lames et une broche de mise la terre La lame large ou la broche est con ue pour assurer votre s curit Si la fiche fournie n entre pas dans votre prise adressez vous un lectricien pour r...

Page 12: ...irectives affich es Le V Mate peut prendre plus de dix minutes pour terminer la configuration N interrompez surtout pas le processus mais patientez et suivez les directives affich es 7 Pour r gler la...

Page 13: ...achetant son produit aupr s de SanDisk ou d un distributeur agr et elle n est pas transf rable Il est possible qu une preuve d achat soit demand e Ce produit doit tre utilis avec des cartes m moire co...

Page 14: ...ell utente Versione 1 1 Si pu registrare questo prodotto sul sito www sandisk com registration e ricevere avvisi e mail sulle nuove versioni del firmware per il videoregistratore a schede di memoria V...

Page 15: ...incolumit dell utente Se la spina in dotazione non si adatta alla presa disponibile rivolgersi a un elettricista Proteggere il cavo di alimentazione in modo che non ci si cammini sopra e che non veng...

Page 16: ...mentatore l orologio del V Mate si azzera e quando si riaccende il V Mate compare un messaggio che richiede di impostare l orologio Una volta impostate la data e l ora o dopo che si decide di saltare...

Page 17: ...a installazione impropria abuso riparazione non autorizzata modifica o incidente Per richiedere un intervento in garanzia contattare la SanDisk al numero 1 866 SanDisk o inviare un e mail a support sa...

Page 18: ...Mate installieren und verwenden k nnen F r private Zwecke Dieses Produkt ist f r Aufnahme und Wiedergabezwecke im privaten Bereich vorgesehen Das Kopieren und die kommerzielle Verwendung von urheberr...

Page 19: ...tromkabel so aus dass es nicht im Weg liegt und nicht versehentlich geknickt wird insbesondere in der N he der verwendeten Steckdose bzw Mehrfachsteckdose und am Kabelanschluss direkt am Ger t Verwend...

Page 20: ...ideobild Bildrate je h her die Bildrate desto ruhiger ist die Videowiedergabe 6 Damit V Mate die Videoaufnahmen starten kann die w hrend Ihrer Abwesenheit zu programmierten Terminen durchgef hrt werde...

Page 21: ...ideoLAN VLC RealNetworks RealPlayer 10 oder h her oder Apple QuickTime 6 oder h her mit den neuesten Softwareupdates Fehlerbehebung Antworten auf h ufig gestellte Fragen und andere Supportinformatione...

Page 22: ...zu DIE OBIGEN ANGABEN BESCHREIBEN DIE GARANTIEVERPFLICHTUNGEN VON SANDISK IN VOLLEM UMFANG SANDISK LEHNT IM GESETZLICH ZUL SSIGEN RAHMEN ALLE WEITEREN AUSDR CKLICHEN UND STILLSCHWEIGENDEN GARANTIEN A...

Page 23: ...e seguridad Si el enchufe proporcionado no cabe en la toma de corriente consulte con su electricista para reemplazar la toma anticuada Proteja el cord n el ctrico para evitar que se pise o que se pell...

Page 24: ...0 minutos para que V Mate complete la configuraci n Por lo tanto aseg rese de no interrumpir el proceso y esperar y seguir las instrucciones en pantalla Configuraci n de V Mate 1 Aseg rese de haber in...

Page 25: ...ompre el producto a SanDisk o a un distribuidor autorizado y no es transferible Podr a requerirse comprobante de compra Este producto debe usarse con tarjetas de memoria que cumplan las especificacion...

Page 26: ...l MultiMediaCard RS MMC MMCplus y MMC mobile son marcas comerciales de MultiMediaCard Association Memory Stick Memory Stick PRO Memory Stick Duo y Memory Stick PRO Duo son marcas comerciales de Sony C...

Page 27: ...tage MMCplus MMCmobile Memory Stick Memory Stick PRO Memory Stick Duo Memory Stick PRO Duo 3 5 3 5 USB mini B RCA NTSC PAL RCA DVD Windows Pentium USB Windows 2000 XP Vista Macintosh USB Mac OS 10 1 2...

Page 28: ...GS RECORDING FORMAT MANUAL SETTINGS 6 V Mate V Mate 1 2 V Mate V Mate 3 SETTINGS Language 4 02 07 ww b4 V Mate SETTINGS FIRMWARE www sandisk com vmate A SETTINGS IR EMITTER V Mate 10 7 SETTINGS Date T...

Page 29: ...me 6 V Mate www sandisk com retail support asp 866 SANDISK 866 726 3475 7 MPEG 4 i MPEG 4 MPEG 4 VIDEO ii MPEG 4 MPEG LA MPEG 4 MPEG LA LL HTTP WWW MPEGLA COM SanDisk SanDisk CompactFlash Card Associa...

Page 30: ...toral sem permiss o do detentor de tal direito pode ser proibido por lei O uso do V Mate em conformidade com todas as leis de propriedade intelectual e direito autoral s o de responsabilidade do utili...

Page 31: ...dente mais largo ou o terceiro dente destina se sua seguran a Caso o tamp o fornecido n o se encaixar na sua tomada consulte um electricista para substituir a tomada obsoleta Proteger o fio el ctrico...

Page 32: ...justar Quando o V Mate for novamente ligado surgir uma mensagem requisitando a defini o do rel gio Ap s da defini o de hor rio surgir o menu principal 3 Para mudar o idioma da interface de utilizador...

Page 33: ...bter assist ncia t cnica coberta pela garantia entrar em contacto com a SanDisk atrav s do n mero 1 866 SanDisk ou enviar um e mail para support SanDisk com O produto deve ser enviado em embalagens re...

Reviews: