


26 S&C Instruction Sheet 661-500
Appendix A
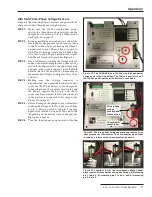
Complete the following steps to manually set the time
of day:
STEP 1.
Push and hold the DOWN pushbutton until the
RTC TIM
mode displays on the LCD screen.
When the mode appears, immediately release
the pushbutton.
STEP 2.
When the pushbutton is released,
RTC TIM
mode is active, and the configured time will be
displayed. The time is in 24-hour format
(HH:MM:SS). The hour position will be flashing
and is ready to be configured. Repeatedly push
the UP pushbutton to increment the number, if
necessary.
NOTICE
The UP pushbutton increases the value of
the digit by 1 . At the maximum value (23 for
hour), the next push goes to the minimum
value (0 for hour) . Certain digit positions
within the configurable value do not follow the
0-through-9 concept; they instead have
their own configurable values .
STEP 3.
To select another position, push the DOWN
pushbutton, which will move the flashing
position to the right. Push it again to go to
another position to change its value.
STEP 4.
When the desired value is entered, repeatedly
push the DOWN pushbutton until the screen
displays “SAVE.”
STEP 5.
If the time of day is correct, push the UP
pushbutton to store this value.
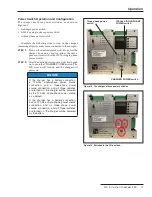
RESET Pushbutton
The RESET pushbutton is used to clear external alarms
caused by these battery conditions:
• Battery Bad
• Battery Removed/Battery with Open Cells
NOTICE
If the battery has been replaced or rewired to the
charger, the user is required to push the RESET
pushbutton to allow the battery to connect to the
charger .
Pushing the RESET pushbutton does not cycle the
power to the charger .
The RESET pushbutton will not clear all alarm conditions.
The following alarm conditions do not require a push of
the RESET pushbutton but will clear when the condition
is no longer active:
• Battery under voltage
• Battery over voltage
• Ac present
• Charger over voltage