background image

the basics 

_ 11

01 THE BASICS

the basics

WHAT’S INCLUDED

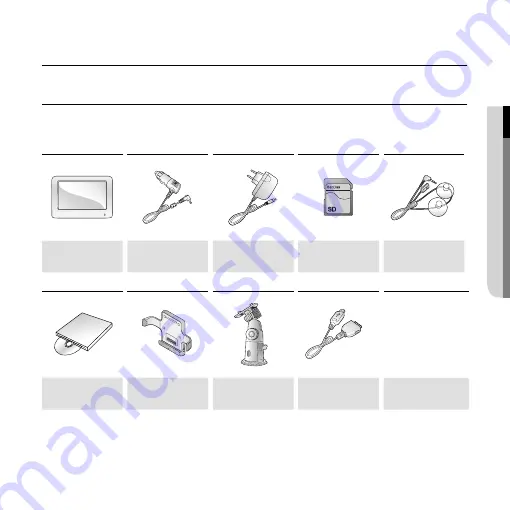
Your new Personal Navigation Device comes with these accessories.
If you’re missing any of these items, contact a Samsung Service center near you. 

Personal 
Navigation Device

Car Charger

Power Adapter

SD Memory Card

TMC antenna

Installation CD

Car Cradle

Cradle

USB Cable

Carrying Case 
(YP-N1BZ only)

The accessories in your box may look slightly different than these. 

Summary of Contents for YP-N1

Page 1: ...Personal Navigation Device user manual YP N1 ...

Page 2: ... the receiver based on the signals from 4 or more GPS satellites EASY TO USE NAVIGATION The easy to use intuitive menu enables users to use the various functions easily while driving a car FAST AND PRECISE PATH SEARCH You can find the optimal path to stopover and destination so that you can reach the destination faster and more conveniently If you drive away from the recommended path new path is a...

Page 3: ...ric shock or personal injury when using your product follow these basic safety precautions NOTE Means hints or referential pages that may be helpful to operate the player Do NOT attempt Do NOT disassemble Do NOT touch Follow directions explicitly Unplug the power plug from the wall socket Call the service center for help These warning signs are here to prevent injury to you and others Please follo...

Page 4: ...the power cord or placing a heavy object over the power cord Do not get the product wet or drop it in water If the product gets wet do not switch it on because you could get an electric shock Instead contact a Samsung Service Center near you Do not place the product in damp dusty or sooty areas because these environments could lead to fire or electric shock Do not pull the power cord out by holdin...

Page 5: ...t or place heavy objects on top of it Prevent any foreign particles or dust from entering into the product Do not place the product near magnetic objects Do not remove the SD memory card during operation of the navigation system Be sure to backup important data Samsung is not responsible for data loss Use only accessories provided by or approved by Samsung Start the engine after disconnecting the ...

Page 6: ...on The position indicated by the GPS may be incorrect depending on the surrounding terrain condition and weather In this case since the current location is incorrect the route guide may provide incorrect information For newly built or expanded roads the route guidance may provide incorrect information In this case correct information will be given by the route guidance as soon as the road of the m...

Page 7: ...g the car charger 21 Hardware power on off switch 22 Using SD memory card 24 Installing external type GPS antenna Not Supplied 25 Installing TMC antenna 26 Changing the settings and preperences 26 Map Settings 28 Display Settings 30 Route Settings 31 Sound Settings 32 General Settings 34 Language Unit Settings 35 System Settings 36 About 37 Usingnavigation system 37 Zooming in out the map 38 Contr...

Page 8: ...rite 45 Saving the location of safety camera 46 Saving the locations of home and work place 47 Finding an address 48 Finding home or workplace 49 Finding out favorites 50 Finding a recently visited place 51 Finding POI point of interest 53 Coordinates 54 Route settings 54 Recalculate 55 Itinerary 56 Edit route 58 Clear route 58 Route Info 59 Simulation 59 Turn view 60 Manage track logs ...

Page 9: ...r a mobile phone 67 To search for a new mobile phone 67 To remove a mobile phone from the list 67 To rename a device 68 To redial using the recent call number 68 To answer an incoming call 68 To switch a call 69 To switch to the mobile phone while talking on the hands free device YP N1 69 To switch to the hands free device YP N1 while talking on the mobile phone 69 To disconnect the mobile phone 7...

Page 10: ...TING TO YOUR PC 71 71 PC requirements 72 Connecting to your PC 73 Disconnecting from your PC 74 Using the map manager TROUBLESHOOTING 76 APPENDIX 79 79 Menu tree 80 Product specifications 82 Contact samsung world wide ...

Page 11: ...e accessories If you re missing any of these items contact a Samsung Service center near you Personal Navigation Device Car Charger Power Adapter SD Memory Card TMC antenna Installation CD Car Cradle Cradle USB Cable Carrying Case YP N1BZ only The accessories in your box may look slightly different than these ...

Page 12: ...y Fixing Groove Use it to fix the main body on the cradle USB Connection port Battery indicator It is turned on when the power adapter or car charger is connected Charging Red Charge Complete Green Power Connection port Connect the power adapter or car charger here Fixing Groove Use it to fix the main body on the cradle ...

Page 13: ...y card slot Fixing Groove Use it to fix the main body on the cradle Speaker Cradle connecter terminal Port connecting the main unit and the cradle Hardware Power On Off switch To use the device on the built in battery power without connecting an external power source you have to slide the Hardware Power On Off Switch to On Fixing Groove Use it to fix the main body on the cradle ...

Page 14: ...peaker and power connections Power connection port Microphone Speaker TMC connection port If you connect a TMC antenna traffic and living information is provided External microphone connection port You can connect a microphone and use it to talk over the phone using the Bluetooth function YP N1BZ only Cradle fixing grooves Fixing Groove used to fix the cradle over the stand ...

Page 15: ... _ 15 01 THE BASICS USING THE TOUCH SCREEN Tap on over the screen with your finger tips Using a sharp object to tap on on the screen may cause damage to it Avoid tap on the touch screen with dirty fingers CAUTION ...

Page 16: ...ity View Map button Route button Mobile phone button Settings button GPS button Zoom In Zoom Out Button Volume Control button Show Hide Setup Route Buttons Compass MENU button The Blue tooth function supports only these models YP N1BZ 1 2 3 4 7 8 9 5 6 10 11 NOTE 16 _ the basics 12 13 14 5 6 1 2 7 8 4 3 13 9 10 12 14 11 ...

Page 17: ...ert the main unit into the cradle Put the main body into the cradle until it clicks at the both side of the fixing parts in order to secure the installation 4 Adjust the angle of the support to facilitate your visibility Release the adjustment screw 1 counterclockwise slightly and adjust the angle between the 180 degrees in vertical and 360 degrees in horizontal If you find a comfortable angle fas...

Page 18: ...e projected part The cradle is separated Install the cradle to a position that does not block driver s field of vision and will not cause an injury of the driver or follow passenger even if it falls Note that the adsorption of the suction cup may decrease when the temperature difference between outside and inside is high Separate the cradle from the vehicle for long time of no use The adsorption o...

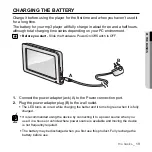
Page 19: ... Power On Off Switch to OFF 1 Connect the power adapter jack A to the Power connection port 2 Plug the power adapter plug B to the wall outlet The LED turns on in red while charging the better and it turns to green when it is fully charged It is recommended using the device by connecting it to a power source when you use it in a house or vehicle where power source is available and moving the devic...

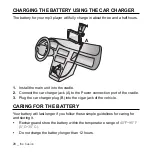
Page 20: ...ect the car charger jack A to the Power connection port of the cradle 3 Plug the car charger plug B into the cigar jack of the vehicle CARING FOR THE BATTERY Your battery will last longer if you follow these simple guidelines for caring for and storing it Recharge and store the battery within the temperature range of 40 F 95 F 5 C 35 C Do not charge the battery longer than 12 hours A B ...

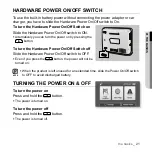
Page 21: ...tively you can turn the power on by pressing the button To turn the Hardware Power On Off Switch off Slide the Hardware Power On Off switch to OFF Even if you press the button the power will not be turned on When the product is left unused for an extended time slide the Power On Off switch to OFF to avoid discharged battery TURNING THE POWER ON OFF To turn the power on Press and hold the button Th...

Page 22: ...pops up Inserting the SD memory card Insert the SD memory card as shown by the figure Insert SD memory card so that the label faces forward write protection switch A SD card supports a mechanical write protection switch Setting the switch prevents accidental erasure of files recorded on the SD card To enable writing move the switch up to the direction of terminals To set write protection move the ...

Page 23: ...le the navigation system is running Do not insert a memory card upside down or in a wrong direction Unsupported memory cards Some SD memory cards if thick out of the specification or with a label attached onto it may not be removed This product supports up to 4GB of memory capacity Memory cards other than SD such as T Flash are not supported When you keep or carry a memory card package it with the...

Page 24: ...ensitivity 1 Connect the GPS antenna jack A to the GPS antenna input connection port of the main unit 2 Install the GPS antenna B on the roof of the vehicle or a metal part of the hood 3 Arrange the GPS antenna cable so that it will not disturb driving The external type GPS antenna is unbundled You can purchase one in a navigation device shop Recommended GPS antenna models SD NOTE ...

Page 25: ...traffic and living information 1 Clean up the windshield 2 Attach the TMC antenna A to the windshield 3 Connect the TMC antenna jack B to the TMC connection port C of the cradle Arrange the TMC antenna cable so that it will not disturb your driving In some areas the TMC reception sensitivity may not be good enough NOTE ...

Page 26: ...our product Map Settings You can configure map settings such as View Mode Day Night Mode Map Color etc 1 Tap Settings button in the main menu The Settings window appears 2 Tap Map button The Map settings window appears 3 Configure the settings you want by tapping on a desired button Tap button to move to the previous screen If you tap View Map button in the Map Settings window you can move to the ...

Page 27: ... tap OK button Auto mode automatically switches to Day or Night mode according to the actual time Time is automatically set through GPS Map Color Select a map color by tapping on the button and select the OK button Display Options Select one from Alternative Road Names Show Street Labels and Textured Polygons and tap OK button Alternative Road Names determines which road name will be displayed whe...

Page 28: ... Brightness etc 1 Tap Settings button in the main menu The Settings window appears 2 Tap Display button The Display settings window appears 3 Configure the settings you want by tapping on a desired button Tap button to move to the previous screen If you tap View Map button in the Display Settings window you can move to the map screen NOTE ...

Page 29: ... off Select one from Always On 15 Sec 30 Sec and 1 min and tap OK button LCD Calibration If the tapping point is incorrectly set you can reset it into focus Pop up Info You can determine whether to display information such as address firm name etc Select either On or Off LCD Calibration Settings 1 Tap LCD Calibration button The LCD calibration confirmation screen appears 2 Point on the center of f...

Page 30: ...icycle and tap OK button Avoidances Select one from Unpaved Roads Motorways Ferries U turns Permit needed Toll roads not to listen to information about the selection in the route guidance and tap OK button Off Route Recalculation Select one from Automatic Ask First and Off and tap OK button The Automatic option automatically finds a new route when you drive out of the recommended route The Ask Fir...

Page 31: ...e up while tapping on the button turns the volume down To select the Mute function press the button so that the icon appears To cancel the Mute function tap button so that the icon changes to Dynamic Volume You can setup the volume so that the volume rises as the velocity increases Select On to automatically adjust the volume according to the velocity Select Off to keep the volume level steady Tou...

Page 32: ... settings 1 Tap Settings button in the main menu The Settings window appears 2 Tap General button The General settings window appears 3 Configure the settings you want by tapping on a desired button Tap button to move to the previous screen If you tap View Map button in the General Settings window you can move to the map screen NOTE ...

Page 33: ...e Example If you set the Speeding tolerance option to 10 an alarm sounds when you drive faster than 88km on a road where the speed limit is 80km Using the Alternative speed limit option you can setup a speed limit in Km h Enable Safety Cameras You can determine whether to display the Safety Cameras speedcam Select either On or Off If you set the Enable Safety Cameras option to On a confirmation me...

Page 34: ...Settings window you can move to the map screen Language setting options Menu language You can select a language for the screen display English AU English UK English US Español Français Hebrew Hrvatski Italiano Magyar Nederlands Norsk Polski Português Română Slovenský Suomi Svenska Türkçe Vlaams Ελληνικά Voice language You can select a language and voice type male female for the voice guidance Time...

Page 35: ...from Main Menu Map and Find Location and tap OK button Keyboard settings You can setup the keyboard to be displayed on the text input screen Demonstration You can view a driving simulation User Data Management You can save data such as route and user settings into an SD memory card and read and delete the data saved in the memory card Select one from Backup Data Restore Data and Clear Data and tap...

Page 36: ...The Settings window appears 2 Tap About button The About window appears You can view model name firmware version and serial number For the procedures to upgrade the firmware refer to the firmware upgrade instructions X Page 69 3 Tap on the Licenses tab You can view available maps 4 Tap on the Maps tab You can view area supported by the navigation function Tap button to move to the previous screen ...

Page 37: ...is automatically searched for 4 Start driving The navigation system starts automatically ZOOMING IN OUT THE MAP You can zoom in or out the map To zoom in or out tap or button on the right side of the map Tapping on the button zooms in the map while tapping on the button zooms out the map If you select Settings General and set Smart Zoom to On The map is automatically zoomed in when you turn your v...

Page 38: ... volume control window appears 2 Adjust the volume by tapping on the and buttons Tapping on the button turns the volume up while tapping on the button turns the volume down To use the Mute function Tap button in the volume control menu If the icon changes to the sound will be muted To cancel the Mute function tap button so that the icon changes to ...

Page 39: ...such as accuracy position etc 1 Tap button on the right side of the map The GPS information screen appears 2 To view traffic information tap Traffic Info button Traffic Events are listed Distance You can view traffic information near you first Type You can view traffic information by type ...

Page 40: ...ING THE SYSTEM When the product does not work properly or cannot be turned off you can reset the product Press the Reset hole with a sharp object The system will be initialized Your settings and data will not be affected SD ...

Page 41: ... menu You will see a map on the screen 2 Select a desired destination by tapping on or dragging it 3 Tap Route To button The route from the current location to destination is automatically searched for The current location is marked with a blue flag and the destination is marked with a red flag 4 Start driving The navigation system starts automatically If the Calculating route message appears plea...

Page 42: ...n menu You will see a map on the screen 2 Select a start point by tapping on or dragging it 3 Tap Start button The start point will be marked with a blue flag 4 Select a desired destination by tapping on or dragging it 5 Tap Route To button The route from the start point to the destination is automatically searched for The destination is marked with a red flag ...

Page 43: ... route is recalculated You can add stopovers on and on REMOVING A STOPOVER You can delete a start point destination or stopover 1 Select a stopover to delete on the map 2 Tap Remove Via button The selected stopover is removed CHANGING THE FINAL DESTINATION You can change a final destination 1 When the navigation route is set select a final destination by tapping on or dragging it 2 Tap Continued b...

Page 44: ...orite location name and address confirmation window appears Favorite options Rename You can rename a Favorite location name Delete You can delete a saved location from Favorite When the deletion confirmation message appears select Yes or No View Map You can view the Favorite location on the map The Favorite location is marked with the icon To search for a saved Favorite location search for the loc...

Page 45: ...p Save button The Save window appears 3 Tap Safety Cameras button The Safety Cameras setup window appears 4 Set the camera type direction and speed and tap OK button When done the product will return to the previous menu Safety Camera options Camera Type allows you to set the type of the safety camera Fixed Removable Red light Section a section detection camera that measures the average speed betw...

Page 46: ...me and workplace Let us take a home for example 1 Select a desired location by tapping on or dragging it You can also search for a location you want by using the Find Location function See page 51 57 2 Tap Save button The Save window appears 3 Tap HOME button The selected location is saved To find out the location of home or workplace navigate in Find Location HOME or WORK in the main menu See pag...

Page 47: ...nter the street number and tap Done button The selected address will be displayed in a map Address options Other City allows you to search for other city Clear allows you to remove the list of recently visited cities Find intersection allows you to search for an intersection Change Country allows you to search for other country City center you can use the map to mark the center of a specific city ...

Page 48: ...he locations of both home and workplace Let us take a home for example 1 Tap Find Location button in the main menu The Find Location window appears 2 Tap Home button Mark the location of your home on the map If the location of home or workplace is not memorized 1 Tap Find Location button in the main menu The Find Location window appears 2 Tap Home button The setting confirmation message appears 3 ...

Page 49: ...OK button The selected location is marked on the map Locations in the Favorites list are marked with the icon Favorites options ABC Distance tapping on the ABC button will sort the list in alphabetical order Tapping on the Distance button will sort the list from the nearest to the farthest Search the character input mode appears You can enter an address in the Favorite list to find it out View Fav...

Page 50: ...the main menu The Find Location window appears 2 Tap Recent Location button The Recent Location list appears 3 Select a desired address in the Recent Location list Using the buttons to move up or down The selected location is marked on the map Recent Location option Clear allows you to remove the list of recently visited places ...

Page 51: ... transportation facilities such as airports and railway stations and etc Shopping you can find shopping malls outlets etc Entertainment you can find leisure places such as parks zoos and cinemas Culture you can find places for cultural life such as museums concert halls libraries etc Sports Recreation you can find recreation places such as golf clubs swimming pools gymnasiums etc Emergency Governm...

Page 52: ...he map Destination indicates the predefined location Address enables you to find a place by the address 5 Tap on a desired address Using the buttons to move up or down The View POI window appears Dial you can use Bluetooth to place a phone call by selecting a number in a phone book if any YP N1BZ only 6 Tap on OK to check your current position on the map The selected location is marked on the map ...

Page 53: ...o select latitude or longitude 5 Tap button to delete a number Numbers are cleared one by one from the end The letters of N S E W are not cleared 6 Enter numbers and symbols using the keyboard and tap Done button The input coordinates of latitude and longitude are marked on the map Coordinate option Change Unit you can select a display form of latitude and longitude Select a desired item and tap o...

Page 54: ... The Route window appears 2 Tap Recalculate button You will see the Route Recalculation window 3 Select a desired item Recalculate options Recalculate reconfigures a set route Bypass You can choose to block the calculated route for a given distance and force an alternative route Select either 1 km 2 km 5 km 10 km or 30 km Clear Route clears a set route Drop next via Drop next via the Drop Next Via...

Page 55: ...t of itinerary Route Summary you can view a summary of distances and addresses for each stopover Itinerary options Show tapping on the Show button under Itinerary will mark the selected location on the map Mode select one from Detailed Instructions Instructions and Route Summary Avoid you can configure the navigation settings so that you can bypass a traffic congestion Select one from Manoeuvre Ro...

Page 56: ...Route window appears 2 Tap Edit Route button The Edit Route list appears 3 Tap Add button The Find Location window appears 4 Refer to pages 51 to 57 to add a route To delete a route 1 Tap Route button in the main menu The Route window appears 2 Tap Edit Route button The Edit Route list appears 3 Select a route to delete in the Edit Route list 4 Tap Delete button The selected route will be removed ...

Page 57: ...ist appears 3 Tap Optimise button This will set the most effective route regarding distance time and fuel to take To change the order of route 1 Tap Route button in the main menu The Route window appears 2 Tap Edit Route button The Edit Route list appears 3 Select a route to change the order of in the Edit Route list 4 Tap Up or Down button Tapping on Up will move one level up in the list and Down...

Page 58: ...can check the distance time to take and estimated arrival time of a set route 1 Tap Route button in the main menu The Route window appears 2 Tap Route Info button The Route Information window appears You can check the distance time to take and estimated arrival time of a set route Route Info options Fit To Screen displays a set route on the map so that it fits the screen Parameters you can set rou...

Page 59: ...button in the main menu The Route window appears 2 Tap Simulation button The Simulation window appears Turn View You can view the navigation screen in a symbol system rather than the typical map 1 Tap Route button in the main menu The Route window appears 2 Tap Turn View button The navigation symbol system appears Tap on any area if you want to switch to the map display NOTE ...

Page 60: ...eck route logs for later use To record navigation tracks 1 Tap Route button in the main menu The Route window appears 2 Tap Manage Track Logs button Track Logs are listed 3 Tap Record button A map screen appears where you can record the navigation tracks To stop recording Tap Stop Recording button ...

Page 61: ...u can check the route information including the recording start and end times time to take average speed and total distance 3 Tap Colour on the map button if you want to specify a route display color on the map The selected route will be displayed in the selected colour Track Information options Rename the character input mode appears You can change the log name See page 51 Fit To Screen displays ...

Page 62: ...her hand this will interfere with the wireless connection or if part of the user s body tap ones on the transmission system of the product or mobile phone Electrical variation from electrical jamming by the wall corner or office partitioning Electrical interference from the same frequency band devices including medical equipment microwave oven and wireless LAN y The farther the distance between pr...

Page 63: ...reat causing less reduction of the signal strength but requiring more power from the battery y Standard Specifications The transmission output is comparatively low which causes more reduction of the signal strength but minimizes the power consumption to increase the useful time Set off the Bluetooth mode when it is left unused Tap on the Enable Bluetooth button on your mobile phone When the V mark...

Page 64: ...uetooth mode 3 Tap Connect to Phone button 4 Press the Search button Make sure that the mobile phone to connect should support the Bluetooth function You will see a list of mobile phones that support Bluetooth 5 Tap on a mobile phone to pair The password input window appears on the mobile phone 6 Enter 0000 for the password The mobile phone is paired and ready for connection with the product For i...

Page 65: ...n the Connect to Phone button in the Mobile Phone window You will see a list of registered mobile phones 2 Tap Delete button The Select a Mobile Phone to Delete window appears 3 Tap on a mobile phone to delete The selected mobile phone will be removed To rename a device 1 Tap on the Connect to Phone button in the Mobile Phone window You will see a list of registered mobile phones 2 Tap on the Rena...

Page 66: ...he Bluetooth mode 3 Tap Connect to Phone button 4 Press the Search button Make sure that the mobile phone to connect should support the Bluetooth function You will see a list of mobile phones that support Bluetooth 5 Tap on a mobile phone to pair The password input window appears on the mobile phone 6 Enter 0000 for the password The mobile phone is paired and ready for connection with the product ...

Page 67: ...n the Connect to Phone button in the Mobile Phone window You will see a list of registered mobile phones 2 Tap Delete button The Select a Mobile Phone to Delete window appears 3 Tap on a mobile phone to delete The selected mobile phone will be removed To rename a device 1 Tap on the Connect to Phone button in the Mobile Phone window You will see a list of registered mobile phones 2 Tap on the Rena...

Page 68: ...her person To switch a call Ex If you get a call at xxx xxxx 5678 while making phone conversations at xxx xxxx 1234 1 You will see the incoming call message for 5678 while making conversations at 1234 2 Tap Yes button The call at 1234 will automatically switch to call waiting mode and you can make conversations at 5678 3 If you make the call at 5678 wait and return to 1234 tap on the Mobile Phone ...

Page 69: ...Voice to Phone button You can make conversations on the mobile phone To switch to the hands free device YP N1 while talking on the mobile phone 1 Tap Mobile Phone button while making conversations The Option menu appears 2 Tap Voice to Handsfree button You can make conversations on the hands free device To disconnect the mobile phone Tap on the Disconnect to Phone button in the Mobile Phone window...

Page 70: ...Phone button in the main menu while making conversations The Option menu appears 2 Tap Tone Keyboard button The number input mode appears 3 Enter a number or numbers Use the button if you entered a wrong number To view my device information Tap on the About button in the Mobile Phone window You can view your device information including device name Bluetooth address and Bluetooth class ...

Page 71: ...cting to your pc PC REQUIREMENTS Your PC system must meet the following minimum specifications in order to install Pentium 300MHz or higher USB Port 2 0 Windows XP or higher 100MB of free hard disc space CD Rom Drive 2X or higher Resolution 1024 X 768 or higher ...

Page 72: ... you use an USB hub for the connection USB communications may not work properly Connect the USB cable directly to the USB port of your PC If you connect the device through a USB hub the connection may be unstable Please connect the device to the computer directly Do not disconnect the USB cable during file transfer Disconnecting during transfer may damage the device or your PC CAUTION NOTE ...

Page 73: ...on the taskbar at the bottom right corner of the desktop and click the left mouse button 2 Click the Safely Remove USB Mass Storage Device Drive message 3 Disconnect the player from your PC Do not disconnect the player from the PC during file transfer This may cause damage to data and the device You cannot remove the hardware while the CD is installed on your PC Please retry after the installation...

Page 74: ...d with the device into the DVD ROM drive DVD를 CD ROM에 넣으면 인식하지 못하므로 반드시 DVD ROM에 넣어 주세요 1 Click Map Manager Device에 IGO 프로그램이 설치되어 있지 않은 경 우 에러 메시지가 나타납니다 PC에 데이터가 백업되어 있지 않은 경우 백업 확인 창이 나타납니다 OK 버튼을 터치하면 데 이터 백업이 시작됩니다 설치 DVD 내의 프로그램이 최신 버전일 경우 프 로그램 업데이트 확인 창이 나타납니다 OK 버 튼을 터치하면 프로그램 업데이트가 시작됩니다 2 Select the language of the installation program 3 왼쪽의 Locally available maps 창에서 원하 는 지도를 선택한 후 Ins...

Page 75: ...Device의 지도 데이터를 PC에 백업하려면 Backup 을 클릭하세요 백업 된 지도 데이터를 Device로 복구시키려면 Restore 를 클릭하세요 최신 버전 지도는 아이콘으로 표시되고 구 버전 지도는 아이콘으로 표시됩 니다 Locally available maps 과 Installed maps on device 의 지도 버전이 동일한 경우 설치되지 않습니다 Installed maps on device 의 지도가 Locally available maps 의 지도보다 최신 버 전일 경우 설치되지 않습니다 Locally available maps 의 지도는 PC의 Documents and Settings BIGFOOT My Documents iGO 2006 에서 확인할 수 있습니다 초기 화면의 Install...

Page 76: ...ally turns off Recharge it and try again y The battery usable time is different from that specified in the user guide The battery usable time can differ depending on the use conditions such as volume level LCD brightness Bluetooth mode etc A recharged battery can have less usable time if it is exposed to low or high temperature for an extended time y y Nothing is displayed on the screen If the pro...

Page 77: ...nected and try again Check if your SD memory card has an appropriate free space y y y A file s or data is missing Make sure the USB cable should keep connected during the file or data transfer process Otherwise it can cause missing file or data or even critical damage to the SD memory card Samsung Electronics has no responsibility for missing data in any way So please take caution y The file trans...

Page 78: ...ith the performance and useful life of the product You don t need to worry about y Bluetooth connections could not be made Check if your mobile phone supports the Bluetooth function Check if your mobile phone is already connected to other device If so disconnect it and try again Check if the Enable Bluetooth option is checked with V in the Mobile Phone window If it is not checked with V Bluetooth ...

Page 79: ...out View Mode Brightness Route Preference Volume Safety Mode Menu language Start up Preferences Day Night Mode Auto Brightness Vehicle Dynamic Volume Warn When Speeding Voice language Keyboard settings Map Color Brightness Timeout Avoidances Touch Tones Enable Safety Cameras Time Zone Demonstration Display Options LCD Calibration Off Route Recalculation Voice Guidance Attention Tone Smart Zoom Uni...

Page 80: ...VGA 480x272 TFT LCD 280 cd m2 with Touch Screen panel Backlight control Audio System internal 0 9W amplify inside a Set 1 2W Speaker inside Cradle Echo cancellation with TMC1182 GPS Module GPS engine SiRF III Frequency 1575 42 MHz C A code 1 023 MHz Chip rate Channel 20 Channels access Sensitivity 159 dBm GPS Performance Acquisition times Cold 45 sec Warm 35 sec Hot start 8 sec Accuracy Position 1...

Page 81: ...rs condition Backlight minimum 보관 온도 0 45 Case Plastics Weight 205 g Dimension WxHxD 122X84X19 5 mm Blue tooth Frequency Range Transmit Receive 2402 2480 MHz Spec Version Supported Version 2 0 EDR Module Transmission Output TMC Useable Sensitiivity 2 4 mW The contents of this Manual are subject to change without prior notice for further improvement ...

Page 82: ... 6225 www samsung com latin GUATEMALA 1 800 299 0013 www samsung com latin JAMAICA 1 800 234 7267 www samsung com latin PANAMA 800 7267 www samsung com latin PUERTO RICO 1 800 682 3180 www samsung com latin REP DOMINICA 1 800 751 2676 www samsung com latin TRINIDAD TOBAGO 1 800 7267 864 www samsung com latin VENEZUELA 0 800 100 5303 www samsung com latin COLOMBIA 01 8000112112 www samsung com co B...

Page 83: ...00 www samsung uz UKRAINE 8 800 502 0000 www samsung com ur LITHUANIA 8 800 77777 www samsung lt LATVIA 800 7267 www samsung com lv index htm ESTONIA 800 7267 www samsung ee AUSTRALIA 1300 362 603 www samsung com au CHINA 800 810 5858 010 6475 1880 www samsung com cn HONG KONG 3698 4698 www samsung com hk INDIA 3030 8282 1800 110011 www samsung com in INDONESIA 0800 112 8888 www samsung com id JAP...

Page 84: ...her types of wastes and recycle it responsibly to promote the sustainable reuse of material resources Household users should contact either the retailer where they purchased this product or their local government office for details of where and how they can take this item for environmentally safe recycling Business users should contact their supplier and check the terms and conditions of the purch...

Page 85: ...nable protection against harmful interference in a residential installation This equipment generates uses and can radiate radio frequency energy and if not installed and used in accordance with the instructions may cause harmful interference to radio communications However there is no guarantee that interference will not occur in a particular installation If this equipment does cause harmful inter...

Page 86: ...ponsibility that the product Trade Name Samsung Electronics Co Ltd Model Number YP U3 has been tested according to the FCC CISPR22 95 requirements for Class B devices and found compliant with the following standards EMI EMC FCC Part 15 Subpart B This device complies with part 15 of the FCC Rules Operation is subject to the following two conditions 1 This device may not cause harmful interference a...

Reviews: