
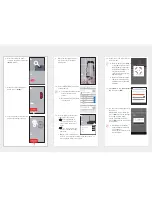
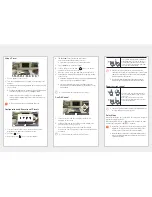
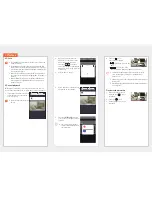

6.
After connecting the power
supply to the product, press the
<
Next
> button.
7.
When the LED of the product
blinks, press <
Ready
>.
8.
Press and hold the Wi-Fi button
until the yellow light turns on.
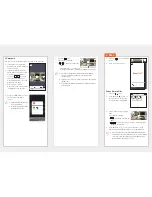
9.
When the next window pops
up, move to Wi-Fi Setup for
Smartphone.
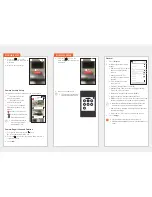
10.
Select ‘DIRECT-CAM’ and enter
your password.
M
Select a name that contains the last
4 digits of the product serial
number.
When password entry is requested,
enter ‘smartcam’.
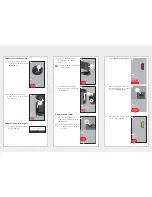
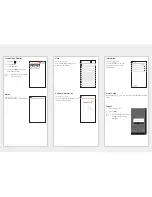
11.
Select a wireless router that is
connected to the camera.
•
: After a password is
entered and verified, it is
connected to the wireless
router.
•
: It is connected to the
wireless router without any
password.
• Others : This is used when no
router to connect with the camera has been found, or
when a hidden SSID is connected.
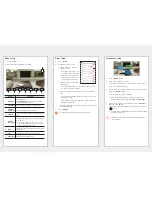
12.
Connection of the camera to the
router is made.
M
When the camera LED is blinking, it
is searching for a wireless router.
When the camera is connected to
the router, the LED illuminates in
blue; when the camera is
connected to the server, the LED
illuminates in green.
When a product that has a wired
LAN function has failed wireless
registration, please try wired LAN
registration.
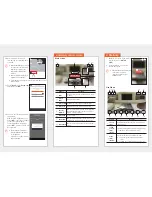
13.
Enter <
Name
> and <
Password
>
and then press <
OK
>.
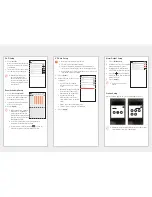
14.
You have successfully registered
the product.
With the SNH model, when you
press <
OK
>, the screen changes
to the camera live window.
For the SmartCam A1 model,
press <
OK
>, and the camera will
be registered.
M
Depending on the smartphone
default settings, the camera may
not be registered.
If this is the case, please check the
Help and try again.
OK
Setting a password
For security purposes, please set up a station name and
password.
Name
Confirm Password
1 to 8 alphanumeric characters
Password
OK
Setting a password
For security purposes, please set up a station name and
password.
mv Argus
•
1 to 8 alphanumeric characters
•
OK
Setting a password
For security purposes, please set up a station name and
password.
mv Argus
•
1 to 8 alphanumeric characters
•
Your product has successfully been
registered.
The camera must be registered.
OK
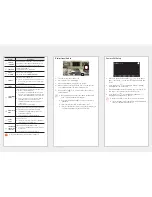
1.1
Preparing registration
Connect the power supply
to the product.
Register a product in use
Next
Register using cables.
1.2
Preparing registration
When the LED on the product is
flickering, it indicates that the product is
ready to start.
Ready
3
Wi-Fi Setup
Select a router that the product
will access.
2BCNI2
ARGUSSTATION06XK
iptime25
Others
3
Wi-Fi Setup
Select a router that the product
will access.
2BCNI2
ARGUSSTATION06XK
iptime25
Others
3
Wi-Fi Setup
Select a router that tthe product
e product
will access.
2BCNI2
ARGUSSTATION06XK
iptime25
Others
2:56
Please wait for a moment
2.1
Access to product
Press and hold the Wi-Fi
button for 5 seconds.
The LED is yellow.
5s
.
Settings
Wi-Fi
Wi-Fi
DIRECT-CAM-06XK
CHOOSE A NETWORK......
ARGUSSTATION06XK
echostock2
iptime25
Other...
Ask to Join Networks
Known networks will be joined automatically. If no
known networks are available, you will have to manually
select a network.
y. If
If
no
no
2.2
Access to product
iPhone settings >Access the Wi-Fi settings menu,
turn on Wi-Fi, and select the last four numbers
of the product serial number (includes "DIRECT-
CAM"), and then connect. (Code: smartcam).
* After completing the configuration, you will be
returned to this screen.


