
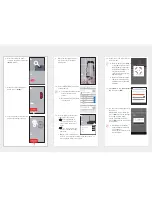
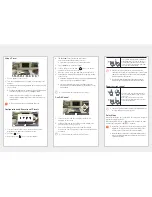
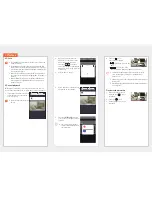
Video Setup
1.
Press <
Video
>.
2.
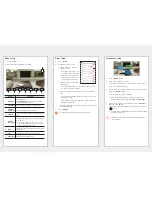
Configures the camera video settings.
Number
Description
Night Vision
Sets IR Night Vision.
Enable <
Night Vision
> so that the camera can switch
automatically to night vision mode.
b
Date Display
The date and time are displayed on the live screen.
c
Brightness
Adjustment
Screen image brightness can be adjusted.
Flip/mirror
Video image direction is inverted up and down or left and
right.
Speaker/
Microphone
Adjust the volume of the internal microphone and speaker
in the camera.
If the volume of the microphone is set to
'
0
'
, the live
video will be inaudible. Also, since no audio event occurs,
it will not be recorded to the SD card.
WDR
Compensates bright area by darkening it, and dark area by
brightening it.
LDC
Enables/Disables image distortion compensation.
Camera Off
Executes/Releases Camera Off mode.
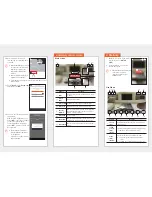
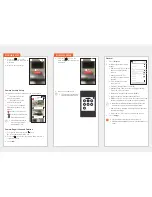
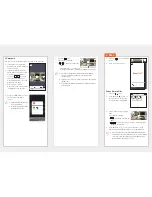
Event Setup
1.
Press <
Event
>.
2.
Configures various events.
• Motion detection : detects
motion events.
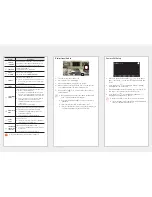
- Sensitivity : When this is set
to a higher value, events are
detected more sensitively.
- Motion zone : Motions are
only detected in that zone.
• Audio detection : Audio events
are detected.
- Sensitivity : When this is set to a higher value, events
are detected more sensitively.
• Event alert : When an event is detected, a notification is
sent.
- Motion/audio detection : When an event is detected, a
notification is sent.
- Auto tracking : When an event is detected, objects are
automatically tracked.
• Event recording time : When an event is detected, set the
recording duration.
3.
Press <
Apply
>.
J
Supported functions may differ depending on the model.
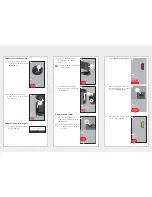
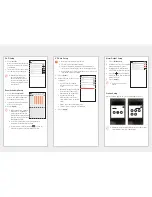
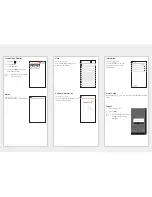
Motion zone setup
1.
Press <
Motion Zone
>.
2.
Move to the motion zone mode.
3.
Press and drag a video to set that region to a motion zone.
Up to 3 motion zones can be set.
4.
If you want to execute the motion zone as a selected region,
press the <
Apply
> button.
Motion is detected only in the setting area.
The motion zone function works only when motion detection is
activated. Activate motion detection in <
Setup
> - <
Event Setup
>.
5.
If you want to delete a selected region, press <
Delete All
>
and then press <
OK
>.
If you want to exit from motion zone setup mode, press the
<
> icon.
If a motion zone is deleted while motion detection is activated, motions
are detected in every zone.
M
Only the PT model moves to the home position when the motion
zone is selected.
WDR
LDC
N.V.
b
c
Event
Motion Detection
Sensitivity
Motion zone
Audio Detection
Sensitivity
Event alert
Motion Detection
Audio Detection
Auto Tracking
Apply
Delete All
Apply


