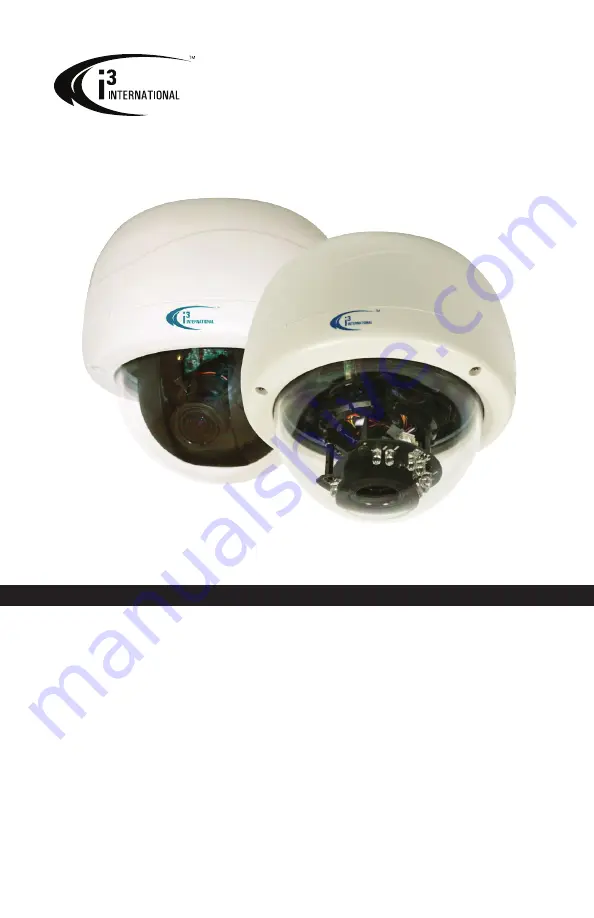
background image

Di721/Do721-series

User Guide 

(Di721, Di721B, Di721R, Di721RB, Di721P, Di721RP, Di721BP, Di721RBP

Do721, Do721R, Do721P, Do721RP)

CONTENTS
1.  Warnings and operation notes................................3
2. Unpacking................................................................5
3. Installation..............................................................6
4. Configuration...................................................12
5.  OSD Settings.........................................................15
6. Specifications..............................................20

Before attempting to connect or operate this product, read these instructions carefully.
Save this manual for future use. 

Summary of Contents for Di721

Page 1: ...721RBP Do721 Do721R Do721P Do721RP CONTENTS 1 Warnings and operation notes 3 2 Unpacking 5 3 Installation 6 4 Configuration 12 5 OSD Settings 15 6 Specifications 20 Before attempting to connect or ope...

Page 2: ...nor its dealers or distributors shall be liable to any person or entity with respect to any liability loss or damage caused or alleged to have been caused directly or indirectly by this information F...

Page 3: ...id excessive heat such as direct sunlight or heating appliances contaminants such as dust and smoke strong magnetic fields sources of powerful electromagnetic radiation such as radios or TV transmitte...

Page 4: ...era or lens must remain clean Use a soft dry cloth to remove finger prints and dust from the dome cover Use a blower to remove dust from the lens Clean the body with a soft dry cloth If it is very dir...

Page 5: ...ad Screw Tapping Type x4 2 Plastic Anchor x4 3 Flat Head Screw Machine Type 26L x3 Di series only 4 Security Tort wrench x1 5 O rings x4 Do series only 6 2nd video monitor output cable x1 7 Rubber gas...

Page 6: ...ides flexible installation on a ceiling or wall even at an angle The dome camera is a fully integrated enclosure with camera and lens Note The six holes on top of the Do series models are not drilled...

Page 7: ...ocus lever 6 Zoom lever 7 Video output connector 8 24 VAC 12 VDC power input connector red black 3 2 Routine Maintenance The dome cover is an optical part Use a soft and dry cloth to remove any finger...

Page 8: ...put connector 8 24VAC 12VDC Figure 3 3 Disassembling the camera 2 Loosen the 3 screws on camera base 2 CAUTION For DC power supply use ensure electrical polarity is correct to avoid malfunction and or...

Page 9: ...k rubber gasket and adhere to the base of the outdoor model cameras 5 Secure the bottom case to the wall or ceiling with the Flat Head Screws tapping type 2 For your convenience the holes on the outdo...

Page 10: ...unpacking list on page 5 to cut a hole into the mounting surface 2 Remove the bottom case of the camera Refer to Figure 3 2 on page 7 3 Insert camera into the hole 4 Turn screws 1 clockwise to adjust...

Page 11: ...back box flushed with the T bar tile 3 Insert camera into the hole and attach anti drop hook cable if required Secure the bottom case to the wall or ceiling with the Flat Head Screws tapping type 2 4...

Page 12: ...r to Figure 3 7 to locate the OSD joystick control on the camera board Use the joystick to access the OSD menu and configure the camera settings as required To use the OSD joystick control 1 Press the...

Page 13: ...t 4 2 Adjusting the Camera Position The dome camera has three axis for positioning the camera While live viewing on the monitor adjust the camera position as follows Horizontal adjustment rotates 3D a...

Page 14: ...ase note It is important that you lock the zoom and focus levers after making adjustments This will avoid the positions moving for example from temperature changes or vibrations 4 Once all adjustments...

Page 15: ...OPEN CLOSE or AUTO Then select SPEED to adjust the DC Iris Lens convergence speed TYPE DC MODE OPEN SPEED 046 5 2 SHUTTER AGC You can set the SHUTTER AGC as AUTO or MANUAL The default setting is AUTO...

Page 16: ...L from 15 to 69 USER1 USER2 You can adjust blue setting B GAIN and red setting R GAIN value from 0 to 255 PUSH When selected in the appropriate position the whole area will perform white balance PUSH...

Page 17: ...g objects on the screen The default is OFF If selecting ON you will enter the MOTION DET submenu You can set up to 4 motion areas to detect moving objectives and adjust the motion detection sensitivit...

Page 18: ...W Force the camera to stay in B W NIGHT mode at all times The B W submenu allows you to set BURST to be ON or OFF 5 91 NR NR allows you to configure the 2D DNR Digital Noise Reduction settings to red...

Page 19: ...s 8 multiple languages Options include ENGLISH default JAPANESE GERMAN FRENCH RUSSIAN PORTUGUESE SPANISH and SIMPLIFIED CHINESE 5 95 CAMERA RESET To restore factory defaults select CAMERA RESET and th...

Page 20: ...e 92 H 67 V Tele 27 H 20 V Wide 93 H 66 V Tele 26 H 20 V Wide 82 H 56 V Tele 22 H 16 V Wide 93 H 66 V Tele 26 H 20 V View angle PAL Wide 89 H 56 V Tele 26 H 17 V Wide 94 H 58 V Tele 26 H 16 V Wide 82...

Page 21: ...pports 40 C only when unit is installed at temperature above 10 C Operating humidity 90 MAX Storage temperature 20 C 60 C 4 F 140 F Mechanism Dimensions xH 136mm x 126mm 140 x 132 mm 5 51 x 5 20 Weigh...

Page 22: ...i INTERNATIONAL INC 1 866 840 0004 www i3international com Canada 780 Birchmount Road Unit 16 Scarborough ON M1K 5H4 U S A 1967 Wehrle Drive Suite 1 PMB 034 Buffalo NY 14221...

Reviews: