7-22
Samsung Electronics
Maintenance & Troubleshooting
7-4 Malfunction
Error Status
Check
Solution
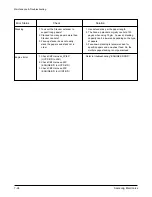
No power
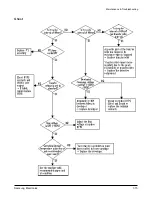
Fuser Error
Cover open
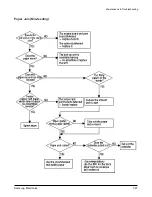
Jam 0
Jam 1
1. If supplying power differs from machine’s
power rating, replace the machine.
2. Replace it.
1. Detach AC connector and measure the
resistane between pin 1 and 2. If it is megohm,
thermostat is open, Replace it.
2. Check bad connector contact or wire is cut.
3. Check thermistor wire and its connection.
4. Replace Engine Control board
1. Open top cover and press the lever with pen. If
Controller detects cover close, there is some
mechanical trouble in top cover and lever’s
assembly. If not so there is electrical problem.
1. Check whether solenoid is working or not by
using DCU mode #6 (Acoustic judgement)
2. Check feed sensor malfunction.
Check if it is misplaced with paper width
sensor.
3. Re-try inserting a fewer papers.
•fan the papers and align
•take out the loaded papers and insert
them reverse direction
4. Take out the loaded papers and insert them
reverse direction
•inserted papers as recommended for
Manual Feeding?
•When loading, tap the papers until paper
detect sensor senses loading
5. When using long papers, use the Stacker
Extender
6. Adjust Guide to fit the paper width
1. It is mostly resulted from double feeding.
Check paper is well stocked in feeder.
2. Check feed actuator position and actuator’s
operating. There may be stiff movind or double
reflection. If not so, check the operation of feed
sensor by DCU mode #8.
3. Check exit lever operation. Remore jam and
check actuator moving by hand. If actuator is
too stiff, paper is wrapped around the heat
roller. Remove obstacles or replace.
1. Check power is supplying
2. Check fuse F1 open
1. Thermostat open
2. AC wire open
3. Thermistor wire open
4. Engine Controller
1. When close Top cover, check the
lever is pressed
2. Micro switch’s contact
3. CPU and related circuit
Check where Jam 0 happens
1. Paper is not picked up
2. Paper is located in feed sensor
3. Happened when inserting specific
papers such as envelope into the
MPF (Multipurpose Paper Feeder)?
4. Happened when inserting specific
papers such as envelope into the
Manual Feeder?
5. Is the Stacker Extender is folded out?
6. Does not the Guide Adjust distort the
papers
Paper is stopped in just after of fuser
unit.
Summary of Contents for MSYS 5150
Page 9: ...2 6 Samsung Electronics Specification Memo ...
Page 16: ...3 26 Samsung Electronics Setup and Installing Memo ...
Page 37: ...4 2 Samsung Electronics Theory of Operation ...
Page 41: ...4 6 Samsung Electronics Memo Theory of Operation ...
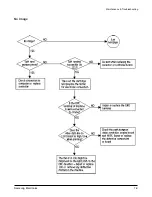
Page 116: ...Samsung Electronics 7 9 Maintenance Troubleshooting No Image ...
Page 117: ...Samsung Electronics Maintenance Troubleshooting 7 10 ...
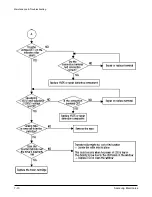
Page 118: ...Samsung Electronics 7 11 Maintenance Troubleshooting All Black ...
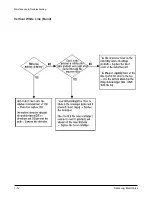
Page 119: ...7 12 Samsung Electronics Maintenance Troubleshooting Vertical White Line Band ...
Page 120: ...Samsung Electronics 7 13 Maintenance Troubleshooting Dark Image ...
Page 121: ...7 14 Samsung Electronics Maintenance Troubleshooting Background ...
Page 122: ...Samsung Electronics 7 15 Maintenance Troubleshooting Ghost ...
Page 123: ...7 16 Samsung Electronics Maintenance Troubleshooting Black Dot ...
Page 124: ...Samsung Electronics 7 17 Maintenance Troubleshooting Horizontal Band ...
Page 125: ...7 18 Samsung Electronics Maintenance Troubleshooting Irregular Density ...
Page 126: ...Samsung Electronics 7 19 Maintenance Troubleshooting White Spot ...
Page 127: ...7 20 Samsung Electronics Maintenance Troubleshooting Trembling at the End When OHP Printing ...
Page 128: ...Samsung Electronics 7 21 Maintenance Troubleshooting Poor Fusing Grade ...
Page 132: ...Samsung Electronics 7 25 Maintenance Troubleshooting No Power LCD NO display LED Off ...
Page 133: ...Fuser Error 7 26 Samsung Electronics Maintenance Troubleshooting ...
Page 134: ...Samsung Electronics 7 27 Maintenance Troubleshooting Paper Jam Mis feeding ...
Page 135: ...7 28 Samsung Electronics Maintenance Troubleshooting Paper Jam Jam1 ...
Page 136: ...Samsung Electronics Maintenance Troubleshooting 7 29 Engine Error ...
Page 137: ...7 30 Samsung Electronics Maintenance Troubleshooting Memo ...
Page 187: ...9 28 Samsung Electronics Electrical Parts List ...
Page 189: ...11 Connection Diagram Samsung Electronics 11 1 ...
Page 190: ...12 1 Main Circuit Diagram Samsung Electronics 12 1 12 Schematic Diagrams ...
Page 191: ...Schematic Diagrams 12 2 Samsung Electronics Main Circuit Diagram ...
Page 192: ...Main Circuit Diagram Samsung Electronics 12 3 Schematic Diagrams ...
Page 193: ...Schematic Diagrams 12 4 Samsung Electronics Main Circuit Diagram ...
Page 194: ...Main Circuit Diagram Samsung Electronics 12 5 Schematic Diagrams ...
Page 195: ...Schematic Diagrams 12 6 Samsung Electronics Main Circuit Diagram ...
Page 196: ...Main Circuit Diagram Samsung Electronics 12 7 Schematic Diagrams ...
Page 200: ...12 3 Sensors Circuit Diagram Samsung Electronics 12 11 Schematic Diagrams ...
Page 201: ...Schematic Diagrams 12 12 Samsung Electronics 12 4 Switch Circuit Diagram ...
Page 202: ...Samsung Electronics 12 13 Schematic Diagrams 12 5 Joint Circuit Diagram ...
Page 204: ...Samsung Electronics 12 15 Schematic Diagrams 12 7 PTL Circuit Diagram ...
Page 205: ...Schematic Diagrams 12 16 Samsung Electronics 12 8 SCAN Circuit Diagram ...
Page 206: ...Samsung Electronics 12 17 Schematic Diagrams 12 9 Engin Circuit Diagram ...
Page 207: ...Schematic Diagrams 12 18 Samsung Electronics Engin Circuit Diagram ...
Page 208: ...Samsung Electronics 12 19 Schematic Diagrams 12 10 LIU Circuit Diagram ...
Page 210: ... Samsung Electronics Co Ltd Mar 1999 Printed in Korea P N JC68 00097A Rev 1 00 ELECTRONICS ...

