background image

025

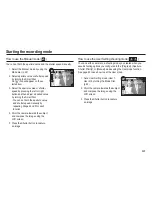
How to use the Manual mode (   )

You can set both the aperture value and the shutter speed manually.

1. Select the Manual mode by using the

Mode dial. (p.22)

2.  Select aperture value or shutter speed 

by turning the Smart Dial. 
An " " icon will appear on the se-
lected item.

3.  Select the aperture value or shutter 

speed by pressing the left or right 
button and then adjust a desired value 
by turning the Smart Dial.
- You can set both the aperture value 

and shutter speed manually by 
repeating Steps 2 and 3 for each 
function.

4.  Point the camera towards the subject 

and compose the image using the 
LCD screen.

5.  Press the Shutter button to capture 

an image.

Starting the recording mode

How to use the User Setting shooting mode ( 

 )

You can set the camera to a shooting mode you created when you 
saved shooting options you con

fi

 gured in the [Program], [Aperture.

Shutter Priority], or [Manual] modes using the User mode function.
See page 63 to see how to set the User mode.

1.  Set a User Setting mode (User 1, 

User 2) by turning the Mode Dial. 
(p.22)

2.  Point the camera towards the subject 

and compose the image using the 
LCD screen.

3.  Press the Shutter button to capture 

an image.

Summary of Contents for HZ50W

Page 1: ......

Page 2: ...tant event to avoid disappointment Samsung takes no responsibility for any loss or damage that may result from camera malfunction Keep this manual in a safe place If you use a card reader to copy the...

Page 3: ...se do not cover the camera or Charger This may cause heat to build up and distort the camera body or cause a fire Always use the camera and its accessories in a well ventilated area Danger DANGER indi...

Page 4: ...y causing camera malfunction Avoid obstructing the lens or the flash when you capture an image When using this camera in low temperatures you may experience the following These are not camera malfunct...

Page 5: ...ume 065 Beep Sound 065 Shutter sound 065 Start up sound 065 AF sound 066 Setupmenu 028 How to use the Movie clip mode 029 Recording HD High Definition movie clips 029 Recording a movie clip without so...

Page 6: ...ptions 091 Deleting images 092 Protecting images 093 Face List Edit 093 Voice memo 066 Display 066 Setting the Grid Line 066 Function Description 066 Start up image 067 Display Bright 067 Quick view 0...

Page 7: ...01 Warningindicator 102 Beforecontactingaservicecenter 104 Specifications 107 TransferringfilestoyourWindowscomputer 107 For Windows users 111 TransferringfilestoyourMaccomputer 111 For Mac users 113...

Page 8: ...he appearance of the parts and accessories in your package may differ from the illustrations below Package Contents Camera Rechargeable battery 4302 001226 AC adapter USB cable AD44 00143A AD39 00183A...

Page 9: ...Microphone AF Lamp Self timer lamp Lens Flash pop up button p 34 Built in flash p 34 Speaker Hook for neck strap p 10 Diopter adjustment lever p 34 Zoom T Lever Digital zoom Zoom W Lever Thumbnail Sh...

Page 10: ...ew finder EVF p 36 Play mode button Smart dial p 11 EVF LCD button p 35 Video shooting button MENU button Mode Dial POWER button Fn Delete button Hook for neck strap AE lock image protection button p...

Page 11: ...ert the lens cap string into the hole in the lens cap 2 Attach the lens cap to the neck strap 3 Attach the lens cap as shown in the image Attaching the neck strap Attach the neck strap as shown below...

Page 12: ...attery chamber Smart dial When pressing the Smart Dial Move UP DOWN LEFT RIGHT Execute options in the shooting mode c Change the display d Change the timer option e Change the close up shooting option...

Page 13: ...When flash battery is charging The lamp blinks When the USB cable is inserted to a PC The lamp lights up LCD screen turns off after initializing the device Transmitting Data with a PC The lamp blinks...

Page 14: ...80 image size 30fps frame rate These gures were measured under Samsung s standard shooting conditions Your results may differ Important information about battery usage When camera is not in use turn o...

Page 15: ...er devices to a PC at the same time Connect the camera by itself If your PC can not detect the camera when you use the front side USB port use the back side USB port of computer If the USB port of the...

Page 16: ...e battery chamber Use Advanced Lithium Batteries with a guarantee from the manufacturing company Do not disassemble the battery or perforate the battery with a sharp pin Do not subject the battery or...

Page 17: ...from the actual battery status Insert the battery as shown If the camera does not turn on after you have inserted battery please check whether the battery direction is right When opening the battery...

Page 18: ...d with a different camera Turn off the camera power whenever the memory card is being inserted or removed Repeated use of the memory card will eventually reduce the memory card s performance Should th...

Page 19: ...y how often you use the zoom Note that the Zoom W T lever does not function while the camcorder is recording a video It does function before and after Several videos were recorded in succession to det...

Page 20: ...displayed again after you set up the date time time zone and language Set up the date time time zone and language before using this camera Setting up the language 1 Select the Language menu by pressin...

Page 21: ...sh p 41 8 Self timer p 43 9 Macro p 38 10 Smart Range p 54 11 Photo Style Selector p 57 12 Face Detection Smart Filter p 49 58 13 Camera Shake Compensation Without Sound p 60 63 14 Date Time 2010 03 0...

Page 22: ...AF Sound On Volume Medium Off Low Medium High Beep Sound 1 Shutter Sound 1 Start Sound Off AF Sound On Volume Medium Exit Back Shooting Sound Display Settings Beep Sound Shutter Sound Start Sound AF S...

Page 23: ...hutter speed Aperture Shutter Priority Lets you set the aperture values or shutter speed manually Manual Lets you set various shooting options including the shutter speed and the aperture values manua...

Page 24: ...s camera shake lighting and distance to the subject The camera recognizes Night mode scenes only when the flash is set to off The camera implements Tripod mode after checking the shooting conditions f...

Page 25: ...lue or the shutter speed If you manually adjust the aperture value the camera adjusts the shutter speed automatically If you manually adjust the shutter speed the camera automatically selects an apert...

Page 26: ...peating Steps 2 and 3 for each function 4 Point the camera towards the subject and compose the image using the LCD screen 5 Press the Shutter button to capture an image Starting the recording mode How...

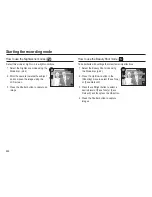
Page 27: ...o use the Nightscene modes Starting the recording mode Take portraits with settings that clear facial imperfections 1 Select the Beauty Shot mode using the Mode dial p 22 2 Press the Up Down button in...

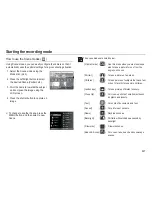
Page 28: ...Beach Snow For ocean lake beach and snowscape scenes Starting the recording mode Using Scene modes you can easily configure the camera so that it automatically uses the optimal settings for a given s...

Page 29: ...the subject and compose the image using the LCD screen 3 Press the shutter button once and the camera records a movie clip The camera continues to record the movie clip for up to 20 minutes even if y...

Page 30: ...movie clip without sound What is H 264 MPEG4 part10 AVC With its high compression rate and the small file size H 264 is the standard for digital video codecs supporting top quality recordings in high...

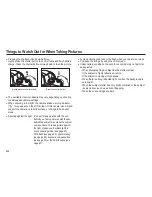
Page 31: ...B function see page 87 Things to Watch Out for When Taking Pictures Pressing the shutter button down half way Lightly press the shutter button to confirm focus and flash battery charge Press the shutt...

Page 32: ...ress the shutter button 1 The image to be captured 2 Press the shutter button halfway and focus on the subject Using the Focus Lock 1 Ensure the subject is in the center of the autofocus frame 2 Press...

Page 33: ...ll not enlarge the image further even if you push the Zoom W T lever Used for taking an image or recording voice in the Recording mode In Movie clip mode Press the shutter button down once fully to st...

Page 34: ...the sound of the Zoom in operation Select Zoom Mute from the recording menu during video recording to prevent the camera from recording the zoom sound You may notice a decrease in image quality when u...

Page 35: ...ght shots You can also use the AEL button for AFL AEL AFL and AF see page 61 for setting procedure In the playback mode use this button to apply image protection p 92 To pop up the flash press the fla...

Page 36: ...How to set exposure compensation 1 Press the exposure compensation button in the shooting mode 2 Set a desired exposure compensation value by using the LEFT RIGHT but tons or the Smart Dial 3 Press th...

Page 37: ...isplay as the LCD screen Use it when you have difficulty seeing the LCD screen due to bright ambient lighting Pressing the EVF LCD button switches the display between the electronic view finder and th...

Page 38: ...or to confirm data or selections This button is used when moving to or saving data changed on the menu screen Press the UP DOWN LEFT RIGHT buttons to shift the AF points OK AF point button Histogram G...

Page 39: ...ghtness in recorded images If the bars in the histogram are higher towards the right the image may be too bright If the bars are higher on the left the image may be too dark If the lighting conditions...

Page 40: ...ity xx Infinity 10 Infinity xx Infinity 10 80 xx xx Tele Tele Tele 170 Infinity xx Infinity 170 Infinity xx Infinity 80 150 xx xx Note that the picture may be blurred if you do not perform manual focu...

Page 41: ...us range Macro Down button Mode Normal Auto Macro Macro Super Macro Manual Focus o o o o o o o o o o o o o o o o o o o o o o o o o Mode SCENE Normal Auto Macro Macro Super Macro Manual Focus o o o o o...

Page 42: ...atmospheric dust If the flash doesn t pop up you can not use the flash Flash Left button When the menu is displayed on the LCD screen pressing the Left button shifts the cursor to the left tab When th...

Page 43: ...The flash operates with a slow shutter speed to obtain a balanced correct exposure In poor lighting conditions the camera shake warning indicator appears on the LCD screen Red eye reduction When the...

Page 44: ...e Self timer button Use the Self timer when you would also like to be in the picture If you press the Self timer button during the self timer operation the self timer function is cancelled Use a tripo...

Page 45: ...22 2 Press the Self timer Right button until the desired mode indicator icon appears on the LCD screen A 10 second 2 second or Double Self timer icon appears on the LCD screen 3 When you press the sh...

Page 46: ...p Down button to select the Shooting menu and then press the Right OK button How to Enable Functions Using the MENU Button Up Down button Right OK button Shooting Sound Display Settings WB Fine tuning...

Page 47: ...a cloudy and overcast sky Fluorescent_H For shooting under daylight fluorescent lights or three way fluorescent lights Fluorescent_L For shooting under white fluorescent lighting Tungsten For shooting...

Page 48: ...or Temperature scale is a conventional measure of color expressed in degrees Kelvin K The scale runs from reds and yellows at the low end below about 2700 K to blues at the high above about 5000 K Eve...

Page 49: ...n dark conditions However the noise level in the image will increase as the ISO value increases making the image appear coarse When Motion Capture is set the camera sets ISO to Auto ISO setting is ava...

Page 50: ...eople at the same time it will focus on the nearest person You can not activate Digital zoom when Face Detection is on When the camera detects a target face the white color focus frame is displayed ov...

Page 51: ...you press the Shutter button the picture is taken in the normal way When you take a smile shot having the subject smile or show teeth helps the camera to detect the subject correctly Blink Detection...

Page 52: ...Indicate faces that the camera automatically registers The camera can recognize the same person as a different person depending on glasses brightness extreme change of pose or facial expressions If yo...

Page 53: ...e faces are indicated with a on the face list Smart FR Edit You can register frequently shot faces or edit the registered face list prior to shooting This feature is available only when you use a memo...

Page 54: ...ct Face Retouch by pressing the Up Down button 2 Select a desired face retouch level by pressing the Left Right button and then press the OK button 3 Press the Shutter button to capture an image The h...

Page 55: ...compression ratio the lower the picture quality Mode Still image mode Icon Sub menu RAW S Fine RAW Fine Super Fine Fine Normal File Format DNG JPEG DNG JPEG JPEG JPEG JPEG Mode Movie clip mode Icon S...

Page 56: ...t in the center of the focus area do not use spot metering as this may result in an exposure error Use exposure compensation instead See page 35 Drive mode You can select continuous shot and AEB Auto...

Page 57: ...ur preferred Focus Area according to the shooting conditions Center AF The camera focuses using the rectangular area in the center of the LCD screen Multi AF The camera focuses by selecting all the av...

Page 58: ...ot have any effect If the flash intensity is out of the control range because the exposure value is too high or low the camera may not operate properly You can add various effects to an image without...

Page 59: ...esired Smart Filter by pressing the Left Right button and then pressing the OK button 2 Press the Shutter button to capture an image Smart Filter Icon Description Normal No effect Vignetting Apply ret...

Page 60: ...2 Change the Sharpness by pressing the Left Right button 3 Press the Shutter button to capture an image Shooting 2 1 0 1 2 2 1 0 1 2 2 1 0 1 2 Back Move Sharpness Contrast Saturation Image Adjust Sat...

Page 61: ...lay the camera shake warning indicator If the subject is moving the captured image may be blurred As the DUAL IS uses the camera s digital signal processor it may take a little longer for the camera t...

Page 62: ...rds for ten seconds from the moment the camera stores the picture You can stop the recording in the middle by pressing the shutter button Shooting Key mapping You can map one of four functions to the...

Page 63: ...you want to stop recording press the shutter button again File type wav Voice recording mode Pausing while recording a voice Using this function you can record your favorite voice clips into a voice...

Page 64: ...mode by saving shooting options which you set in the Program Aperture Shutter Priority and Manual modes Set a desired option and save the setting information How to set the user mode 1 Select a mode f...

Page 65: ...able scene detection function On Enable scene detection function Shooting Select Off for normal movie recording When you set Smart Scene Detection you cannot set the Photo Style Selector and Smart Fil...

Page 66: ...Shutter sound Off 1 2 3 Shutter sound Sound menu You can select the beep sound the camera plays when you press the buttons Select Off to turn the Beep Sound off Beep Sound sub menus Off 1 2 3 Beep Sou...

Page 67: ...rid Line You can select the image that appears on the LCD screen first whenever the you turn on the camera Sub menus Off Logo User Image To use a saved image as the start up image run Start Image in t...

Page 68: ...e the LCD screen will be turned off automatically Sub menus Off The LCD screen will not be turned off On If you don t operate the camera within the specified time about 30 SEC the LCD screen turns off...

Page 69: ...run Format on the following types of memory card A new memory card or an unformatted memory card A memory card that has a file this camera can t recognize or one that has been taken from another came...

Page 70: ...ilable cities Time Zones London Cape Verde Mid Atlantic Buenos Aires Sao Paulo Newfoundland Caracas La Paz NewYork Miami Chicago Dallas Denver Phoenix LA San Francisco Alaska Honolulu Hawaii Samoa Mid...

Page 71: ...of time to prevent unnecessary battery drainage Sub menus Off The power off function does not operate 1 min 3 min 5 min 10 min The power turns off automatically if the camera is not used for the peri...

Page 72: ...ra 3 If there is no picture after the TV turns on press the source button on the TV remote control to change to the HDMI mode Depending on the TV it might not change to the HDMI mode even though you p...

Page 73: ...80p NTSC or 576p PAL it is only available to play back the image movie clip voice If your HDTV does not support the HDMI resolution you selected it cannot show a clear image on the screen If you try t...

Page 74: ...with a PC or a printer through a USB cable you can manually set Computer or Printer USB sub menus Auto Automatically enables an external device connected with a USB cable Computer Sets computer connec...

Page 75: ...play back a movie clip file To pause a movie clip file while playing it back press the OK button again Press the OK button again to restart the movie clip To rewind the movie clip while it is playing...

Page 76: ...e Left Right button 2 Press the OK button to play back the recorded voice file To pause a recorded voice file while playing it back press the OK button again To resume playback of the voice file press...

Page 77: ...p 74 2 Voice Memo p 93 3 DPOF p 94 4 Protect p 92 5 Smart Face Recognition p 51 6 Folder name File name 100 0010 p 69 7 Memory indicator 8 Battery p 16 9 Histogram p 38 10 ISO 80 6400 p 48 11 Aperture...

Page 78: ...oom lever to the right Play mode button If you have turned on the camera by pressing the POWER button you can press the Play mode button once to switch to Play mode and press it again to switch to Rec...

Page 79: ...1 and 2 above 2 Press the Delete button The Delete window appears 3 Press the Up Down button to select Yes and then press the OK button 9 Thumbnail Window 20 Thumbnail Window In Smart Album it may tak...

Page 80: ...ght 2 Move the Digital Zoom lever to the right repeatedly to make the image larger 3 Press the Up Down Left Right sides of the 5 Function button to view different portions of the enlarged image 4 Pres...

Page 81: ...age with a voice memo a voice file or a movie clip During playback Temporarily stops playback In Pause mode Resumes playback Info DISP Up button When the menu is displayed on the LCD screen the Up DIS...

Page 82: ...Left Right button to select an image you want to delete 3 Press the Delete button The camera displays the Delete File window 4 Press the Up Down button to select Yes and then press the OK button You c...

Page 83: ...lector Normal Soft p 85 Vivid Forest Retro Cool Calm Classic Negative Custom RGB Smart Filter Off Miniature p 86 Vignetting Fish eye Sketch Defog Image Adjust Off ACB p 87 Red eye Fix Face Retouch Bri...

Page 84: ...the camera is connected to a PictBridge supporting printer direct connection to the camera sold separately with a USB cable Setting up the play back function using the LCD monitor Menus are subject to...

Page 85: ...the left side of the table The available resize dimensions are on the top o Sizes you can Select o o o o o o o o o o o o o o o o o o You can resize a large sized image to a smaller size but not vice...

Page 86: ...n 1 Press the Play mode button 2 Press the Left Right button to select an image 3 Press the Menu button 4 Press the Up Down button if necessary to select Edit and then press the OK button 5 Press the...

Page 87: ...button to select Smart Filter and then press the OK button 6 Press the Left Right button to select a Smart Filter function and then press the OK button The camera saves the changed image as a new fil...

Page 88: ...rocessing message appears 2 Press the OK button The Face Retouch bar appears 3 Use the Left Right button to select 1 2 or 3 The Processing message appears 4 Press the OK button The camera saves the ad...

Page 89: ...t of the image 1 Select by pressing the Left Right button and then press the OK button A bar for selecting the contrast appears 2 Change the contrast by pressing the Left Right button 3 Press the OK b...

Page 90: ...menu by pressing the Up Down button Play The Multi Slide Show stops after one cycle Repeat The Slide Show repeats until cancelled 3 Press the OK button and the slide show starts To pause the slide sh...

Page 91: ...order you select them 5 Repeat Step 4 for each image you want to included Press the Fn button when done To play a slide show of a group of selected images follow these steps 1 On the Multi Slide Show...

Page 92: ...button to mark an image for deletion Press the Fn button to display the Delete Confirmation window Select Yes and then press the OK button to delete the marked images If you chose All the Delete Confi...

Page 93: ...Press the OK button to protect an image or remove protection from an image When you protect an image a key appears on the image When you unprotect the key is removed Press the Fn button to save your c...

Page 94: ...ace List Edit You can arrange or delete portrait images in Smart Album according to their ranking This feature is available only when you use a memory card 1 Press the Up Down button to select the Fac...

Page 95: ...F menu tab and then press the Right button 2 Press the Right button again and the Standard sub menu appears 3 Select a desired sub menu by pressing the Up Down button and then pressing the OK button S...

Page 96: ...ct a desired sub menu by pressing the Up Down button and then pressing the OK button Select The selection window appears Lets you choose the print size of images to be printed Up Down Left Right Selec...

Page 97: ...to Card command copies only some of the images and then displays the Memory Full message Then the camera returns to the Playback mode Please be sure to delete any unnecessary files on the memory card...

Page 98: ...USB cable 2 Once the camera is turned on the camera automatically recognizes the printer and completes the connection If automatic connection fails set the USB menu to Printer p 73 For a printer that...

Page 99: ...ity Date Print and File Name Print menus for printed pictures 1 Press the Menu button and the PictBridge menu will appears 2 Use the Up Down button to select the desired menu and then press the Right...

Page 100: ...mable materials Do not leave this camera in places subject to dust chemicals like naphthalene and mothballs high temperature and high humidity Keep this camera with silica gel in a hermetically sealed...

Page 101: ...d LCD assemblies If this does not work lens cleaning paper with lens cleaning fluid can be used Clean the camera body with a soft cloth Do not allow this camera to come into contact with solvent mater...

Page 102: ...ere are no images stored on the memory Take images Insert a memory card that is holding some images File Error File error Delete the file Memory card error Contact a camera service center Low Battery...

Page 103: ...Shutter button There is insufficient memory capacity Delete unnecessary image files The memory card has not been formatted Format the memory card p 68 The memory card is exhausted Insert a new memory...

Page 104: ...creen has not been connected properly to the camera Check the connection cables There are incorrect files on the memory card Insert a memory card that has correct files The Removable Disk file does no...

Page 105: ...Manual User 16 1 2 000 sec Continuous AEB 1 4 1 2 000 sec Exposure Control Program AE Metering Multi Spot Center weighted Face Detection AE Compensation 2EV 1 3EV steps ISO Auto 80 100 200 400 800 160...

Page 106: ...Multi slide show Movie Clip Multi slide show Slide show with Effect Music Shooting Single Continuous High Speed Motion Capture AEB Self timer 10 sec 2 sec Double Movie Clip With Audio or without Audi...

Page 107: ...ery SLB 11A 3 8V 1130mAh Included battery may vary depending on sales region Dimensions WxHxD 116 1 82 8 91 1 mm XX XX XX inches excluding protrusions Weight Approx XX oz 396 g without battery and car...

Page 108: ...24 X 768 pixels 16 bit color display compatible screen 1280 X 1024 pixels 32 bit color display recommended Microsoft DirectX 9 0c or later For Windows users Using a self assembled PC or a PC and OS th...

Page 109: ...le You must plug the end of the cable with the indicator light into your camera If the cable is reversed it may damage your files The manufacturer is not responsible for any loss of data 1 Insert the...

Page 110: ...the camera fails to connect a pop up window will appear Select Computer Disconnecting the camera for Windows XP The way to disconnect the USB cable for Windows Vista 7 is similar 1 If the status lamp...

Page 111: ...e Intelli studio icon on your Windows desktop Intelli studio allows you to play back and edit files You can also upload files to websites such as Flickr or YouTube For details select Menu Help in the...

Page 112: ...1 Open menus 2 Display files in the selected folder 3 Change to the Photo edit mode 4 Change to the Video edit mode 5 Change to the Sharing mode You can send files by email or upload files to website...

Page 113: ...e disk icon 4 Transfer photos or videos to the computer 1 Connect your camera to a Macintosh computer with the USB cable You must plug the end of the cable with the indicator light into your camera If...

Page 114: ...it functions are listed below Menu bar Image editing tools Exposure bias Compensates for the exposure value White balance Adjusts the white balance value Tone Adjusts the contrast Color Changes the co...

Page 115: ...osure of an image using the Samsung RAW Converter You can adjust the exposure by using the menu option as shown in the illustration below Original image P Mode Aperture f 2 8 Shutter Speed 1 30 sec IS...

Page 116: ...as RAW files Using the Samsung RAW Converter you can edit JPEG TIFF files in the same way as RAW files You can adjust the white balance sharpness reduce noise etc The images below show how to change t...

Page 117: ...is connected to the USB port located on the front of the computer the computer may not recognize the camera Connect the camera to the USB port located on the back of the computer Case 1 USB cable is n...

Page 118: ...camera and Windows will start If the problem happens continuously set the Legacy USB Support to disable and then re start the PC The Legacy USB Support is in the BIOS setup menu The BIOS setup menu d...

Page 119: ...ne or more of the following measures Reorient or relocate the receiving antenna Increase the distance between the equipment and receiver Connect the equipment to an outlet on a circuit different from...

Page 120: ......

Reviews: