25
SALICRU
Code
Condition
Description
LCD colour
BATL
Warning
Battery voltage is too low.
Red
OVTP
Fault
Fault due to internal temperature too
high.
Red
FNLK
Fault
Fan is faulty or doesn't work.
Red
BTWK
Warning
Battery faulty or damaged.
Red
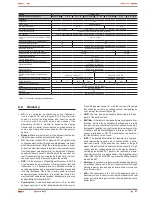
Tabla 8.
UPS status and LCD panel colour depending on the
condition.
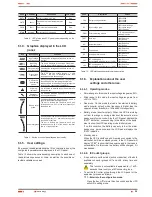
6.1.4. Graphics displayed in the LCD
panel.
Icon
Description
Function
Input voltage
and frequency.
It displays the voltage and frequency values of
the input.
Input plug
indicator.
The icon is displayed in the screen, if the mains
is inside the permissible range of the equipment.
Output voltage
and frequency.
It displays the voltage and frequency values of
the output.
Output plug
indicator.
The UPS has two outlets groups, > 1 kVA
models. the icon is displayed when their
respective outlets have voltage.
UPS status
/ User setting
screen.
Acronym chain of the status mode. They diosplay
the condition of the equipment (see table 8).
Acronym chain of the values. They displayes the
options of the user setting (see table10).
Warning
indicator.
It is activated as warning fault mode or alarm in
the equipment.
Setting or
configuration.
It is activated when the equipment is on setting
or configuration mode .
Battery level
graph.
It displayes the battery charge level in %, which is
equal to the available energy capacity.
The bar is divided into five parts, each part
corresponds to a 20 % of the total capacity of
the battery set.
Load level graph.
It displayes the load level connected at the output
of the equipment in %, equivalent to the power
consumed in real time.
The bar is divided into five parts, each part
corresponds to a 20 % of the load or nomknal
power of the equipment.
Tabla 9.
Button or control panel keypad funcionality.
6.1.5. User settings.
By means of an abbreviated chain of 2 to 4 characters (code), the
configurable parameters are displayed in the LCD panel.
Table 10 shows the corresponding description to each one of
these letters sequences or chain, as well as the possible se-
lectable variables or values.
Code
Description
Values
OPV
Output voltage selection.
(220)=220V
(230)=230V
(240)=240V
AV
Input voltage type
(000)=Normal range
(001)=Wide range
(002)=Gen set
EBM
External battery module
0 - 9 it is the quantity of
battery modules
TEST
Auto test.
(000) Deactive
(001) Active
AR
Automatic restart.
(000) Deactive
(001) Active
GF
Green mode.
(000) Deactive
(001) Active
BZ
Acoustic alarm control.
(000) Deactive
(001) Active
LS1
IEC outlets group 1
(not available in equipments ≤ 1 kVA)
(000) Deactive
(001) Active
LS2
IEC outlets group 2
(not available in equipments ≤ 1 kVA)
(000) Deactive
(001) Active
Tabla 10.
UPS status and character chain description.
6.1.6. Explanations about the user
settings and other ones.
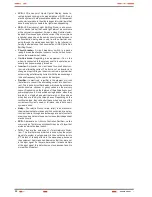
6.1.6.1. Operating modes.
•
Normal range: In this mode, the input voltage range are ±20%.
•
Wide range: In this mode, the input voltage range are from
+20% to –30%.
•
Gen mode: On this mode the load is transferred to battery
mode (inverter output), when frequency is higher than the
upper and lower threshold , of 40 and 80 Hz respectively.
•
Battery mode (inverter output): When the UPS is working
out from the range or during a blackout, the acoustic alarm
beeps every four seconds. Also the LCD panel displays the
"BATT" indication, corresponding to the status of the equip-
ment to show the UPS operating mode -Battery mode-.
If on this condition, the battery capacity is low, the alarm
beeps once per second and the LCD panel displays the
"BATL" indication.
•
Standby mode.
When the UPS is shutdown and it remains connected to the
wall outlet, it will be on standby mode. In the LCD panel will
display "STBY" to show that the power supply to the loads is
not available. On this mode the battery will be charged, if it
was needed.
6.1.6.2. IEC outlet groups.
•
It is possible to set the status (active or deactive) of the both
available connector groups LS1 and LS2, at any time and
separately.
This function is not available in equipments ≤ 1 kVA,
because there is only one IEC connector group.
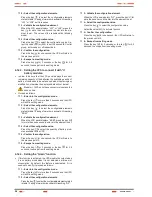
•
To set the IEC outlet group through the LCD panel of the
equipment, proceed as follows:
1.- Enter into the configuration mode.
Press the key
for more than 3 seconds and the UPS
will shift to setting mode.


