background image

19

SALICRU

Depending on the weight of model of the equipment and 

battery module, it is recommended to make the installa-

tion works by two persons. 


ˆ

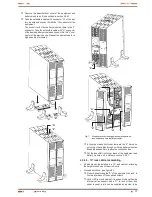
Fix the equipment to the frame of the cabinet by means 

of the screws "B".

• 

Regarding the connections of the UPS with the battery 

module, make the following steps, but reading section 4.3.3 

previously:


ˆ

Connect the supplied earth joint cable "F", between the 

UPS and battery module.


ˆ

Remove the beautiful front cover of the equipment and 

battery module, as it is described in section 4.2.4.1.


ˆ

Take the extensible cable with connector "H" of the bat-

tery module and connect it with the "G" connector of the 

equipment.
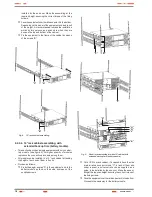
To connect it with other battery modules, there is the "J" 

connector. Take the extensible cable with "H" connector 

of the beside battery module and connect it to the "J" con-

nector of the previous one. Repeat the same steps for a 

high quantity of modules.


ˆ

In the side of each front cover, there are the "K" trims as a 

notch to go the cables through it with the battery modules. 

Break the needed trims to pass the connection bus.


ˆ

Put the beautiful front cover back of the equipment and 

battery module, as it is stated in section  4.2.4.1.

4.3.  Connection.

• 

Cross cable section used in the power supply of the 

equipment and loads to feed, will be sized according 

to the nominal current stated in the nameplate sticked on the 

equipment, by respecting the Low Voltage Electrotechnical 

Regulations or norms of the corresponding country.

• 

Installation will have the suitable input protections sized to 

the current of the equipment and stated in the nameplate of 

the equipment (residual current devices type B and circuit 

breaker with C characteristic or any other equivalent one).
Overload conditions are considered as a nonpermanent an 

exceptional operating mode, so these currents will not be 

kept in mind when sizing the protections.

• 

Output protection will be done with a circuit breaker of C char-

acteristic or any other equivalent one.

 The equipments can be installed and used by per-

sonnel with not specific training, just with only help of 

this «Manual».

• 

To insert  the option cards, it is needed to remove the fixing 

screws of the smart slot and the own cover.
When finalising the corresponding tasks, the cover will be in-

stalled and its fixing screws again.

4.3.1.  Connection of input.

• 

 As this is a device with class I protection against elec-

tric shocks, it is essential to install a protective earth 

conductor (connect earth(

)

). Connect the conductor be-

fore connecting the power supply to the input power block.

• 

Take the power cord with schuko plug and IEC connector and 
connect the IEC connector to the UPS inlet. Next insert the 

schuko plug to the AC mains outlet.

4.3.2.  Connection of the IEC outlets.

• 

 As this is a device with class I protection against elec-

tric shocks, it is essential to install a protective earth 

conductor (connect earth(

)

). Connect the conductor to 

the terminal, before connecting the power supply to the input 

power block.

• 

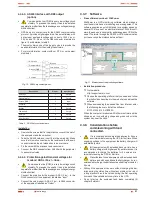
All the equipments have female IEC outlets, in greater or lesser 
numbers depending on the power rate of the equipment:


ˆ

Models up to 1 kVA: 1 group of 4 IEC outlets of 10A.


ˆ

Models of 1,5 and 2 kVA: 2 groups of 4 IEC outlets of 10A la-
belled as LS1 and LS2, which can be set through the control 
panel and/or Win Power.


ˆ

Models of 3 kVA: 2 groups of 4 IEC outlets of 10A labelled 
as LS1 and LS2, which can be set through the control panel 
and/or Win Power, plus a IEC connector of 16A.


ˆ

 Loads can be connected to the IEC outlets, mean-

while the features of the equipment and IEC out-

lets limitations are not exceeded, otherwise there will be 

sudden blackouts in the power supply of the connected 

loads at the output.

• 

If besides of the critical loads, it is required to connect lag-

ging loads of high consumption, like laser printers or CRT 

monitors,  the inrush currents of these peripherals will be kept 

in mind in order to avoid blocking the equipment under the 

worst conditions.
It is better to not connect the loads of this kind, due to the high 

quantity of energy resources that take from the UPS.

4.3.3.  Connection of the external 

batteries (extended back up time).

• 

As this is a device with class I protection against elec-

tric shocks, it is essential to install a protective earth 

conductor (connect earth(

)

). Connect the conductor to 

the terminal, before connecting the power supply to the input 

power block.

• 

 To not respect the stated indications in this sec-

tion and the safety instructions 1.2.3 means a 

high risk of electrical discharge and even the death.

• 

To connect the batteries with the equipment, follow the de-
scribed steps in sections 4.2.4.4 and 4.2.4.6.

• 

All the standard UPSs have batteries in the same enclosure, 

less the B0 and B1 (not available for models equal or below 

1kVA). Battery protection is done by internal fuses and not ac-

cessible for the end-user.
Battery modules have internal protections for the batteries 

too and they are not accessible for the end-user.

• 

 IMPORTANT FOR SAFETY: In case of installing the 

batteries by yourself, the accumulators has to be pro-

vided with a two pole circuit breaker protection sized to the 

features stated in table 3.

• 

Before starting the connection between the bat-

tery module/s and the equipment, check that the 

equipment and loads are in "Off" position.
Likewise when batteries are installed by the own user, 

the fuse or switch has to be turned off.

• 

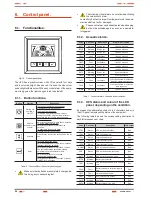
Connection terminals of external batteries with the equip-

ment are done with a polarised Anderson connector. This 

connector is not available in models up to 1kVA.

• 

For battery connection with the equipment, follow the stated 

steps in sections 4.2.4.4 and 4.2.4.6, keeping in mind the model.

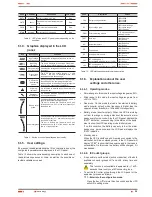
Summary of Contents for PS.2000.ADV RT (B1)

Page 1: ...PLY UPS LIGHTING FLOW DIMMER STABILIZERS ILUEST SWITCH MODE POWER SUPPLY STATIC INVERTERS PHOTOVOLTAIC INVERTERS VOLTAGE STABILIZERS AND POWER LINE CONDITIONERS SPS ADVANCE RT series UNINTERRUPTIBLE P...

Page 2: ......

Page 3: ...IEC outlets 4 3 3 Connection of the external batteries extended back up time 4 3 4 Connection of main input earth terminal and the earth bonding terminal 4 3 5 EPO terminals in UPSs 1kVA Emergency Pow...

Page 4: ...s for safety of the things To not respect such instructions can damage the goods Precaution symbol Read the paragraph text and take the stated preventive mediums it contents the basic in structions an...

Page 5: ...ive terminal for the load earth connection When an outgoing dis tribution is done i e power strips it is essential that they have an earth terminal connected to each one of them It is essential that t...

Page 6: ...ven pack aged the equipment will be left for a minimum time of two hours in the new location before making any action with the purpose of adapting it to the new environmental conditions and avoid the...

Page 7: ...battery cabinet to the equipment respect the cable s polarity and colour red positive black negative indicated in the manual and in the cor responding labelling Wear rubber gloves and shoes Use tools...

Page 8: ...tive EMC In accordance with the specifications of the harmonized stand ards Standards as reference EN IEC 62040 1 Uninterruptible power supply UPS Part 1 1 General and safety requirements for UPS s us...

Page 9: ...ment can be checked Act in accordance with the installation Front virew ADVANCE RT Fixing screws Plastic beauty front Fixing screws Plastic beauty front Control panel with LCD Plastic beauty front Fro...

Page 10: ...AC power supply Earth connection for battery module Output connector with M dem ADSL Fax protection Connector for external EPO Smart slot protection cover Fan IEC outlets LS2 Input connector for modem...

Page 11: ...of strings in parallel Omitted for one 0 Battery module without them but the needed accessories to install them ADV RT Series of the battery module MOD BAT Battery module i Note relative to the batter...

Page 12: ...from the batteries through the inverter for a determined time depending on the model battery charge level and the own load connected at the output For models higher than 1000 VA it is possible to inc...

Page 13: ...olling and management at the manager system dis posal This facility is got through the SNMP adaptor which is well known by the main software and hardware manufacturers The available SNMP option for SP...

Page 14: ...c isolation transformer as standard as an option or either in stalled by yourself either at the UPS input or output or at all of them protections against indirect contact has to be fitted in residual...

Page 15: ...als therefore they should be disposed according to current regulations We recom mend to keep the packaging in case its use is necessary in the future Proceed as follows Cut the strips of cardboard enc...

Page 16: ...wise B and insert it again into the beautiful front cover till click it C Check the correct closing of the fixing nails Put the beautiful front cover back in the reverse way as its removing see sectio...

Page 17: ...ing with ex tended back up time battery module In the side of each front cover there are the K trims as a notch to go the cables through it with the battery modules Break the needed trims to pass the...

Page 18: ...igure 9 For higher quantity of modules reproduce the connection procedure among them All models can be installed in a 19 rack cabinet attending the height of each one of them is 2 units Proceed as fol...

Page 19: ...utlets As this is a device with class I protection against elec tric shocks it is essential to install a protective earth conductor connect earth Connect the conductor to the terminal before connectin...

Page 20: ...rmally closed NC Less punctual cases it is not recommended to use this type of connection due to the function of the EPO button because it would not work in case of any of the two cables that goes fro...

Page 21: ...the equipment labelled as Input Connect the own modem ADSL Fax to RJ45 connector of the equipment labelled as Output 4 3 7 Software Free software download WinPower WinPower is a UPS monitoring softwa...

Page 22: ...part from sensi tive ones are required to be connected like laser printers or CRT monitors keep in mind the start inrush currents of these peripherals in order to avoid that the equipment becomes bloc...

Page 23: ...from the nominal and takes as a default value the wrong one Check the frequency in the control panel and repeat the procedure if this circumstance would occur 5 2 2 UPS start up with mains present For...

Page 24: ...on stabilizer mode Blue BATT Warning UPS working on battery mode Blue BTOP Warning Battery disconnected Red TEST Warning UPS working on battery in life function test Blue OPVH Fault Battery mode with...

Page 25: ...the possible se lectable variables or values Code Description Values OPV Output voltage selection 220 220V 230 230V 240 240V AV Input voltage type 000 Normal range 001 Wide range 002 Gen set EBM Exte...

Page 26: ...ments stated in table 10 and go forward or backward till reaching EBM 3 Validate the configuration element When the LCD panel displays EBM press the key for more than one second to enter into the elem...

Page 27: ...the battery and earth termi nals Even with the input circuit breaker switch from protection panel is turned off the internal parts of the UPS are still con nected to the batteries so there are hazardo...

Page 28: ...company is not forced by the warranty if it appreciates that the defect in the product doesn t exist or it was caused by a wrong use negligence installation and or inadequate testing tentative of repa...

Page 29: ...reventive and corrective maintenance contracts is pos sible to determine the intervention timetable and response times as well as exclusion or inclusion parts in partial or total way with the purpose...

Page 30: ...r kVA 0 750 1 1 5 2 3 Power kVW 0 675 0 900 1 350 1 8 2 7 Wave shape Pure sinewave Nominal voltage 220 230 240 V AC selectable Voltage accuracy battery mode 5 Voltage THD linear load 10 3 Voltage THD...

Page 31: ...l loads always flow in the same direction from the highest potential point to the lowest one Although usually the direct current is identified with the constant cur rent for example the one supplied b...

Page 32: ...agni tude and frequency by the user or the designer Rectifier In electronic a rectifier is the element or circuit that allows to convert the alternating current into direct cur rent This is done by re...

Page 33: ...33 SALICRU...

Page 34: ...34 USER MANUAL...

Page 35: ...35 SALICRU...

Page 36: ...NCIA VALLADOLID ZARAGOZA BRANCHES AND SERVICES AND TECHNICAL SUPPORT S T S CHINA FRANCIA HUNGR A MARRUECOS M XICO PORTUGAL REINO UNIDO SINGAPUR SUBSIDIARIES ALEMANIA ARABIA SAUD ARGELIA ARGENTINA B LG...

Reviews: