Functional unit workshop service
VHF 5000 System
3-8
3.2.9
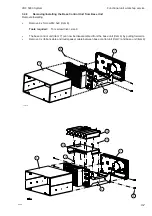
Removing/installing the Duplex filter from the VHF transceiver unit
The Duplex filter should be firm fixed in all cable connections. There are no specific tests that identify failures
in the duplex filter.
For the RT5020 – Duplex transceiver an over temperature detection is enabled. If the over temperature warning
message displays on the RT5020, under conditions where the transceiver has not been overheated and has
not been in a constant transmitting state for 1 hour, an error might be in the temperature sensing component.
The temperature sensor is located on the Base Band module, which – in this case - should be replaced.
0608
1
3
4
Fig. 2
Fig. 3
Fig. 1
Fig. 4
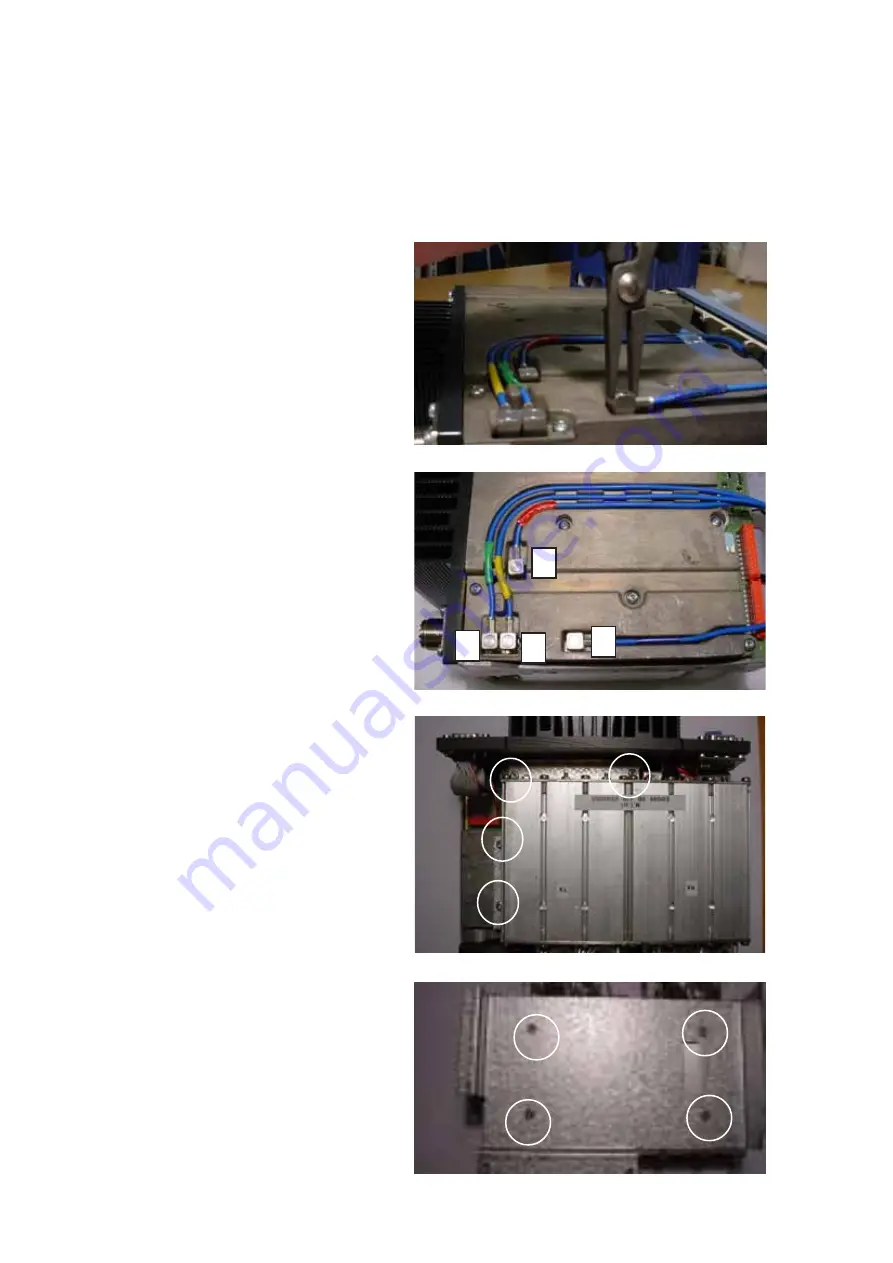
Use the following procedures & illustrations to remove/
install the Duplex Filter. The sequence of the proce-
dures applicable to the removal and the installation
respectively is consecutively numbered 1 through 3
and should be carried out in accordance with this.
Removal:
•
Remove 4 x Cables on the bottom of the radio.
(See Fig. 1)
Tools required:
Flat-nose pliers.
•
Remove 4 x Screw M3x8
.
The duplex filter including bracket can now be
removed from the radio.(See Fig. 3)
•
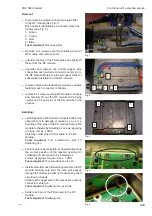
Remove bracket from duplex filter by removing
4 x Screw M3x5. (See Fig. 4)
Installing:
•
Install the bracket onto the duplex filter using
4 x screw M3x5, applying a torque of max. 1Nm
(See Fig. 4)
Tools required:
Torx screwdriver, size 10.
•
Install bracket at the Base Band module shield
using 4 x screws M3x8, applying a torque of max.
1Nm (See Fig 3).
Tools required:
Torx screwdriver, size 10.
•
Mount Cables for Duplex filter as shown by
numbers: (See Fig. 2)
1. Green
2. Yellow
3. Red
4. Blue
•
Position the cables into the cable grooves at the RF
module shield (See Fig. 1).
Summary of Contents for RT5022
Page 2: ......
Page 4: ...VHF 5000 System 0930 ...
Page 16: ...Maintenance VHF 5000 System 2 2 ...
Page 70: ...Feature sales VHF 5000 System 4 2 ...
Page 82: ...Installation VHF 5000 System 5 12 0608 ...
Page 83: ...VHF 5000 System Installation 5 13 0608 ...
Page 84: ......

