


49
50
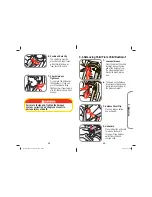
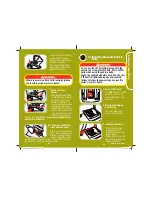
Check for Proper Recline
Make sure level line on side
of child restraint is level with
the ground. Adjust child
restraint if needed.
You may need to place a large
rolled towel(s) or foam pool
noodle(s) under the front of
the child restraint to achieve
correct recline angle. Check
often to be sure padding is
still in place and the belt is
tight.
4.
5.
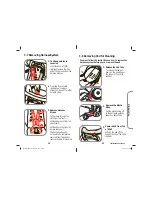
Check Vehicle Belt
Tightness
Grasp the child restraint
at the belt path
with one
hand. Push and pull the
child restraint from side to
side, forward and back. The
child restraint should not
move more than 1 inch.
NOTE:
If child restraint
moves more than 1 inch, try
reinstalling the child restraint
or try another seating
location.
Warranty
Dorel Juvenile Group, Inc. (DJG) warrants this product to the original
retail purchaser as follows:
This product is warranted against defective materials or
workmanship for one year from the date of original purchase.
An
original receipt is required to validate your warranty.
DJG
will, at its option, provide replacement parts or replace this product.
DJG reserves the right to substitute if the part or model has been
discontinued.
To make a claim under this warranty you may contact us at www.
djgusa.com, fax us at 1-800-207-8182 24 hours a day, write to
DJG, Consumer Relations Department, P. O. Box 2609, Columbus, IN
47202-2609, or call 1-800-544-1108 from 8:00 a.m. to 6:00 p.m.
EST Monday through Thursday and from 8:00 a.m. to 4:30 p.m. on
Friday.
Proof of purchase is required and shipping charges
are the responsibility of the consumer.
Warranty Limitations:
This warranty does not include damages which arise from misuse or
abuse of this product.
Limitation of Damages:
The warranty and remedies as set forth are exclusive and in lieu of
all others, oral or written, expressed or implied. In no event will DJG
or the dealer selling this product be liable to you for any damages,
including incidental or consequential damages, arising out of the use
or inability to use this product.
Limitation of warranties and other warranty terms and state
law rights:
Any implied warranties, including implied warranties of the
merchantability and fitness for a particular purpose, shall be limited
to the duration and terms of the express written warranty. Some
states do not allow limitations as to how long an implied warranty
lasts or the exclusion or limitation of incidental or consequential
damages, so the above limitations may not apply to you. This
warranty gives you specific legal rights, and you may have other
rights, which vary from state to state. Neither DJG nor the dealer
selling this product authorized any person to create for it any other
warranty, obligation, or liability in connection with this product.
PLEASE COMPLETE AND MAIL THE PRE-ADDRESSED OWNER
REGISTRATION CARD WITHIN (30) DAYS OF PURCHASE TO EXPEDITE
WARRANTY CLAIMS AND TO VERIFY THE ORIGINAL DATE OF
PURCHASE.
4358-6459A SF Onboard 22.indd 51-52
4358-6459A SF Onboard 22.indd 51-52
9/5/14 4:27 PM
9/5/14 4:27 PM


