background image

© Safe Fleet | May 2018 | All rights reserved | Part #: 700-1111 R2

inView 360 Fusion Calibration Guide

p. 11

Setting the System for Calibration

Setting the System for Calibration

After you’ve placed down your pads and recorded your measurements, you’re ready begin the calibration process. First, 

you'll need to capture the images from the cameras and transfer them to your computer for calibration. 

Capturing AVM images

To capture the images, you’ll need to do the following:

1.  Insert SD card (with SAV-BOOT) into the 

Electronic Control Unit (ECU)

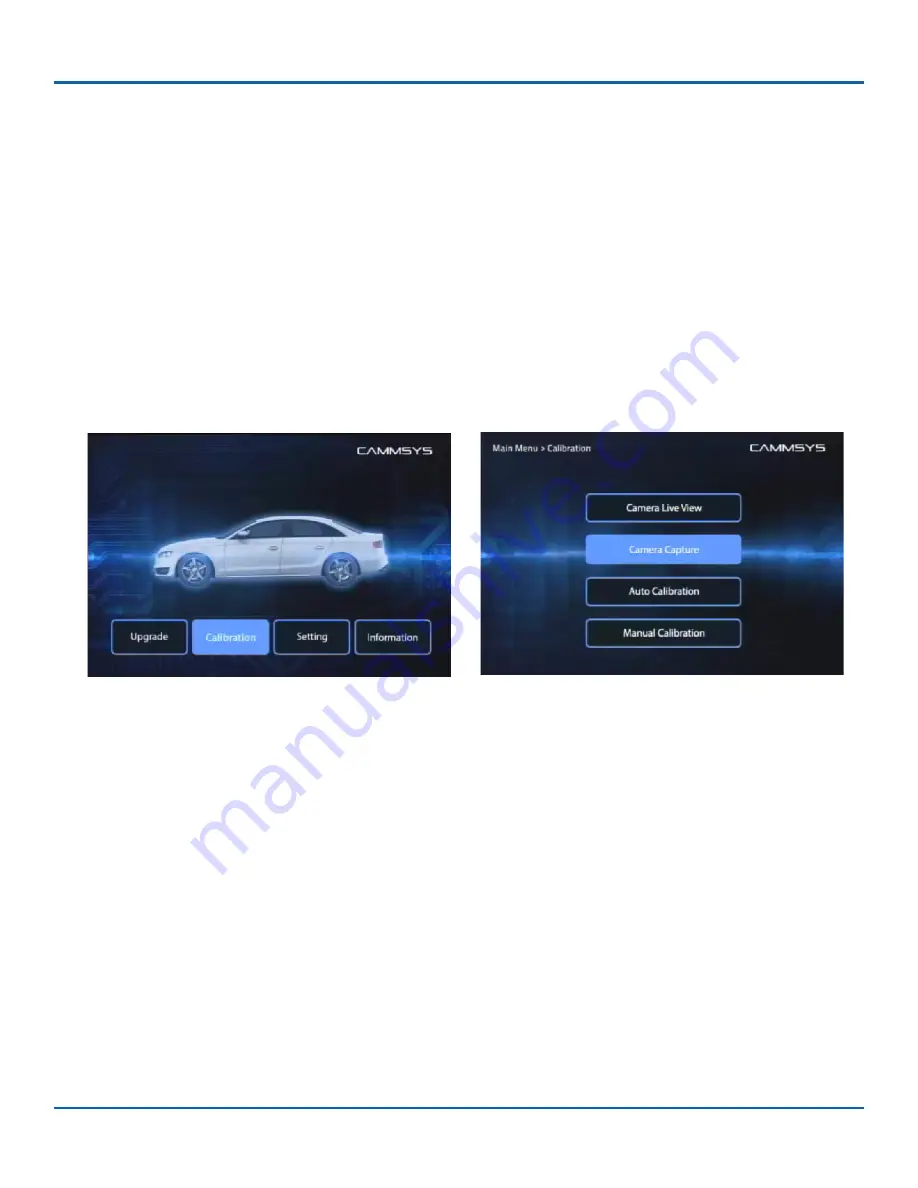
2.  Power up the ECU. The ECU detects the SD card on power up, and displays the system menu.

3.  Use the AVM remote control to select the 

Calibration

 option, then press the 

OK

 button (indicated on the remote by a 

 symbol). Next, select 

Camera Capture

 and press 

OK

 again. 

4. 

The AVM copies 4 files to the SD card. 

5.  When copying is done (OK appears on the screen), power down the unit, and remove the SD card.

Transferring images to your computer

Once you’ve captured the raw images on the SD card, you’ll need to transfer them to your PC for calibration. To do this: 

1. 

Insert the SD card (with USB adapter, if required) into the PC.

2. 

Navigate to the SD card location. Cut the following 4 files: 

•  FRONT.bin

•  RIGHT.bin

•  LEFT.bin

•  REAR.bin

Summary of Contents for inView 360 Fusion

Page 1: ...Safe Fleet May 2018 All rights reserved Part 700 1111 R2 Calibration Guide inView 360 Fusion...

Page 2: ...Safe Fleet May 2018 All rights reserved Part 700 1111 R2 THIS PAGE LEFT INTENTIONALLY BLANK...

Page 3: ...10 Setting the System for Calibration Capturing AVM images 11 Transferring images to your computer 11 Launching the calibration tool 12 Selecting vehicle and entering pattern info 13 Understanding Pix...

Page 4: ...ommunity https community seon com 360 fusion 360 fusion resources For access to the community website please contact the Seon Service Team to get a username and password email service seon com or call...

Page 5: ...s in image AVM components are installed in the vehicle Calibration pads are placed around the vehicle Camera images are captured and stored on an SD card in the vehicle Images are transferred from the...

Page 6: ...should have the following tools to help you perform the calibration Long measuring tape 100 foot recommended 4 x 25 foot measuring tapes Large plastic square ruler Masking tape any color as long as it...

Page 7: ...on can be completed outside but only on a level paved surface Calibrating in the rain or snow is not recommended as this can cause distortion snow or rain on the camera lenses Installing the Calibrati...

Page 8: ...ation software later on in the process Place your calibration pads 1 Start by placing measuring tapes in front of the vehicle starting from the front of the tires and going forward measuring tapes 2 P...

Page 9: ...e Horizontal H and Vertical V values Vehicle Length in Feet Vertical V and Horizontal H Spacing in Inches 20 25 25 30 30 40 40 35 40 45 40 50 4 Place tape a distance of V in front of the vehicle again...

Page 10: ...y calibrate the AVM system you will need to calibrate using the initial recommended values then re adjust the pads or cameras and repeat calibration until you have the desired image Ultimately the cal...

Page 11: ...rol Unit ECU 2 Power up the ECU The ECU detects the SD card on power up and displays the system menu 3 Use the AVM remote control to select the Calibration option then press the OK button indicated on...

Page 12: ...the location of your Seon Calibration Tool You will see a sub folder labeled Output Open this folder and paste the 4 bin files here Launching the calibration tool To launch the calibration tool doubl...

Page 13: ...next tab Vehicle Pattern Info The Vehicle Pattern Info screen is where you ll enter the vehicle measurements and pad information 1 Enter your vehicle Length and Width 2 Click the 2 Computation button...

Page 14: ...w This is your Pixel Pitch Preview Understanding Pixel Pitch In the Vehicle Information box you ll see several values on the right hand side These values represent the vehicle s pixel pitch Think of p...

Page 15: ...n see more of the area around the vehicle i e the vehicles in the surrounding area When you enter your vehicle length and width the calibration tool computes a range of values based on your vehicle s...

Page 16: ...image will change to reflect the new value About View Modes Pixel pitch values are configured differently depending on the calibration tool s View Mode When setting pixel pitch values you have set and...

Page 17: ...in NT normal top mode If you wish to use a portrait position then you ll need to calibrate for in ST separate top mode Note that a third option ST FFT Side Top Full Front Top works in conjunction with...

Page 18: ...nd max range as calculated by the application 3 Click Confirm A preview of the pixel pitch will appear in the window below Setting pixel pitch for NT or ST Mode The procedure for setting pixel pitch f...

Page 19: ...l cameras Calibrating the 4 cameras 1 Click the Vehicle Pattern Info tab 2 Choose your AVM 221 as your model NOTE Choosing correct AVM You must choose AVM 221 for calibration to work properly 3 Switch...

Page 20: ...n to exit Zoom mode 5 Click the PAN button to enable pan mode Left click and drag the image until you can see the calibration pads Click the PAN button once again to exit PAN mode 6 Left click on the...

Page 21: ...e selector to switch between NT ST and ST FFT to get a preview of the 360 image in each mode Viewing changes in pixel pitch If you switch back to the Vehicle Pattern Info screen and change the pixel p...

Page 22: ...iew a Roll rotates the camera image clockwise or counter clockwise b W Scale stretches the camera image vertically c H Scale stretches the camera image horizontally d Trans H slides the camera image l...

Page 23: ...your pads are 30 from the bumper the red lines will tell you that you are within 30 of the bumper when backing up The green and yellow lines let you know that you still have room to back up and that...

Page 24: ...rd delete all contents on the card and save again before transferring back to the ECU 6 Navigate to your SD card folder in Windows Explorer Ensure that the SD card is empty by deleting the 4 camera fi...

Page 25: ...AVM and verifying image quality Calibrating Files on ECU 1 Put the SD card into the ECU 2 Power up the device The configuration screen appears 3 Navigate using remote control to the Calibration optio...

Page 26: ...Image Test To verify the accuracy of the AVM calibration use tape to create 2 lines one on each side of the vehicle Place each tape a distance of the vehicle s width away from the vehicle Alternately...

Page 27: ...ice Technicians to better track your product when it comes in for service Please show the RMA number on the outside of the package ANY RETURNED PRODUCT WITHOUT AN RMA NUMBER MAY BE REFUSED Product Inf...

Reviews: