background image

25


                                  Doc. No.

  P30001PE0101-07


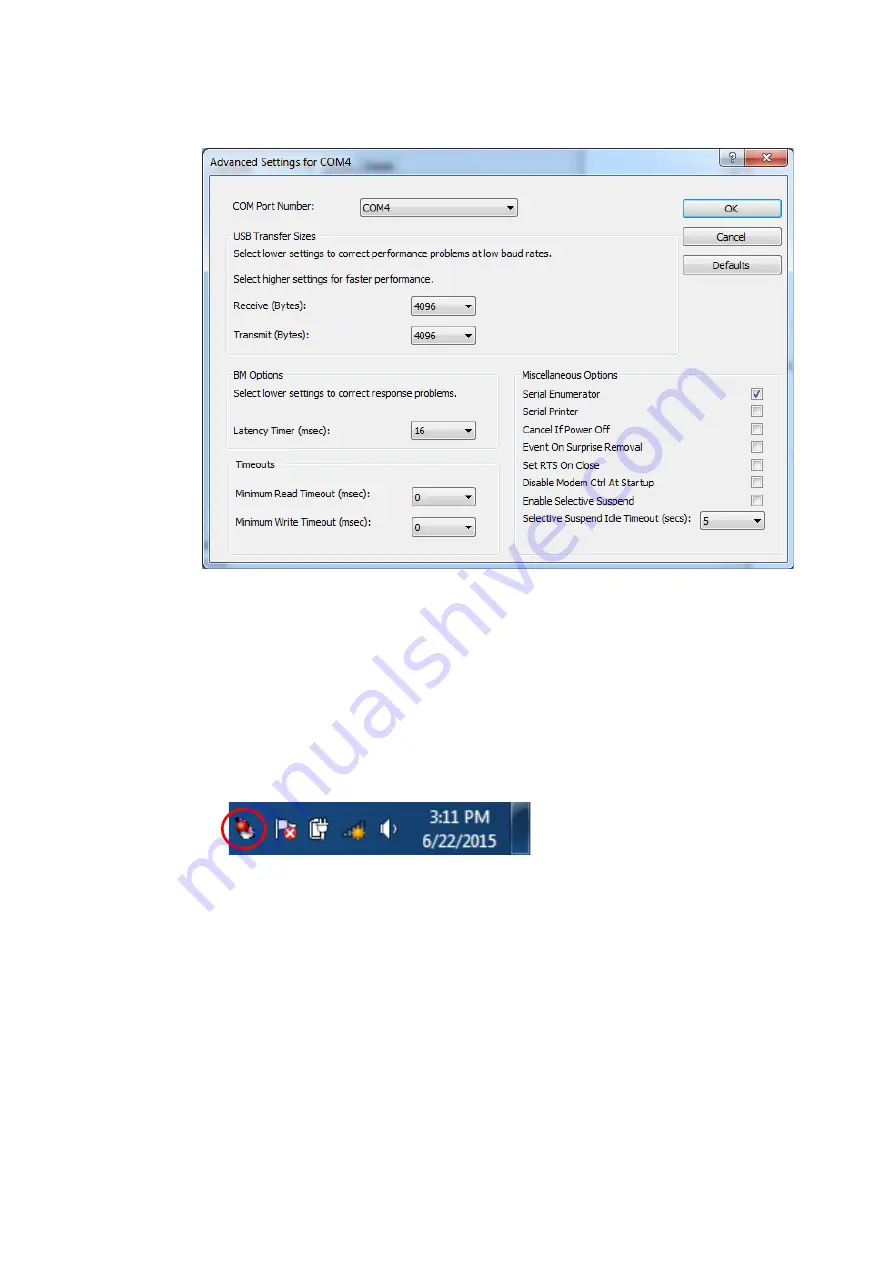
Change the dialog field “COM Port Number” to “COM1”. 
The USB port is now mapped to COM port 1. 
Always use COM Port 1 when working with the magLEAD 12gC. 
 

5.3.4.

Installing the magLEAD Communicator 


Insert the CD labeled “magLEAD Communicator” into the PC. 
Start “Setup.exe”. 

  The installation wizard will guide you through the installation process. 

  After installation, open the magLEAD Communicator 

by double-clicking the magLEAD Communicator icon in the lower system bar. 


The user interface of the “magLEAD Communicator” opens. 


Select “Options” and open the “Serial port” window. 
Check the “COM1” box. 

Summary of Contents for magLEAD 12gC

Page 1: ...Doc No P30001PE0101 07 magLEAD 12gC Instruction for Use Version 2 May 2022 ...

Page 2: ...1 Setup procedure 19 5 2 Configuration and setting up the instrument 22 5 2 1 Setting the installation date 22 5 2 2 Setting the serial port 22 5 2 3 Setting time and date 22 5 2 4 Setting the preventive maintenance reminder 22 5 2 5 Installing the barcode reader optional 22 5 3 Installing the PC software optional 23 5 3 1 System requirements 23 5 3 2 Installing the driver of the USB RS232 convert...

Page 3: ...3 Setup Screen 43 9 3 1 Setting the date 43 9 3 2 Setting the time 43 9 3 3 Setting the serial port 44 9 3 4 Setting the preventive maintenance reminder 44 9 4 Test Screen 45 9 4 1 Axis Test Screen 45 9 4 2 Temp Test Screen 45 9 4 3 Serial port test Screen 46 9 4 4 Version Screen 47 10 Barcode reader optional 48 11 Report file 48 12 magLEAD Communicator optional 51 12 1 User interface 51 13 Mainte...

Page 4: ...this manual near the instrument in case you need a quick reference Please inform us Precision System Science Co Ltd if this manual is lost or damaged The following items are included in the instrument package Items Qty Remarks 1 magLEAD 12gC main body 1 2 Power cable AC100V 1 3 Power cable AC240V 1 4 Reagent cartridge rack 1 5 Tip tube rack 1 6 Silicon grease 1 7 D rings 12 8 Fuse 3 15A 250V 2 For...

Page 5: ...12 MagDEA Dx SV 200 12gC I7812 MagDEA Dx SV 400 12gC For other RUO products please see the PSS homepage Please notice to the manufacturer and the competent authority of the Member State in which the user and or the patient is established in case where any serious incident has occurred in relation to the device ...

Page 6: ...choose to use this symbol to indicate both To indicate that caution is necessary when operating the device or control close to where the symbol is placed or to indicate that the current situation needs operator awareness or operator action in order to avoid undesirable consequences Caution label for hot surface To warn of a hot surface Caution label for crushing of hands To warn of a closing motio...

Page 7: ...nts in vitro diagnostic IVD medical equipment About the symbol of label The symbols on the labels for devices other than those listed above are described below Serial number Indicate the manufacturer s serial number so that a specific medical device can be identified YYYYMMDD Country of manufacture Japan To identify the country of manufacture of products The date of manufacture Unique device ident...

Page 8: ...tion of blood groups ABO system rhesus C c D E e anti Kell anti Duffy or anti Kidd irregular anti erythrocytic antibodies human cytomegalovirus and human chlamydia HLA tissue groups DR A or B PSA tumor marker 2 Detection confirmation or quantification of markers of HIV infection HIV 1 and 2 HTLV I and II and hepatitis B C and D in human specimens congenital infections rubella or toxoplasmosis in h...

Page 9: ...or repair the instrument yourself This may cause instrument failure or electric shock to you Contact PSS for instrument repair or maintenance Emergency Situations In case of an instrument emergency such as extraordinary heat smoking abnormal smell etc immediately unplug the power cable from the wall outlet to avoid fire or electric shock Contact PSS for repair If foreign material or water splashes...

Page 10: ...an extended period of time Precautions for Instrument Operation There is a possibility of biohazard exposure while operating the instrument Wear appropriate personal protective equipment such as a mask goggles and gloves Pay close attention when handling biohazardous samples When operating the instrument under low temperature conditions keep the instrument power on Make sure that no foreign materi...

Page 11: ...ument usage This warranty excludes problems that occur due to inadequate storage inadequate usage or operation or repair modification or maintenance of the instrument by people who are not authorized by PSS even within the warranty period About Disposal Contact PSS if you need to dispose of the instrument ...

Page 12: ...l space High speed simultaneous processing of up to 12 samples by 12 nozzles Special disposable tips and reaction cartridges for ease of operation 3 3 Performance Instrument type Desktop Throughput Samples 1 12 samples batch Processing time About 30 min 1 12 samples Temperature control function Heat Block 40 to 90 deg C Processing volume 25 1000ul Dispensing accuracy 25 50ul 10 Aspiration accuracy...

Page 13: ...Transient overvoltage 2500 V Pollution degree 2 Installation site Indoor use only Temperature 15 30 deg C Relative humidity 15 75 Non condensing Altitude Up to 2 000 m above the sea level Space Maintain sufficient distances from the walls as indicated below for ventilation maintenance work etc Also maintain more than 200 mm free space above the instrument Designed to last 5 years or more 4 runs da...

Page 14: ...ed to direct sunlight or vibrations When operating the instrument in a cold chamber or cold room keep the instrument power on to avoid condensation 3 8 About the Caution Labels Inside the Instrument 3 8 1 Caution label for hot surface Place attached Heat block and inner wall of the cover The area where this label is attached becomes hot during operation Be sure not to touch this area Caution Cauti...

Page 15: ...hed Magtration Unit The area where this label is attached can potentially pinch your hand or fingers in the driving mechanism of the open close operation Take care not to be pinched 3 8 3 Caution label for biological hazard Place attached Inner wall of the instrument cover Caution ...

Page 16: ...azard risk from samples or extracted purified products while operating this instrument Wear a mask goggles and gloves for your own safety as described in this manual Pay close attention when handling highly hazardous samples 3 8 4 Caution label for UV Lamp Place attached Top of the instrument cover CAUTION UV emitted from this product IEC62471 Risk Group 2 The magLEAD 12gC contains a UV lamp Avoid...

Page 17: ...P30001PE0101 07 4 System Components 4 1 Front View 1 Green LED Lit when powered on 2 Red LED Blinks if an error occurred 2 Alarm Status LED red Operation Panel IC Card Inlet 1 Power Status LED green Door Display ...

Page 18: ...rument The fuse box and connectors are located on the back of the instrument Note Replacement of the fuse shall only be made by field service personnel authorized by PSS Contact us for fuse replacement Connector for Handheld Barcode Reader RS232C Connector for PC Fuse box Power Cable Connector Power Switch ...

Page 19: ...nt Cartridges Simple placement of special disposable cartridges pre filled with reagents minimizes cross contamination The back two positions wells in the cartridge are used for heating Tip Sets Positions for tips DN100N tips in the tip sheath One or two tips or tip sheath Sheath DN100 are used per sample depending on the protocol Refer the instructions provided in the package insert for the reage...

Page 20: ...trument from the shipping crate The instrument will be installed by field service personnel authorized by PSS Contact us if you need to move the instrument 2 Remove the protective films attached to the instrument 3 Open the instrument door 4 Push the pipettor head upward Warning ...

Page 21: ... the power cable and the handheld barcode reader that came with the instrument Connect the power cable to the wall outlet Do not use any power cable other than the one provided to avoid risk of fire or temporary blackout Caution Power Cable RS232C Connector for PC Connector for Handheld Barcode Reader ...

Page 22: ...he power is switched off Press the bottom as shown below and pull out the card Ensure that the power is turned OFF when inserting or removing the IC card The card and or the instrument may become damaged if the card is inserted or removed while the power is on Handle the IC Card with care as it can be damaged by impact exposure to water or dust If the IC Card is not inserted properly the LCD may n...

Page 23: ...from YYYY to MM to DD Press the up arrow or down arrow to increase or decrease the value of the selected field After setting the date store the setting by pressing ENT Press ESC to leave the date unchanged If you accidentally set the wrong date call Precision System Science 5 2 2 Setting the serial port Set the serial port to use a PC as the output device for the report file Section 5 2 11 12 5 2 ...

Page 24: ...or receiving report files from instrument and storing instrument data on the PC hard disk 5 3 1 System requirements Operating system Windows 10 Windows 7 or Windows 8 USB Port USB 1 1 or higher Microsoft NET Framework V1 1 freely available for download at www microsoft com installed on the PC The instructions in Sections 5 3 2 and 5 3 3 refer to the Windows 10 operating system Specifications for W...

Page 25: ... Open the Device Manager NOTE The process to open the Device Manager varies according to the operating system version Expand Ports to show all available COM ports Connect the converter to an open USB port on the PC The device manager should then automatically update the COM port list Look for the COM port named USB Serial Port Right click this COM port and select Properties Click the Port Setting ...

Page 26: ...AD Communicator Insert the CD labeled magLEAD Communicator into the PC Start Setup exe The installation wizard will guide you through the installation process After installation open the magLEAD Communicator by double clicking the magLEAD Communicator icon in the lower system bar The user interface of the magLEAD Communicator opens Select Options and open the Serial port window Check the COM1 box ...

Page 27: ...26 Doc No P30001PE0101 07 The magLEAD Communicator is now ready to receive data from the instrument To check the connectivity between the PC and magLEAD 12gC follow the test described in Section 9 4 3 ...

Page 28: ...30001PE0101 07 6 System Components 6 1 Accessories Power Cable Silicon Grease Fuses and D Rings Reagent Cartridge Rack Tip Tube Rack Power Cable for 100VAC Power Cable for 240VAC Fuse 3 15A Silicon Grease D Rings ...

Page 29: ...andheld Barcode Reader optional Reference Refer to the user manual for the barcode reader for details magLEAD Communicator PC Software optional product Reference Please refer to Installing the PC software Chapter 5 3 for details ...

Page 30: ...osables magLEAD Tip and Sheath set Micro tube Screw cap Reference Refer to the package insert of the disposables for details 6 3 Reagents Prefilled Reagent Cartridges Reference Refer to the package insert of the reagent kit for details ...

Page 31: ...ot use disposables or reagents other than those specified to avoid instrument malfunction Be sure to wear a mask goggles and gloves for your own safety when loading or discarding reagents disposables and samples When discarding disposables follow the regulations required by your facility and regional laws Caution ...

Page 32: ...r may slide downward if it is not held by the magnet at the top When opening the door make sure lift the door fully that you hear a clicking sound at the upper end 7 2 Inserting Reagent Cartridges into the Reagent Cartridge Rack 1 As shown in the image below orient each reagent cartridge with the arrow pointing towards the reagent cartridge rack Slide the cartridge all the way back along the groov...

Page 33: ...ack position on the stage Reference Be sure that two farthest wells of the cartridge fit into the heating block Operating the instrument operation with the Reagent Cartridges or the Reagent Cartridge Rack incorrectly positioned may result in instrument malfunction Caution ...

Page 34: ...AD Tip and Sheath sets magLEAD Tip and Sheath set insert them into the holes of the Tip Tube Rack 7 5 Inserting Elution Tubes Place the Micro tubes for elution into the Tip Tube Rack For details regarding the correct position and number of Tubes and maglEAD Tip and Sheath set refer to the package insert of the reagent kit and consumable kit Caution ...

Page 35: ... instrument with incorrectly positioned Tip Sets or Tip Tube Rack may result in instrument malfunction Note When running a protocol with a small number of samples use bilaterally symmetric positions in the Reagent Cartridge Rack and the Tip Tube Rack using central positions with high priority Insert the rack making sure that the holes on the right side of the rack fit to the location pins on the s...

Page 36: ...axes will be homed automatically during the system initialization Be sure the power is OFF when inserting or removing the IC card If the IC Card is inserted or removed while the instrument is powered on the IC Card and or the main unit may be damaged Power ON Screen PSS magLEAD 12gC Version X X X X Initializing 7 8 6 5 2 3 9 0 1 4 ESC STOP Key Description 0 9 Choosing a menu ESC Returns to previou...

Page 37: ... displayed Confirm that the run has been fully completed Turn the instrument power switch off 8 3 Protocol Run Procedure After inserting the protocol IC Card and switching on the magLEAD 12gC follow the steps below to start a protocol 1 From the MENU Screen press the START key to run a protocol Follow the instructions for your specific protocol as they appear on the screen MENU Screen 2 Enter addi...

Page 38: ...t to the PC confirm that the serial port has been set correctly Refer to the section 9 3 3 7 After the protocol run you may choose to perform an optional UV decontamination run If the STOP key is pressed during a run the protocol will stop and provide the option to continue or to abort the run If you select to abort the run the protocol cannot be resumed Refer to Chapter 14 2 for further details D...

Page 39: ...ey Homes the Z Axis 3 key Homes the P Axis 4 key Homes the M Axis 0 key Home all Axes ESC key Returns to the previous screen The following screen appears Axis indicates either the ALL Y Z P or M function Press START to perform the home axis operation or press ESC to return to the previous screen During this operation the following screen will appear DD MM YYYY HH MM START Run 1 UV 2 Man 3 Test 4 S...

Page 40: ...reen appears Press the START key to clean the Piercing Unit After the key is pressed the Piercing Unit will be lowered for cleaning and the following screen appears Open the door and clean the piercing unit using a paper or cloth moistened with water or 70 ethanol depending on how dirty the piercing unit is After cleaning the piercing unit close the door and press the ENT key Wear a mask goggles a...

Page 41: ...wing screen appears If there are no report files temporarily stored on the instrument the following screen appears Press ESC to return to the manual operation screen If an error occurs during transmission the following screen appears Press ESC and check the connection between the instrument and the PC Make sure that the PC is turned on and that the magLEAD Communicator is installed and running on ...

Page 42: ...cation of specific pathogens 9 2 1 Switching on the UV lamp Make sure that the instrument door is closed In the MENU Screen press 1 to select the UV light function The following screen appears Use the keys 0 through 9 to set the duration of the decontamination time The minimum time is 30 minutes and the maximum time is 330 minutes The default is 30 minutes After setting a valid time press the ENT ...

Page 43: ...n appears 9 2 2 Switching off the UV lamp During a manual UV run you can abort the run by pressing the STOP key The following screen appears Press STOP again to abort the UV run Press START to continue the UV run 9 2 3 Lifetime reminder of the UV lamp The lifetime of the UV lamp is limited to 5000 cycles corresponding to about 5000 decontamination runs of 30 minutes each The instrument will inform...

Page 44: ...in the System Setup menu The following screen appears Set the day month and year Press SHIFT and the down arrow to move the cursor to the right from DD day to MM month to YYYY year Press SHIFT and the up arrow to move the cursor to the left from YYYY to MM to DD Press the up arrow or down arrow to increase or decrease the value of the selected field After setting the date store the setting by pres...

Page 45: ...t setting of the serial port as PC or Not Used Press the up arrow or the down arrow to change the NS new setting field to PC or Not Used If Not Used is selected a report file will not be generated sent to the PC Press ENT to store the new setting Alternatively press ESC to leave the current setting unchanged 9 3 4 Setting the preventive maintenance reminder Press 4 in the system setup menu to chan...

Page 46: ...trument before executing this test ESC key Press this key to display the Test Screen 9 4 2 Temp Test Screen Open the Temp Test Screen by pressing 2 key from the Test Screen SS S indicates the set temperature in degrees Celsius Press the up arrow or the down arrow to increase or decrease the temperature The upper limit is 99 C Press START to start the heating process The following screen appears DD...

Page 47: ...Screen to display the Serial port test screen PC Press 1 in the serial port test screen to test the PC communication The following screen appears Press START to send a test string to the PC The following screen appears If the transmission is successful the result will show PASSED If not successful it will show FAILED TEST TEMPERATURE Temp ss s C actual aa a C Key ESC TEST SERIAL PORT 1 PC 2 Bar co...

Page 48: ...tes a successful barcode scan The following screen appears showing up to 25 digits B indicates the individual digits of the bar code 9 4 4 Version Screen Open the Version screen by pressing the 4 key in the Test Screen The following screen appears VersionNo indicates the current version of the firmware Press ESC to return to the test screen TEST Key ESC TEST BBBBBBBBBBBBBBB BBBBBBBBBBBBBBBBBBBB BB...

Page 49: ...n 11 Report file The magLEAD 12gC generates a report file during the protocol run This report file contains the fields described in the table below Note For generating and sending a report confirm that the serial port has been properly set up Refer to section 9 3 3 Up to 10 report files can be stored temporarily on the magLEAD 12gC instrument When this maximum has been reached the oldest report fi...

Page 50: ...l maintenance reminder the date is stored and is reported here Date of last UV run Jan 16 2015 Date of the last UV run recorded and stored Start of last UV run 14 04 Start time of last UV run End of last UV run 14 34 End time of last UV run Status of last UV run o k Status of the last UV run possible options o k normal finish UV run aborted UV lamp expired Protocol name MagDEA Dx SV 200mL 12gc Pro...

Page 51: ...0 Sample ID defined by the barcode system of the user Maximum of 20 characters Reagent kit name MagDEA Dx SV Reagent kit name defined by the barcode reading only Reagent lot number 1151234567 Reagent lot number defined by the barcode reading only Reagent expiry date 201602 In this case February 2016 Reagent expiration date This information can only be entered through a barcode reading Assay kit ID...

Page 52: ... Management System or other programs 12 1 User interface The main window shows the list of report files received Click the Refresh list button to update the list Select a file by single clicking the file name The software magLEAD communicator will perform a checksum test on the file The result is shown under Validity check result The report file name contains the following components Title e g mag...

Page 53: ...ect File to exit the graphical user interface Select Options to display the following window showing the magLEAD 12gC serial ports COM1 should already be selected You can check the serial settings by checking one of the boxes The following window opens The following default settings are as shown in the image above baud rate of 9600 bits s 8 data bits parity none 1 stop bit flow control none ...

Page 54: ...ut in the main window to show the version of the magLEAD Communicator Click the Change path button in the main window to change the folder where the selected report file will be stored Browse and select the folder in the following window ...

Page 55: ...be done by Field Service personnel Clean up the stage nozzles piercing unit and racks after each time the instrument is shut down 13 1 Cleaning Procedure Areas to be cleaned Tip Tube rack Reagent cartridge rack Nozzles Piercing unit All accessories and instrument interiors Cleaning Method Choose the cleaning solution according to the instrument s pollution status Wipe the polluted areas using pape...

Page 56: ...here are no flames nearby 13 2 D Ring Maintenance To ensure complete connection and to prevent leakage we recommend performing maintenance of the D Rings once every two weeks 1 Wearing gloves wipe away old grease using a paper or cloth 2 Slightly apply some silicon grease to your gloved finger 3 Wipe the silicon grease onto the surfaces of the D Rings black rubber rings on the nozzles Tip Ejector ...

Page 57: ...1PE0101 07 4 Wipe off any excess silicon grease from the edges of nozzles and the tip ejector using lint free paper Excess silicon grease can lead to instrument operation problems such as improper tip removal Caution ...

Page 58: ...us for technical support LineNo indicates the line number of the protocol where the error occurred A protocol run that was interrupted by an error cannot be resumed 3 Press the ESC key after confirming the error to display the MENU Screen 4 Press the 1 key in the MENU Screen to display the Manual Screen 5 Press the 2 key in the Manual Screen to return the tips to the tip holders and to home all ax...

Page 59: ...protocol It is possible to abort a protocol run while the instrument is actively processing samples Follow the instructions below 1 Press STOP The following screen appears Note that the protocol has not stopped yet 2 Press STOP again to abort the protocol The protocol run will be invalid and will be marked accordingly in the report file The following screen appears Alternatively if you do not want...

Page 60: ...2 again to return the tips to the tip rack and to return the modules to their home positions If the instrument stops while there are tips on the nozzles follow the steps described above Keep the door closed while operating the instrument Re check that disposables have been positioned correctly Caution ...

Page 61: ... disposables after the protocol has already started press STOP to abort the instrument operation We strongly recommend that you restart the protocol run from the beginning after you have added the disposables We are not responsible for incorrect results if you continue a protocol run from the point it was stopped after adding disposables If you open the front door after stopping the instrument the...

Page 62: ...61 Doc No P30001PE0101 07 from one lane to the next ...

Page 63: ...ol run contact us for assistance 22 M axis time out error during a protocol run contact us for assistance 23 Y axis time out error during a protocol run contact us for assistance 24 Door open error when starting an operation Close the door and follow the operation in section 14 25 Bottom sensor of pipettor head Z axis activated during an operation Check if something obstructed the motion of the co...

Page 64: ...estarting a protocol run If you encounter error codes other than those listed above or if the error could not be solved by the countermeasure described contact us with the specific error codes The instrument specifications and appearance may be changed without prior notification 16 Revision history Add consumables and IC card list Updating the symbol list Update regulations and standards ...

Page 65: ...tp www pss co jp E mail service pss co jp Precision System Science USA Inc 5673 West Las Positas Blvd Suite 202 Pleasanton CA 94588 U S A E mail contact pssbio com Precision System Science Europe GmbH 55122 Mainz Mombacher Str 93 Germany E mail contact psse pss co jp Emergo Europe Prinsessegracht 20 2514 AP The Hague The Netherlands TEL 31 0 70 345 8570 ...

Reviews: