background image

Choosing a Performance...................................

Hold down the Select button and press the F1 button. “

appears on the display. Then the currently selected Performance
number appears on the display, as shown below.

While in this state, you can use the Value buttons to choose a
Performance. Pressing the Enter button makes it possible to start
playing with the selected Performance. To cancel instead, press
the Exit button.
For more information on the settings for each Performance, refer
to the Performance Chart in the owner’s manual for the particu-
lar model that you’re using.

Changing Performance Settings ........................

If the MIDI receive channels set for the various Parts don’t match
the MIDI send channels used by the connected MIDI keyboard,
no sound is played.
Try changing the settings for the Patches and Effects assigned to
the Parts to modify a Performance to suit your own style of play.
Here’s how to change these settings.

• Choosing a Part

To switch Parts, hold down the Part button while you press 
/

. The display shows you which Part is selected — for exam-

ple,  “P-1” on the display indicates “Part 1”; and “P-2” means
“Part2.”
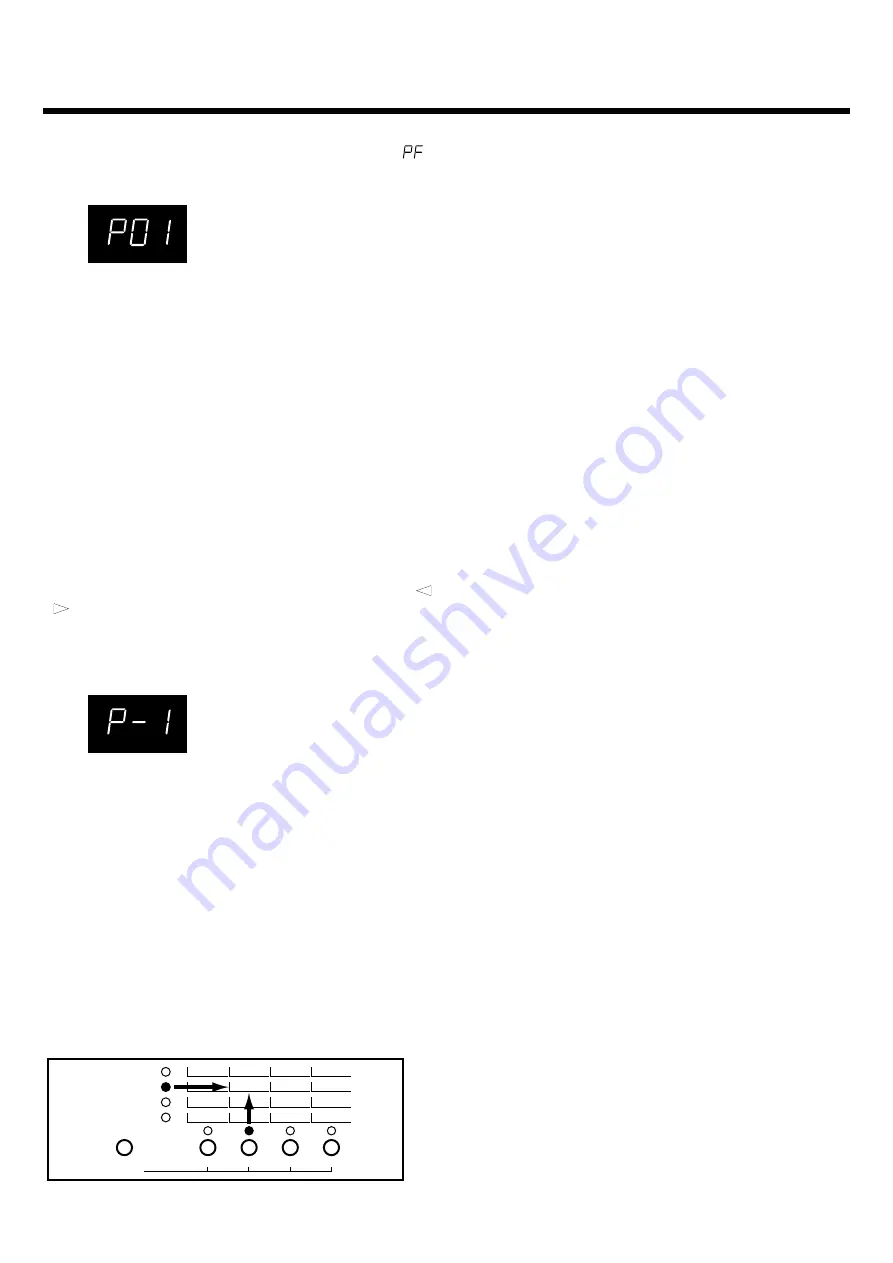
The figure below shows how the display looks when Part 1 has
been selected.

• Changing the Patches and Rhythm Set

Press the Patch button to make the indicator light up, and then
use the Value buttons to choose the desired Patches or Rhythm
Set.

* A Rhythm Set can be assigned only to Part 8.

• Changing Parameter Settings

You can make changes to the various Parameters printed on the
right-hand side of the unit’s front panel.
Choose the Parameter Group with the Select button, and then
use the F1, F2, F3, or F4 button to select the Parameter. The lit-up
indicator shows you which Parameter has been selected.

In the example below, the Key Shift Parameter is selected.

View the value shown in the display while using the Value but-
tons to change the value.

About the Functions for the Parameters ............

The Parameters that make up Part Param 1, Part Param 2 and a
part of MIDI Rx (Vol&Hold, Prog Chg) can be set independently
for each Part. The Parameters contained in Master and a part of
MIDI Rx (Bank Sel, SysEx) are set commonly for all Parts.
See the Parameter Chart on page 9 for a description of each
Parameter’s possible range and their default values.

• Part Param 1 (Part Parameter 1)

Level:  

This adjusts the volume level for each Part.

Pan:  

Allows you to localize the sound image for each Part. At

“0,” the sound is centered in the stereo field. Settings of “L1” to
“L64” place the sound at positions toward the left, with a larger
number indicating a further distance away from the center. In
the same way, settings of “r1” to “r63” position the sound to the
right, with a larger number indicating a further distance away
from the center.

Reverb (Reverb Level):  

This sets the depth of the Reverb effect

(reverberation effect) for each of the Parts.

Chorus (Chorus Level):  

This sets the depth of the Chorus effect

(an effect that makes the sound “fatter”) that is applied to each
Part.
There are patches that are set the chorus output send to reverb.
The chorus level is changed, and the reverb level changes when
using the these patches.

• Part Param 2 (Part Parameters 2)

Rx Ch (MIDI Receive Channel):  

This sets the MIDI receive

channel for each Part.

Key Shift:  

This alters, in half-steps, the pitch at which each Part

is played. This pitch is raise (or lowered) by an octave for each
setting of +12 (or –12).
This parameter is set to too high or low value, and this unit
might not sound or make strange sound in key range.

Detune:  

This is used to make fine adjustments in the pitch for

each Part. The pitch is raised (or lowered) by half a semitone for
each setting of +50 (or –50).

Assign (Voice Assign):  

This assigns a minimum number of

voices available for play by a Part. This unit can simultaneously
play a maximum of 28 voices. If you are using a sequencer to
play complex arrangements, the number of voices available may
not be enough, and some notes could be dropped.
If this happens, you may want to assign a number of voices that
are required for certain Parts to prevent voices for such impor-
tant Parts from being stolen, even when the total number of
simultaneous notes exceeds 28. Remember, however, that the
total number of voices assigned to all Parts together cannot be
greater that 28.

Part Param1

Part Param2

Master

MIDI Rx

Select

F1

F2

F3

F4

Level

Tune

Vol&Hold

Rx Ch

Pan

Device ID

Prog Chg

Key Shift

Reverb

Reverb

Bank Sel

Detune

Chorus

Chorus

Sys Ex

Assign

4

Quick Start

Summary of Contents for Sound Expansion Series

Page 1: ...1995 2 3 3 3 3 3 3 3 3 3 4 4 4 5 5 5 5 5 6 6 6 6 6 NRPN 6 6 7 7 MIDI 7 7 MIDI 8 8 8 8 9 9 9 10 MIDI 12 MIDI 20 00785290 95 2 A4 11KG...

Page 2: ...AND 2 THIS DEVICE MUST ACCEPT ANY INTERFERENCE RECEIVED INCLUDING INTERFERENCE THAT MAY CAUSE UNDESIRED OPERATION Input Output MIDI Thru Out In R L Mono R L Mono AC RISQUE DE CHOC ELECTRIQUE NE PAS OU...

Page 3: ...ut MIDI Thru Out In R L Mono R L Mono Input Output MIDI Thru Out In R L Mono R L Mono Phones Volume Min Max Power Output MIDI In Patch Value Part Monitor Enter Mute Exit Part Param1 Part Param2 Master...

Page 4: ...2 MIDI Rx Vol Hold Prog Chg Master MIDI Rx P 9 Part Param 1 Level Pan 0 L1 L64 r1 r63 Reverb Chorus Part Param 2 Rx Ch MIDI MIDI Key Shift 12 12 1 Detune 50 50 1 2 Part Param1 Part Param2 Master MIDI...

Page 5: ...D JV 80 JV 90 JV 1000 JV 880 ID ID ID Reverb Chorus MIDI Rx MIDI Vol Hold Prog Chg on oFF Bank Sel 0 32 0 80 81 80 0 0 0 1 10 0 10 11 0 126 oFF P 8 2 Sys Ex GS GS GM GM Mute Monitor Monitor 1 Patch Pa...

Page 6: ...I Rx Part Param1 Part Param2 1 7 8 PF rhy Pat Enter Enter Exit MIDI Out MIDI In ID P 5 MIDI Out MIDI In ID P 5 P 5 Select F3 Enter Exit NRPN Select F4 Value on oFF on NRPN GS GM on oFF NRPN oFF Sys Ex...

Page 7: ...attery Low MIDI Off Line MIDI In MIDI MIDI Buffer Full MIDI MIDI Checksum Error Er1 Er2 Part Param1 Part Param2 Master MIDI Rx Select F1 F2 F3 F4 Level Tune Vol Hold Rx Ch Pan DeviceID ProgChg KeyShif...

Page 8: ...32 32 0 0 80 1 128 0 81 129 255 MIDI 0 80 1 128 81 129 256 32 0 0 1 128 MIDI 0 32 0 32 0 80 81 Bank Sel P 5 0 no Patch Value MIDI P 16 Control Channel 1 GM GS 2 1 GM GS GM GS 2 P 5 oFF PAr GM GS 2 2 1...

Page 9: ...une 427 4Hz 452 6Hz Device ID 1 32 Reverb oFF on Chorus oFF on MIDI Rx Sw Vol Hold oFF voL hLd on Prog Chg oFF on Bank Sel oFF 0 126 Sys Ex oFF PAr on 4 3 Level P 4 0 MIDI 7 11 MIDI MIDI Master Reverb...

Page 10: ...0H 00H 01H ID Command ID CMD 00H 00H 01H 02H 03H 00H 01H 00H 02H 00H 00H 01H BODY ID ID 2 1 2 2 1 3 3 2 1 2 2 ID A B ID ID 3 20msec 1 Request data 1 RQ1 11H 1 F0H 41H DEV MDL CMD BODY F7H ID ID ID ID...

Page 11: ...11 1 1 1 ID 7 1 Data set 1 DT1 12H 1 1 MIDI 1 1 256 256 1 1 ID 7 A B 1 B A 1 A 1 F0H 41H DEV MDL 12H aaH ddH sum F7H ID ID ID ID MSB LSB MSB LSB A B 1 1 1 20msec A B 1 1 20msec 1...

Page 12: ...DI 0H FH ch 1 ch 16 vv 00H 7FH 0 127 1 4 OFF BnH 05H vvH n MIDI 0H FH ch 1 ch 16 vv 00H 7FH 0 127 OFF BnH 07H vvH n MIDI 0H FH ch 1 ch 16 vv 00H 7FH 0 127 MIDI OFF OFF OFF BnH 0AH vvH n MIDI 0H FH ch...

Page 13: ...VF TVA mm 0EH 40H 72H 50 0 50 01H 64H mmH TVF TVA mm 0EH 40H 72H 50 0 50 01H 66H mmH TVF TVA mm 0EH 40H 72H 50 0 50 18H rrH mmH rr mm 00H 40H 7FH 64 0 63 semitone 1AH rrH mmH TVA rr mm 00H 7FH 0 1CH r...

Page 14: ...16 1 OMNI OFF BnH 7CH 00H n MIDI 0H FH ch 1 ch 16 OMNI ON BnH 7DH 00H n MIDI 0H FH ch 1 ch 16 OMNI ON MONO BnH 7EH mmH n MIDI 0H FH ch 1 ch 16 mm 00H 1FH 0 16 SOLO 4 M 1 POLY BnH 7FH 00H n MIDI 0H FH...

Page 15: ...H F7H EOX OFF 50ms 2 FEH 250msec F0H iiH ddH eeH F7H F0H ii ID 41H 65 dd ee 00H 7FH 0 127 F7H EOX End of Exclusive System common 3 3 ID xxH ID Master Device ID GS GS ID 42H 1 RQ1 11H F0H 41H ID Roland...

Page 16: ...000a Program change 0 1 00 00 00 1D 0000 000a Bank select 0 1 00 00 00 1E 0000 aaaa Patch receive channel 0 15 1 16 00 00 00 1F 000a aaaa Patch transmit channel 0 17 00 00 00 20 000a aaaa Control cha...

Page 17: ...assign 0 1 POLY SOLO 00 0s 20 1D 0000 000a Solo legato 0 1 OFF ON 00 0s 20 1E 0000 000a Portamento switch 0 1 OFF ON 00 0s 20 1F 0000 000a Portamento mode 0 1 LEGATO NORMAL 00 0s 20 20 0000 000a Port...

Page 18: ...aaaa TVA ENV time 3 0 127 00 0s 2y 6E 0aaa aaaa TVA ENV level 3 0 127 00 0s 2y 6F 0aaa aaaa TVA ENV time 4 0 127 00 0s 2y 70 0aaa aaaa Dry level 0 127 00 0s 2y 71 0aaa aaaa Reverb send level 0 127 00...

Page 19: ...47 2FH 79 4FH 111 6FH 16 10H 48 30H 80 50H 112 70H 17 11H 49 31H 81 51H 113 71H 18 12H 50 32H 82 52H 114 72H 19 13H 51 33H 83 53H 115 73H 20 14H 52 34H 84 54H 116 74H 21 15H 53 35H 85 55H 117 75H 22...

Page 20: ...el Date Feb 22 1995 Version 1 00 MIDI 1 3 2 4 ON 1 2 MIDI ON ON OFF 0 32 1 5 6 38 7 10 11 64 65 66 67 91 93 98 99 100 101 1 0 127 1 16 1 16 0 127 0 127 M 1 123 127 1 2 2 2 1 2 2 1 2 2 2 2 2 1 2 NRPN L...

Page 21: ...Turning On the Power 3 About the Unit s Operation Modes 3 About the Temporary Area 3 Try Listening to Sounds in the Performance Mode 3 Switching to the Performance Mode 3 Choosing a Performance 4 Cha...

Page 22: ...ert the power cord included with the unit into this jack and plug the other end into an AC power outlet 14 MIDI In MIDI Out MIDI Thru Connectors MIDI In Receives messages from external MIDI devices MI...

Page 23: ...atch mode works well for live stage perfor mances with a MIDI keyboard hooked up About the Temporary Area When a Performance or Patch is called up the information for its settings is stored in a tempo...

Page 24: ...ll Parts See the Parameter Chart on page 9 for a description of each Parameter s possible range and their default values Part Param 1 Part Parameter 1 Level This adjusts the volume level for each Part...

Page 25: ...n 10 is shown You can set this value to any number from 0 to 126 When set to oFF no Bank Select messages are received When the Patch Table set to 2 this parameter cannot be work SysEx System Exclusive...

Page 26: ...MIDI Out connector on the sequencer to the unit s MIDI In connector Make sure that the unit s Device ID number p 5 is set to the same number that was used when the settings were save Also check to mak...

Page 27: ...ry required for preserving parameter settings in nearly depleted Consult with the nearest Roland Service Station MIDI Off Line MIDI communications have been disrupted Consider if the cable connected t...

Page 28: ...odify the Bank Sel parameter p 5 to change the value for Controller Number 0 that is used to switch Patches The number of Patches varies from one model to another If you specify a Bank in which a Patc...

Page 29: ...checked that relevant Parts are not set to be muted Could you be sending an invalid Bank Select message Reverb Chorus Not Obtained Could the Master setting for Reverb or Chorus be set to oFF Are you...

Page 30: ...dures one way transfer and handshake transfer One way transfer procedure See Section 3 for details This procedure is suited to the transfer of a small amount of data It sends out an Exclusive message...

Page 31: ...y with such devices Roland has limited the DT1 to 256 bytes so that an excessively long message is sent out in separate segments A DT1 message is capable of providing only the valid data among those s...

Page 32: ...erformance mode ignored when the Receive volume switch is OFF for each part This message is ignored when Volume switch of the patch tone is OFF Pan Status Second Third BnH 0AH vvH n MIDI channel numbe...

Page 33: ...ue 40H Even among different GS devices relative change parameters may sometimes differ in the way the sound changes or in the range of change Parameters marked absolute change will be set to the absol...

Page 34: ...n off all MIDI on notes as if it received Reset all controllers stop measuring message interval System Exclusive message status data bytes F0H iiH ddH eeH F7H F0H System exclusive ii manufacturer ID 4...

Page 35: ...MODEL ID 46H Bytes Description F0H Exclusive status 41H Manufacturer ID Roland Dev Device ID 46H Model ID 12H Command ID DT 1 aaH Address MSB bbH Address ccH Address ddH Address LSB eeH Data ffH Data...

Page 36: ...Part3 C 0 127 64 63 00 00 00 47 B 00 00 00 48 0aaa aaaa Scale Tune Part4 C 0 127 64 63 00 00 00 53 B 00 00 00 54 0aaa aaaa Scale Tune Part5 C 0 127 64 63 00 00 00 5F B 00 00 00 60 0aaa aaaa Scale Tune...

Page 37: ...4 depth 1 127 63 63 00 0s 2y 12 0000 aaaa Aftertouch 1 destination 0 12 1 00 0s 2y 13 0aaa aaaa Aftertouch 1 depth 1 127 63 63 00 0s 2y 14 0000 aaaa Aftertouch 2 destination 0 12 1 00 0s 2y 15 0aaa a...

Page 38: ...0 5 10 20 30 40 50 70 100 200 300 400 500 600 800 1200 00 mm rr 09 0000 aaaa Bender range 0 12 00 mm rr 0A 0aaa aaaa P ENV velocity sense 1 127 63 63 00 mm rr 0B 0000 aaaa P ENV time velocity sense 0...

Page 39: ...H 57 39H 89 59H 121 79H 26 1AH 58 3AH 90 5AH 122 7AH 27 1BH 69 3BH 91 5BH 123 7BH 28 1CH 60 3CH 92 5CH 124 7CH 29 1DH 61 3DH 93 5DH 125 7DH 30 1EH 62 3EH 94 5EH 126 7EH 31 1FH 63 3FH 95 5FH 127 7FH Th...

Page 40: ...lusive O Control Change True Voice Key s Ch s Default Messages Altered Note ON Note OFF X X X X X X X X X Song Pos Song Sel Tune X X X Clock Commands All Sound Off Reset All Controllers Local ON OFF A...

Reviews: