background image

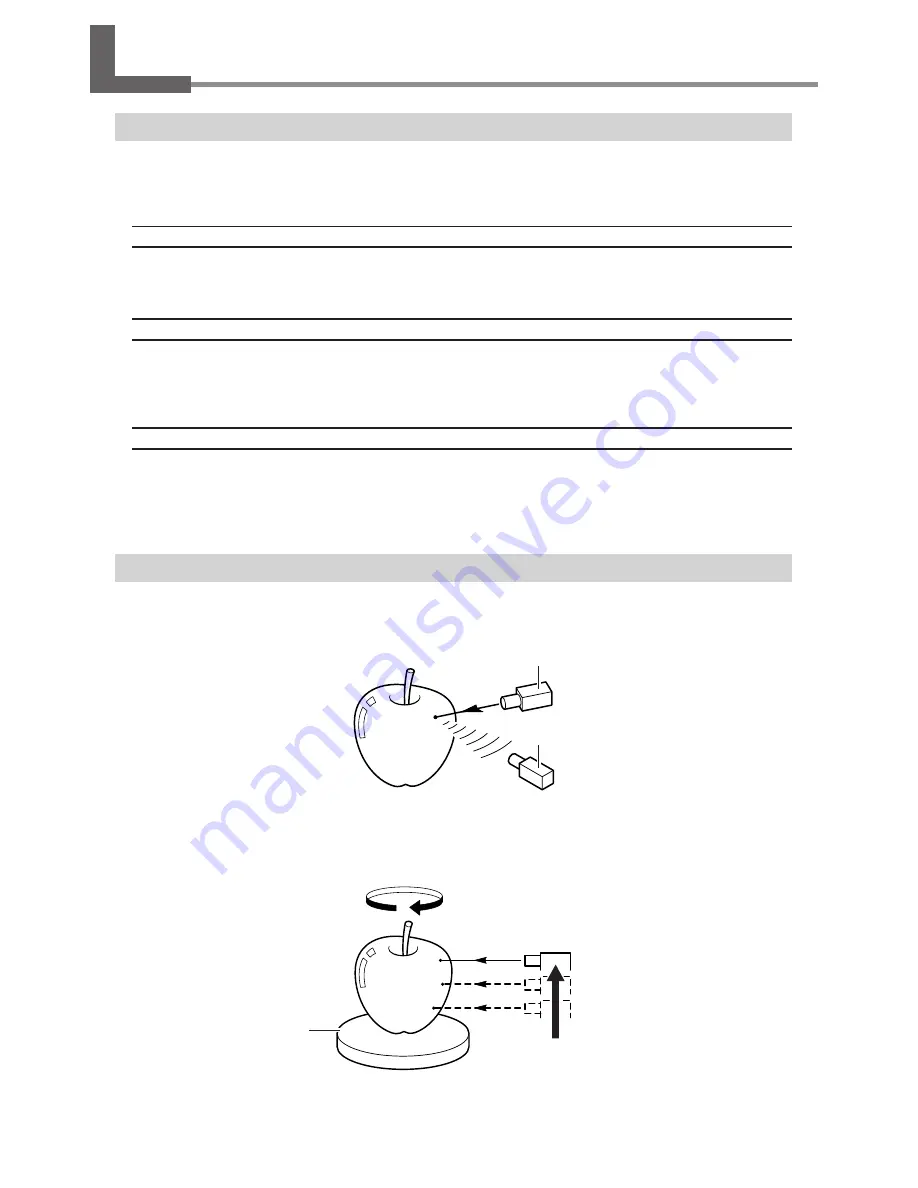
Rotating table

Laser emitter

Sensor

1-1 What Is the LPX-600?

Features

The LPX-600 is a three-dimensional (3D) scanner that uses a noncontacting laser method to scan the shape of solid ob-
jects. 

Noncontacting Laser System for Fast, Dependable Scanning

You can perform scanning without contact with the scan object, using a laser beam. This enables high-speed scanning 
without the worry of damage to the object. 

Support for Two Scanning Modes

Using the included Dr. PICZA3 program lets you perform scanning in either of two modes: plane scan or rotary scan. You 
can choose the scanning mode that matches the shape of the scan object. By combining the two modes, you can even scan 
objects with complex shapes. 

A Wide Array of Scanning Functions

In addition to the two basic scanning modes, line-segment and point scanning functions are also supported. By using Dr. 
PICZA3, you can extract the data for just the characteristic line segments (such as contour lines) and points of an object. 
Using this as auxiliary data for three-dimensional modeling operations using CAD or computer-graphics programs makes it 
possible to reduce the time and effort of modeling operations.

Scanning System

The LPX-600 scans objects using laser light. It emits a spot beam onto the scan object and detects reflected light from the 
object with sensors. 

It performs scanning as it rotates the scan object and moves the laser beam from bottom to top.

10

1. Getting Started

Summary of Contents for Picza LPX-600

Page 1: ...anual and the specifications of this product are subject to change without notice The operation manual and the product have been prepared and tested as much as possible If you find any misprint or err...

Page 2: ...nada CLASS A NOTICE This Class A digital apparatus meets all requirements of the Canadian Interference Causing Equipment Regulations CLASSE A AVIS Cet appareil num rique de la classe A respecte toutes...

Page 3: ...20 Installing the Programs 26 Making the Settings for Using Dr PICZA3 27 3 Creating 3D Data 29 3 1 Task Flow 30 3 2 Mounting the Scan Object 31 Preparing the Scan Object 31 Mounting the Scan Object 33...

Page 4: ...the United States Other company names and product names are trademarks or registered trademarks of their respective holders 5 What to Do If 53 5 1 What to Do If 54 5 2 When Moving the Machine 56 6 App...

Page 5: ...rnings The specific meaning of the symbol is determined by the design contained within the triangle The symbol at left means danger of electrocution The symbol alerts the user to items that must never...

Page 6: ...on a stable surface Failure to do so may result in the unit tipping over leading to injury WARNING Do not use if the housing or window area is cracked or deformed In such cases there is danger of ext...

Page 7: ...and cause fire WARNING When unplugging the electrical power cord from the power outlet grasp the plug not the cord Unplugging by pulling the cord may damage it leading to fire electrical shock or ele...

Page 8: ...remove the labels or allow them to become obscured Also be sure to observe the stated cautions during use In addition to these symbols the symbol shown below is also used Indicates a handy tip or advi...

Page 9: ...n a Suitable Location Install in a location having the specified temperature and relative humidity Install in a stable location offering good operating conditions Never Touch the Machine During Scanni...

Page 10: ...his documentation on your computer screen Installing the program enables you to view the documentation See 2 4 Installing and Setting Up the Software It provides detailed descriptions of the commands...

Page 11: ...1 Getting Started 9...

Page 12: ...n object By combining the two modes you can even scan objects with complex shapes A Wide Array of Scanning Functions In addition to the two basic scanning modes line segment and point scanning functio...

Page 13: ...canned It rotates during scanning Never touch any internal area other than the table Interlock switch This is one of the safety devices Never insert any objects here Doing so may keep the door open an...

Page 14: ...it or flashing red Dark An error has occurred See 5 1 What to Do If Illumination pattern blue and red Status Indicated by the Movement Lights These light up blue and move clockwise two at a time durin...

Page 15: ...2 Preparing the Machine This section describes what to do when you first open the packing including how to connect the machine to a computer and install the programs and the like 13...

Page 16: ...he following items are packed with the machine Make sure they are all present and accounted for AC adaptor 1 Power cord 1 Clay 1 CD ROM 1 User s manual 1 Roland LPX EZ Studio 1 AC adaptor holder 1 USB...

Page 17: ...15...

Page 18: ...more per sons Failure to do so may result in falling of the unit leading to injury Unsuitable Installation Sites Locations with excessive humidity or dust Locations subject to high temperature Locatio...

Page 19: ...terial is required when moving the machine Do not discard it See 5 2 When Moving the Machine Front Peel off the tape and remove the packing Interior With your fingers loosen and remove the screws secu...

Page 20: ...ay lead to fire electrical shock or electrocution WARNING Never damage the power cord or pull it with force Doing so may tear the cord s insulation causing an electrical short and resulting in electri...

Page 21: ...is point You connect the USB cable only when instructed to in the procedures for installing the driver Starting driver installation with the cable connected may cause installation to fail and make the...

Page 22: ...log on as Administrator Insert the Roland Software Package CD ROM into the CD ROM drive The window shown in the figure appears automatically Switch on the machine Wait a short while until the lights...

Page 23: ...re automatically Recom mended then click Next When this dialog box appears click Continue Any way Installation starts automatically Click Finish The Welcome to the Found New Hardware Wizard dialog box...

Page 24: ...about one minute From this point on keep the door closed until installation ends Failure to do so switches off the power which may prevent installation from completing correctly Connect the included U...

Page 25: ...ives check box then click Next Click Next Installation starts automatically Click Finish The Welcome to the Found New Hardware Wizard dialog box appears Carry out steps through again This completes th...

Page 26: ...ion ends Failure to do so switches off the power which may prevent installation from completing correctly Connect the included USB cable The Add New Hardware Wizard dialog box ap pears Windows Me Choo...

Page 27: ...Roland Software Package CD ROM to search the driver Execute installation of the driver Click Finish Installation is executed automatically This completes the installation of the driver Select Specify...

Page 28: ...on screen instructions to start installation and setup When the window shown in the figure appears click Next Thereafter follow the on screen instructions When all installation and setup finishes the...

Page 29: ...hen Dr PICZA3 Go to the File menu and click Preferences Make the setting for the communication port and the unit of measurement to use with Dr PICZA3 This completes all the preparations you need to ma...

Page 30: ...28...

Page 31: ...3 Creating 3D Data This chapter describes how to create 3D data using the machine and the included Dr PICZA3 program 29...

Page 32: ...itable for scanning and if so mount it on the machine See 3 2 Mounting the Scan Object 2 Perform scanning Use Dr PICZA3 to carry out scanning basic scanning See 3 3 Performing Scanning 3 Finish the da...

Page 33: ...Object Size CAUTION Never try to scan an object that protrudes beyond the table or whose size exceeds the scanning area Doing so may cause the machine to malfunction or damage the object to be scanned...

Page 34: ...Objects that do not pass light Not OK Dark colored objects black blue etc Not OK Glossy and highly reflective objects metals mirrors etc In such cases applying a surface coat primer coat to the objec...

Page 35: ...chine s sen sors detect the reflection of the laser beam allowing the object to be scanned The surfaces that reflect laser light as the table rotates and the object passes through this area can be sca...

Page 36: ...ose the scanning mode that matches the shape of the scan object The Settings for Scanning dialog box appears Object whose shape is close to a sphere or cylinder Object with little unevenness Choose ro...

Page 37: ...cify the angle that allows the laser beam to pass through the cavities Settings for Scanning dialog box Plane Scan When scanning ends the results of scanning appear Go to 3 3 Performing Scanning see C...

Page 38: ...ocessing by the computer We recommend making sure enough memory is installed in the computer when you are performing scans that use up large amounts of memory For reference Maximum memory use amount o...

Page 39: ...e the perspective and change the amount of zoom This changes the view method The three dimensional item that has been scanned is called the object Dr PICZA3 Window Drag the object to orient the area y...

Page 40: ...the 3D data Line Scan Point Scan You use line scanning and point scanning when you want line segment or point data to serve as supplemental data for three dimensional modeling operations using CAD or...

Page 41: ...a fine scanning pitch It may be a good idea to perform rescanning in the same mode you used for the basic scanning When you want to perform fine detail scanning of the surface pattern of a scan objec...

Page 42: ...scan at the minimum pitch necessary to get the general shape See 4 Editing Scanning Results Using 3D Editor Shortcut Keys for Shifting the Perspective To Rotate the Object Hold down the SPACE key and...

Page 43: ...sults you can go back to the previous state before rescanning by clicking the button For detailed information on rescanning methods refer to the online help for Dr PICZA3 When You Want to Respecify th...

Page 44: ...gain Tips for Creating a Polygon Mesh To create a polygon mesh having a high degree of completion you may need to scan at as fine a pitch as possible in order to increase the number of scanning points...

Page 45: ...ble Data Scanning data is measuring points scanning points data obtained by scanning Polygon mesh data is data composed of new polygons created by estimating the proper shape of the scan object from t...

Page 46: ...to use for exporting Depending on the file format you clicked a dialog box may appear Choose a selection supported by the program with which you want to share the data then click OK Type in the name...

Page 47: ...4 Editing Scanning Results Using 3D Editor This chapter describes basic operation methods for 3D Editor the 3D data editing program included with the machine 45...

Page 48: ...lete You can delete unneeded objects Merge You can unite a number of objects There is even an alignment feature for doing this Reduce the number of polygons This reduces the amount of data while keepi...

Page 49: ...ject format DXF format and so on Clicking the Export button lets you save data in a wide variety of file formats that are useful for creating 3D CAD data and 3D computer graphics Importing More Than O...

Page 50: ...you want to move only in the Y or Z direction X direction movement is not possible Front This is a view of the object seen from directly in front You use it at times such as when you want to move onl...

Page 51: ...ere you have scanned an apple using Dr PICZA3 Procedure Start 3D Editor Try cutting the apple vertically First do the preparation Click the Run 3D Editor button 3D Editor starts The scanning data for...

Page 52: ...o two parts However its still looks like a single object New objects with names like Cut 0 and Cut 1 appear in the Object List When you have decided on the cut location click Run Drag the cut surface...

Page 53: ...rspective except Side The cut off portion is deleted Click the Select Object button Click the cut off portion to select it When you view the Object List you see that Cut 0 has been deleted Click the E...

Page 54: ...52...

Page 55: ...5 What to Do If This section describes how to resolve problems that can occur dur ing operation and what is required when moving the machine to a different location 53...

Page 56: ...M not ready appears on the computer Is the machine powered up Be sure to turn on the machine before you run Dr PICZA3 Is the number for the communication port set cor rectly In Dr PICZA3 go to Prefere...

Page 57: ...eps below 1 Display System Properties Windows XP Click the Start menu then right click My Computer Click Properties Windows 2000 Me 98 SE Right click My Computer on the desktop Click Properties 2 Disp...

Page 58: ...s to secure the head in place Open the door then move the head to where it is to be secured in place Refrain from touching anything outside the shaded area in the figure below Improperly moving the he...

Page 59: ...6 Appendix 57...

Page 60: ...1 2 scale Unit mm 6 1 Table Dimensional Drawing 4 5 4 5 20 screw holes M6 depth 7 mm 150 110 70 190 254 1 6 230 58 6 Appendix...

Page 61: ...bels Serial Number This is required when you seek maintenance servicing or support Never peel off the label or let it get dirty Power Rating Use an electrical outlet that meets the requirements for vo...

Page 62: ...kg 139 lb Packed dimensions 830 W x 710 D x 1050 H mm 32 3 4 W x 28 D x 41 3 8 H in Packed weight 83 kg 183 lb Environment Temperature 10 to 40 C 50 to 104 F 25 C 77 F or more recommended Humidity 35...

Page 63: ......

Page 64: ...e media on which the backup copy of the Software is recorded does not belong to the Company 4 Forbidden items 1 This copy of the Software or a backup copy of the Software must not be used on multiple...

Reviews: